22 Delicious Easy Finger Foods for a Party
Hosting a party is always such a joy, but when it comes to the food, I know how important it is to keep things simple and fun. That’s why I love finger foods. They’re easy to eat, and even easier to serve! Whether you’re hosting a casual gathering with friends or celebrating a milestone with family, having a spread of bite-sized treats can really take the pressure off while still keeping everyone satisfied.
I’ve spent years experimenting with different snacks, and over time, I’ve found the best finger foods that are not only delicious but also so easy to prepare. You don’t have to spend hours in the kitchen to create a memorable spread! From crispy appetizers to savory bites, these recipes will have you covered from start to finish. Trust me, these dishes are guaranteed to be a hit at any party, and they’ll have your guests coming back for more.
As a busy mom of three, I know how precious time can be. That’s why I’m all about recipes that come together quickly, without sacrificing flavor or creativity. In this list of 22 finger foods, you’ll find everything from fresh veggie bites to cheesy goodness and even some dips. No matter your taste or dietary preference, there’s something for everyone.
1. BBQ Chicken Flatbread
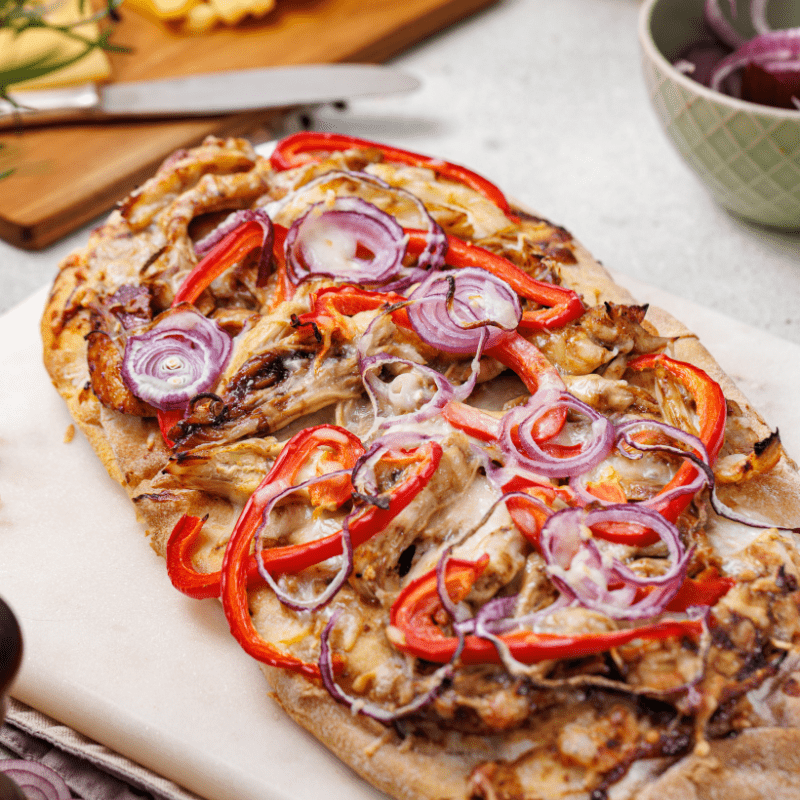
One of my family’s absolute favorites is this BBQ Chicken Flatbread and it works really well as part of a finger food buffet. It’s a perfect balance of smoky, sweet, and savory, and it’s so easy to make – which is a huge bonus when I’m preparing a few different foods to serve up together. The kids love the combination of tender chicken, tangy BBQ sauce, and melted cheese on a crispy flatbread, making it a guaranteed hit every time. It’s the kind of recipe that gets everyone excited to eat!
You can read more about this recipe here.
Servings: 2
Ingredients:
For the base:
- 2 flatbreads (lavash, pita, or pre-made pizza crust)
For the topping:
- 200 g cooked or roasted chicken (shredded)
- 4-5 tbsp your favorite BBQ sauce
- 100 g shredded mozzarella cheese (or a mix of cheddar and mozzarella)
- 1 small red onion (thinly sliced)
- 1 small sweet pepper (thinly sliced, optional)
- 1-2 tbsp chopped fresh cilantro or parsley (for garnish)
For serving (optional):
- Sour cream or Greek yogurt
- Lime wedges
Instructions:
Prepare the base:
- Preheat your oven to 200°C (390°F). If using a pre-made pizza base, follow the instructions on the package.
- Place the flatbreads on a baking sheet lined with parchment paper.
Prepare the topping:
-
In a bowl, mix the shredded chicken with 3 tbsp of BBQ sauce. Let it sit for 5 minutes to soak in the flavor.
-
Spread a thin layer of BBQ sauce (about 1 tbsp per flatbread) on each flatbread.
Assemble:
-
Evenly distribute the BBQ chicken over the flatbread.
-
Top with shredded cheese.
-
Add the sliced red onion and sweet pepper (if using).
2. Potato Fritters
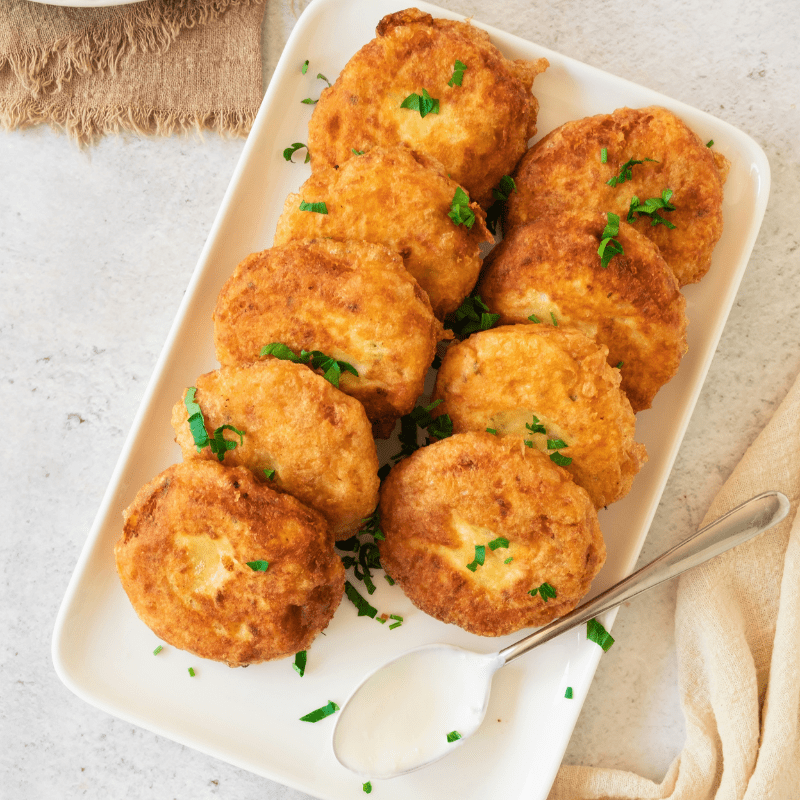
These potato fritters are one of my favorite finger foods to serve at gatherings. Crispy on the outside and soft on the inside, they’re always a hit with my kids and guests alike. They’re simple to make, yet so satisfying, making them perfect for snacking or as a side dish. I love how versatile they are – you can easily dip them in sauces or serve them on their own!
You can read more about this recipe here.
Servings: 12
Ingredients
- 6 – 7 medium potatoes, boiled and peeled (about 2 pounds)
- 1 pound white cheese
- 1/4 cup cornmeal plus 2 tbsp for rolling the frittatas
- 4 large eggs
- 3 tsp oregano
- 1 1/2 tsp smoked paprika
- 2 tablespoons chopped fresh parsley or green onions (optional)
- Salt and pepper to taste
- Vegetable oil, for frying
Instructions:
Fry the fritters:
-
Heat about 1/4 inch of vegetable oil in a large skillet over medium heat.
-
Place the cornmeal in a shallow dish.
-
Beat the eggs in a deep dish.
-
Place the potato frittata first in the flour and then dip in the egg.
-
Once the oil is hot, add the fritters in batches. Fry for 3-4 minutes per side or until golden brown and crispy. Avoid overcrowding the pan.
-
Remove the fritters from the skillet and place them on a plate lined with paper towels to drain excess oil.
Serve:
-
Serve immediately with chopped parsley.
-
Option: Serve with dipping sauce, such as sour cream, garlic aioli, or ketchup.
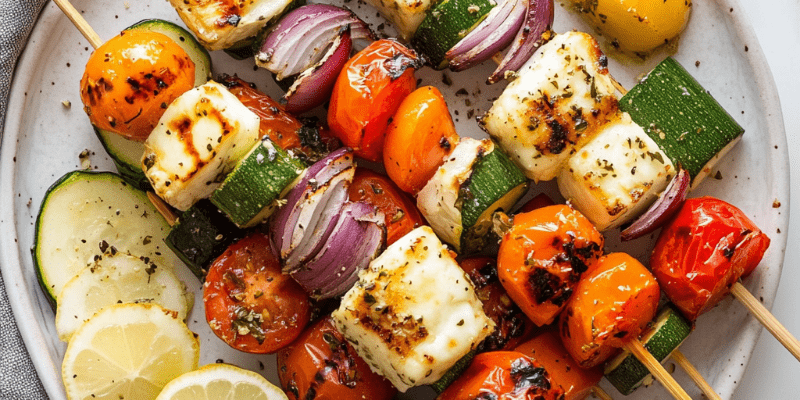
3. Kofte Kebabs with Tzatziki

These Kofte Kebabs with tzatziki are a flavorful, mouthwatering option for any finger food spread. The rich combination of lamb or beef with warm spices like cumin, paprika, and coriander makes these kebabs absolutely irresistible. I love how they’re grilled to perfection, juicy and smoky on the inside with a crispy exterior. Paired with the cool, tangy tzatziki, they’re the perfect balance of flavors and textures. Whether served with lavash bread or fresh veggies, they always disappear fast at our family gatherings!
You can find out more about this recipe here.
Servings: 6-8
Ingredients:
- 500 g minced meat (lamb, beef, or a mix)
- 1 small onion (finely grated or minced)
- 2 garlic cloves (minced)
- 1 tsp salt
- 5 tsp black pepper
- 5 tsp ground cumin
- 5 tsp ground coriander
- 5 tsp smoked paprika
- 25 tsp cayenne pepper (optional)
- 2 tbsp finely chopped parsley or cilantro
- 1 tbsp olive oil
- Skewers (metal or wooden, soaked in water)
Instructions:
Prepare the mince:
- In a large bowl, mix the minced meat with onion, garlic, salt, and all the spices.
- Add parsley or cilantro and olive oil.
- Knead the mixture thoroughly until it becomes sticky and well-combined.
Shape the kebabs:
- Divide the mixture into 6-8 portions.
- Shape them into long sausage-like forms and gently press them onto the skewers, ensuring they stick firmly.
Cook the kebabs:
- Grill, barbecue, or cook on a grill pan.
- Cook for 8-10 minutes, turning frequently to brown evenly on all sides.
Serving:
- Serve hot with lavash bread, fresh tzatziki sauce, and a fresh vegetable salad (e.g., tomatoes, cucumbers, red onion, and parsley, dressed with olive oil).
Tzatziki Sauce
Ingredients:
- 200 g Greek yogurt
- 1 small cucumber (or half of a medium one)
- 1–2 garlic cloves
- 1 tbsp olive oil
- 1 tsp lemon juice or 0.5 tsp white wine vinegar
- Salt and black pepper to taste
- 5 tbsp fresh dill or mint (optional)
Preparation:
- Grate the small cucumber and squeeze out the excess liquid.
- Finely chop or grate 1–2 garlic cloves.
- Combine the yogurt, cucumber, and garlic in a bowl.
- Add olive oil, lemon juice, salt, and pepper.
- If desired, mix in finely chopped dill or mint.
- Let it rest in the fridge for 1–2 hours.
4. Bruschettas

This bruschetta is one of those simple yet delightful dishes that I can’t get enough of. The fresh tomatoes, fragrant basil, and garlic combine so beautifully, and the balsamic glaze adds a sweet touch that really elevates the flavor. It’s perfect as a light appetizer or party snack. I love serving it on crispy, toasted French bread – it’s always a popular recipe. It’s fresh, vibrant, and so easy to make!
You can read more about this recipe here.
Servings: 6
Ingredients:
- 6 Roma tomatoes
- 3 cloves of garlic
- 5 oz fresh basil
- 1 tbsp olive oil
- 1 tbsp balsamic glaze
- ¼ tsp salt, or to taste
- ¼ tsp black pepper, or to taste
- French bread, for serving
Instructions:
- Start by cutting off the top of the tomato and then cut in half, lengthwise.
- Remove the seeds from the tomatoes with the back of a spoon. Discard the seeds.
- Dice the tomatoes. Add them to a bowl and set aside.
- Chop the basil and set aside.
- Mince the garlic and set aside.
- To the bowl of tomatoes, add the basil, garlic, olive oil and season with salt and pepper. Mix until well combined.
- Serve bruschetta on toasted sliced French bread and drizzle with balsamic glaze.
5. Caprese Skewers

These Caprese Skewers are a quick and delicious way to bring the flavors of Italy to your table. The combination of juicy cherry tomatoes, fresh mozzarella, and fragrant basil drizzled with balsamic glaze is simply irresistible. I love how easy they are to assemble, making them perfect for any get-together or a light snack. They’re always a hit with my family, and they look so colorful and inviting on the plate!
You can read more about this recipe here.
Servings: 12
Ingredients:
- 12 cherry tomatoes
- ½ cup mozzarella pearls
- 24 fresh basil leaves
- 1 tbsp balsamic glaze
- ½ tsp black pepper, or to taste
Instructions:
- On a skewer place 2 small pearls of mozzarella.
- Then add a basil leaf. You can fold it double if it’s too big.
- Then add a cherry tomato.
- Then add another basil leaf.
- And add 2 small mozzarella pearls again.
- Repeat until you run out of ingredients.
- Drizzle with balsamic glaze and season with black pepper to taste.
6. Avocado Deviled Eggs

These Avocado Deviled Eggs are a fun twist on the classic! The creamy avocado filling adds a rich, smooth texture that pairs perfectly with the tangy egg yolks. I love how simple yet impressive they are to make, and they’re always a hit at parties. They’re a great way to add a bit of extra flavor to the classic deviled egg, and the creamy avocado makes them so satisfying. Perfect for any occasion, these are always gone in no time at our family gatherings!
You can read more about this recipe here.
Servings: 12
Ingredients:
- 6 eggs
- 1 avocado
- 2 tbsp sour cream
- ½ lemon, juiced
- Salt, to taste
- Black pepper, to taste
- Parsley, for garnish
- Paprika powder, for garnish
Instructions:
- Place a pot on the stove over medium-high heat and start boiling water in it.
- Once the water reaches a boiling point, carefully add the eggs, and let them cook for 8-10 minutes.
- Remove the eggs from the boiling water and transfer them to a bowl filled with ice water to cool down.
- Peel the avocado and mash it in a separate bowl.
- Cut the boiled eggs in half lengthwise and scoop out the egg yolks into the bowl with mashed avocado.
- Add sour cream, lemon juice, salt, and pepper to the bowl. Mix everything together until well combined.
- Rinse the egg whites to remove any residue and pat them dry gently.
- Transfer the avocado and egg yolk mixture into a piping bag and carefully pipe it back into the hollows of the egg whites.
- If desired, garnish the deviled eggs with paprika powder and parsley for added flavor and presentation.
7. Everything Bagel Cucumber Rolls with Smoked Salmon

These Everything Bagel Cucumber Rolls with Smoked Salmon are a refreshing and savory treat that I can’t get enough of. The cool, crisp cucumber serves as the perfect base for the creamy cream cheese and the bold flavors of everything bagel seasoning. Add in the rich smoked salmon, and you’ve got an irresistible bite-sized snack that’s perfect for any gathering. They’re simple to put together yet always feel special, and they’re a guaranteed hit with my guests every time!
You can read more about this recipe here.
Servings: 4-6
Ingredients:
- 1 English cucumber
- 4 ounces cream cheese, softened
- 1 tablespoon fresh dill, chopped (optional)
- Everything bagel seasoning
- 4 ounces smoked salmon, thinly sliced
Instructions:
- Begin by preparing all of your ingredients.
- Using a mandoline or vegetable peeler, slice the cucumber lengthwise into thin strips.
- Arrange the cucumber slices on a flat surface and gently pat them dry with paper towels.
- Spread a layer of cream cheese over each cucumber slice.
- Generously sprinkle everything bagel seasoning on top of the cream cheese.
- Layer the smoked salmon over the cream cheese and add the dill if using.
- Carefully roll up each cucumber strip.
- Place the rolls in the refrigerator for at least 30 minutes to let the flavors combine and chill.
- Before serving, cut the cucumber rolls into smaller, bite-sized pieces.
- Arrange them on a platter, and enjoy your tasty Everything Bagel Cucumber Rolls with Cream Cheese and Smoked Salmon!
8. Mini Salmon Quiches

These Mini Salmon Quiches are a savory bite-sized delight that I love making for gatherings. The flaky, buttery crust pairs perfectly with the creamy filling, and the salmon adds a deliciously rich flavor. They’re super easy to prepare and make the perfect appetizer or snack, whether it’s for brunch, a party, or even a cozy family meal. Every time I serve them, they vanish quickly! They’re the kind of dish that feels fancy but is so simple to make, and I love how versatile they are.
You can read more about this recipe and get a printable recipe card here.
Servings: 12
Ingredients:
For the Crust:
- 1 cup all-purpose flour
- 1/4 cup unsalted butter, chilled and cubed
- 2-3 tablespoons ice cold water
- Pinch of salt
For the Filling:
- 1/2 cup smoked salmon, chopped
- 1/2 cup grated cheddar or Gruyere cheese
- 4 medium eggs
- 1/2 cup heavy cream
- Salt and pepper to taste
- Chopped dill to garnish
Instructions:
For the Crust:
- Preheat the oven to 350°F (175°C).
- Grease and flour a mini muffin tin.
- In a bowl, mix the flour and salt. Add the cubed butter and blend gently until it resembles coarse crumbs.
- Gradually add the ice-cold water, 1 tablespoon at a time, mixing until the dough comes together.
- Roll out the dough on a floured surface and cut into circles to fit your mini muffin tin cups.
- Press the dough circles into the cups, forming mini crusts. Prick the bottoms with a fork to prevent puffing. Place in the fridge while you work on the filling.
For the Filling:
- In a bowl, whisk together the eggs, cream, salt, and pepper until well combined.
- Place a small amount of chopped salmon and grated cheese into each mini crust.
- Pour the egg mixture over the salmon and cheese, filling each crust almost to the top.
- Place the muffin tin into the oven and bake for 15-20 minutes or until the quiches are set and slightly golden on top.
- Once done, allow to cool for a few minutes, then carefully remove the mini quiches from the muffin tin.
- Garnish with chopped dill before serving.
9. Spanish Pan con Tomate

Servings: 4-6
Ingredients:
- 1 loaf ciabatta bread
- 2-3 garlic cloves, peeled
- 2 ripe medium tomatoes (preferably vine-ripened)
- 4 tablespoons extra virgin olive oil, plus more for brushing
- Sea salt, to taste
- Freshly cracked black pepper, to taste
- Fresh basil, chopped, for garnish
Instructions:
Prepare the Bread
- Cut the ciabatta loaf in half lengthwise, then cut each half into manageable pieces if desired.
- Brush the cut sides generously with olive oil.
- Place the bread on a baking sheet, cut side up, and broil for 4-5 minutes until nicely browned and slightly charred on the edges.
Prepare the Tomato Mixture
- Cut the top side off the tomatoes and discard.
- Grate the flesh side of the tomatoes on the largest holes of a box grater over a bowl. The tomato will grate into pulp and juice, leaving the skin behind. Discard the tomato skin.
- Pour the grated tomato mixture into a fine-mesh sieve set over another bowl and gently press to drain some of the excess liquid.
- Transfer the thicker tomato pulp to a bowl and season with sea salt and freshly cracked black pepper to taste.
Rub with Garlic
- Once the bread is out of the broiler and still warm, rub the cut side of each slice with 2-3 peeled garlic cloves, adjusting the intensity as desired.
Assemble the Pan con Tomate
- Spoon the seasoned, drained tomato mixture generously over the garlic-rubbed bread.
Drizzle and Garnish
- Drizzle with olive oil and garnish with freshly chopped basil.
- Serve immediately for the best flavor and texture.
10. Honey Carrots Toast

These Honey Carrot Toasts are one of my favorite light bites! The sweet honey-glazed carrots pair perfectly with the creamy cottage cheese and whole grain toast, making for a deliciously satisfying snack or appetizer. I love the added crunch of pumpkin seeds and the fresh herbs that bring it all together. It’s such a simple yet flavorful recipe that always impresses at gatherings, and the extra drizzle of honey is the perfect finishing touch!
You can read more about this recipe and get a printable recipe card here.
Servings: 2
Ingredients:
- 2 medium size carrots (about 1 ½ cup)
- 2 whole grain slices of bread
- 1 cup cottage cheese
- 1tbsp olive oil
- ½tbsp honey
- ½ stp oregano
- ½ tsp paprika
- ¼ tsp salt
- 1 sprig of fresh rosemary
- 1 sprig of fresh thyme
- 1tbsp Pumpkin seeds
- Fresh parsley
Instructions:
-
Heat a frying pan over medium heat, then add olive oil and reduce the heat to low.
-
Cut the carrots into 2–3 inch pieces and add them to the pan along with the dry spices and fresh herbs.
-
Cook the carrots until tender, adding a tablespoon of water and covering with a lid if needed.
-
Once the carrots are tender, stir in the honey, then remove them from the pan and set aside.
-
In the same pan, add the pumpkin seeds and cook until they start to pop and turn brown. Remove and set aside.
-
Add the bread slices to the pan and toast on both sides until golden.
-
Top each slice of toast with a generous layer of cottage cheese.
-
Add the honey-glazed carrots, then sprinkle with toasted pumpkin seeds and finely chopped parsley.
-
Drizzle with extra honey before serving.
11. Pumpkin Feta Phyllo Cups

These Pumpkin Feta Phyllo Cups are the perfect little bite-sized treats for any occasion! The crispy phyllo dough pairs so wonderfully with the creamy feta and the sweet, tender pumpkin. I love how the spinach adds a fresh pop of color and flavor, making these cups both savory and satisfying. They’re a great appetizer to serve at a party, and the honey adds just a hint of sweetness that really brings everything together. Plus, they’re so easy to make yet look and taste impressive!
Servings: 6
Ingredients:
- 6 sheets of phyllo dough
- 200 g pumpkin, peeled and cut into small cubes
- 100 g feta cheese, crumbled
- 1 cup baby spinach, finely chopped
- 2 tbsp olive oil
- Salt and pepper to taste
- 1 tbsp honey (optional)
- 2-3 tbsp melted butter (for brushing the phyllo dough)
- Pumpkin seeds or sesame seeds for garnish (optional)
Instructions:
- Preheat the oven to 180°C (350°F).
- In a skillet, heat 1 tbsp of olive oil and sauté the pumpkin cubes until tender, about 5-7 minutes. Season with salt, pepper, and honey (if using), and stir.
- Add the baby spinach and cook for another 1-2 minutes, until wilted. Turn off the heat and add the crumbled feta cheese. Gently mix the filling.
- Cut the phyllo dough sheets into squares (about 10×10 cm each). Brush each square with melted butter.
- Stack three squares on top of each other, rotating them slightly to form a star shape. Press the stacked squares into a muffin tin, shaping them into cups.
- Fill each phyllo cup with the pumpkin, spinach, and feta filling.
- For extra texture, sprinkle pumpkin seeds or sesame seeds on top if desired.
12. Asian Sticky Wings

These Asian Sticky Wings are an absolute winner ever time I make them! The combination of honey, soy sauce, and hoisin creates a rich, sticky glaze that coats the wings perfectly, giving them a deliciously sweet and savory flavor. I love how tender the chicken turns out, with just the right amount of crispy edges. The sesame seeds and scallions on top add a lovely crunch and freshness. They’re great for parties, and I always get compliments when I serve them. Whether as an appetizer or a main dish, these wings are always a hit at our gatherings!
Servings: 8
Ingredients:
- 4 lbs (2 kg) chicken wings, separated into drumettes and wingettes
- 1/2 cup soy sauce
- 1/4 cup honey
- 3 tablespoons brown sugar
- 3 tablespoons rice vinegar
- 3 tablespoons oyster sauce
- 3 tablespoons hoisin sauce
- 1/4 cup sesame oil
- 6 cloves garlic, minced
- 2-inch piece of ginger, grated
- 2 teaspoons Chinese five-spice powder
- 1/2 cup water
- 2 tablespoons cornstarch mixed with 4 tablespoons water (to thicken sauce)
- 2 tablespoons sesame seeds, toasted
- 1 scallion, finely sliced
Instructions:
-
In a large bowl, combine the soy sauce, honey, brown sugar, rice vinegar, oyster sauce, hoisin sauce, sesame oil, minced garlic, grated ginger, and Chinese five-spice powder. Whisk until well blended.
-
Add the chicken wings to the marinade, ensuring each piece is well coated. Cover the bowl with plastic wrap and refrigerate for at least 1 hour, preferably overnight, to allow the flavors to penetrate the meat.
-
Preheat your oven to 400°F (200°C). Line two baking sheets with aluminum foil or parchment paper, and place wire racks on top of each sheet.
-
Arrange the marinated chicken wings in a single layer on the wire racks. Reserve the marinade for later use. Bake the wings for 35–40 minutes, turning halfway through, until they are golden brown and slightly charred on the edges.
-
While the wings are baking, pour the reserved marinade into a large saucepan. Add 1/2 cup of water and bring to a boil over medium heat. Reduce the heat and simmer for 5–7 minutes until slightly reduced. Stir in the cornstarch slurry and continue to simmer for another 2–3 minutes until thickened and sticky.
-
Once the wings are cooked, remove them from the oven and transfer to a large mixing bowl. Pour the thickened sauce over the wings and toss until evenly coated.
-
Transfer the sticky wings to a serving platter. Sprinkle with toasted sesame seeds and sliced scallions.
-
Serve hot as an appetizer or main dish with your favorite sides, such as steamed rice or a crisp salad.
13. Corn Dogs

These homemade Corn Dogs are a fun and nostalgic treat that I love making for my family! The crispy, golden exterior pairs perfectly with the juicy hot dog inside, and the sweet cornmeal batter gives them that classic flavor we all know and love. They’re surprisingly easy to make and perfect for a snack or party appetizer. I love serving them with a side of ketchup or mustard, and they always go fast at gatherings! If you’re craving something comforting and tasty, these corn dogs hit the spot every time.
Servings: 6
Ingredients:
- 6 hot dogs
- 6 wooden skewers or sticks
- 3/4 cup yellow cornmeal
- 3/4 cup all-purpose flour
- 1/4 teaspoon salt
- 1/4 teaspoon baking powder
- 1/8 teaspoon baking soda
- 1 tablespoon granulated sugar
- 1 large egg
- 3/4 cup buttermilk (or you can use regular milk with a tablespoon of vinegar or lemon juice added)
- Vegetable oil, for frying
Instructions:
-
Dry the hot dogs with paper towels. Skewer each hot dog with a wooden stick, making sure the stick is centered and inserted about halfway up the hot dog.
-
In a large bowl, whisk together the cornmeal, flour, salt, baking powder, baking soda, and sugar. In a separate bowl, beat the egg and mix in the buttermilk. Pour the wet ingredients into the dry ingredients and stir until just combined. The batter should be thick enough to coat the hot dogs—add a little more buttermilk if needed.
-
Pour vegetable oil into a deep fryer or large pot, making sure there’s enough to fully submerge the corn dogs. Heat the oil to 350°F (175°C), using a thermometer to check the temperature for accuracy.
-
Pour the batter into a tall glass for easy dipping. Dip each skewered hot dog into the batter, coating it completely. Let the excess batter drip off briefly, then carefully lower the corn dog into the hot oil.
-
Fry the corn dogs in batches, if needed, for about 2–3 minutes or until golden brown and crispy. Avoid overcrowding the pot to ensure even cooking.
-
Remove the cooked corn dogs from the oil using a slotted spoon and drain them on paper towels to remove excess oil.
-
Serve the corn dogs hot with your favorite condiments like ketchup, mustard, or mayonnaise.
14. Mini Piggies in a Blanket

These Mini Piggies in a Blanket are the ultimate bite-sized snack that everyone loves! With savory little sausages wrapped in a soft, buttery dough, they’re perfect for dipping in mustard, ketchup, or any sauce you love. I can’t resist how easy and fun they are to make, plus they’re always a hit at parties or gatherings. These mini treats are perfect for both kids and adults, and they disappear in no time whenever I make them!
Read more about this recipe and get a printable recipe card here!
Servings: 24
Ingredients:
- 1 refrigerated can of croissant dough (with 12 croissants)
- 24 cocktail sausages (pre-cooked)
- 1-2 eggs, beaten (for egg wash)
- 1 tsp poppy seeds, for sprinkling
Instructions:
- Preheat the Oven: Preheat your oven to the temperature indicated on the croissant dough package. This is usually around 350°F (175°C).
- Open the Croissant Dough: Open the refrigerated can of croissant dough and carefully unroll it. You’ll find 12 triangular pieces of dough.
- Cut the Dough: Cut along the perforated lines of the dough triangles to make 24 smaller triangles. This will provide enough dough to wrap around each mini sausage.
- Wrap the Sausages: Take one of the smaller dough triangles and place a mini sausage at the wide end of the triangle. Roll the dough around the sausage. Repeat with all the sausages and dough triangles.
- Egg Wash: In a small bowl, beat the eggs. Using a pastry brush or your fingers, lightly brush each wrapped sausage with the beaten egg. This will help the dough brown nicely during baking.
- Sprinkle Poppy Seeds: Sprinkle poppy seeds over the egg-washed dough-wrapped sausages. This adds a pleasant visual appeal and a subtle nutty flavor.
- Arrange on Baking Sheet: Place the prepared mini piggies in a blanket on a baking sheet lined with parchment paper. Make sure to leave some space between each one to allow for even baking.
- Bake in the Oven: Put the baking sheet in the preheated oven and bake for about 15-18 minutes, or until the piggies in a blanket are golden brown and the dough is cooked through.
- Serve: Once baked, remove the mini piggies in a blanket from the oven and let them cool slightly before serving. You can serve them with your favorite dipping sauces like ketchup, mustard, or barbecue sauce.
- Enjoy your delicious homemade mini piggies in a blanket as a delightful appetizer or snack!
15. Mini Caprese Pizzas

These Mini Caprese Pizzas are such a fresh and tasty twist on the classic! The combination of juicy tomatoes, creamy mozzarella, and fragrant basil on a crispy crust makes each bite feel like a little burst of flavor. I love how simple they are to make, and they’re always a crowd favorite when served at gatherings. The drizzle of balsamic glaze adds that perfect touch of sweetness, and they’re great as appetizers or a fun snack. You can’t go wrong with these mini pizzas – they’re always a hit!
You can read more about this recipe and get a printable recipe card here!
Servings: 6
Ingredients:
- 6 mini naan rounds
- ½ cup pizza sauce or marinara
- ½ cup shredded mozzarella
- ¼ cup cherry tomatoes
- ¼ cup arugula
- 3-4 basil leaves
- 1 tbsp balsamic glaze
- ½ tsp black pepper
Instructions:
- Preheat your oven to 350 degrees Fahrenheit.
- Slice your cherry tomatoes.
- Place your basil leaves on top of each other, roll them together and cut them thinly.
- Place your mini naan rounds on a baking sheet and evenly divide the pizza sauce over the mini rounds.
- Then evenly divide the shredded cheese, cherry tomatoes, and sliced basil over the mini pizzas.
- Season with black pepper.
- Place in preheated oven for 15-20 minutes, or until the cheese is fully melted and the edges reach your desired crust.
- Top with balsamic glaze and arugula.
- Enjoy
16. Smoked Salmon and Avocado Bruschetta

This Smoked Salmon and Avocado Bruschetta is the perfect combination of creamy, smoky, and fresh flavors! The buttery avocado pairs so well with the rich smoked salmon, and the crunchy toasted bread gives it the ideal texture. I love how easy it is to make, yet it feels so gourmet. It’s always a hit at any gathering or brunch, and I love how it can be served as an appetizer or a light snack. The addition of a squeeze of lemon just brings everything together, making it a refreshing and delicious treat!
Servings: 4
Ingredients:
- 1/2 French bread, sliced and toasted (crostini)
- 8 oz smoked salmon
- 1 ripe avocado
- 2 tbsp Greek yogurt
- 1 tbsp mayonnaise
- 1/2 lemon, juiced
- Few sprigs of dill
- Salt and pepper to taste
Instructions:
- Preheat the oven broiler on high.
- Slice the French bread into 1/2-inch thick pieces.
- Place the bread slices on a baking sheet and position the rack about 6 inches below the broiler element.
- Broil the bread slices for about 1.5 minutes on each side or until they are golden brown and crispy. Keep a close eye on them to prevent burning.
- In a bowl, scoop out the ripe avocado and mash it with a fork until smooth.
- Add Greek yogurt, mayonnaise, and freshly squeezed lemon juice to the mashed avocado. Mix well to combine.
- Season the mixture with salt and pepper to taste. Adjust the seasoning according to your preferences.
- Once the crostini are ready, spread a generous amount of the avocado mixture onto each slice.
- Carefully drape a slice of smoked salmon over the avocado spread on each crostini. You can fold the salmon to fit nicely on the bread.
- Wash and chop the dill finely.
- Sprinkle chopped dill over the smoked salmon for a burst of fresh flavor.
17. Roasted Cherry Tomato and Burrata Bruschetta

This Roasted Tomato and Burrata Bruschetta is an absolute favorite in my house! The sweet, caramelized tomatoes paired with the creamy burrata create such a rich, satisfying flavor. I love the contrast between the warm, roasted tomatoes and the cool, smooth cheese, all served on crispy toasted bread. It’s simple to make, but it feels like a special treat every time.
You can read more about this recipe and get a printable recipe card here.
Servings: 2-4
Ingredients:
- 1 pint cherry tomatoes
- 4 oz burrata cheese ball
- 1 small shallot, finely chopped
- 2 cloves garlic, minced
- 2 tbsp olive oil
- Salt and pepper to taste
- Fresh basil leaves, chopped
For serving:
- 1 baguette, sliced (optional)
- 1 tbsp balsamic glaze
Instructions:
- Preheat your oven to 375°F (190°C).
- In a baking dish, combine cherry tomatoes, chopped shallot, minced garlic and olive oil. Toss to coat the tomatoes evenly.
- Roast the tomatoes in the preheated oven for about 20-25 minutes or until they start to burst, releasing their juices. Then top roast on high for about 2-3 minutes to brown the top.
- Once the tomatoes are done, remove them from the oven and let it cool for about 5 minutes.
- Then sprinkle chopped fresh basil over them, season with salt and pepper, place the burrata on top of the tomatoes.
- Finish by drizzling balsamic glaze over the bruschettas.
- Serve with crostinis, cracker or bread.
Dips
18. Caramelized Onion Dip

This Caramelized Onion Dip is one of my all-time favorite dips to make! The rich, sweet flavor of the caramelized onions combined with the creamy base creates the perfect savory treat. I love how easy it is to make, yet it tastes so gourmet and always impresses guests. It’s great for dipping chips, veggies, or even crusty bread. Every time I serve it, it’s gone in no time, and I always get asked for the recipe! It’s one of those dishes that just feels like comfort in every bite.
You can read more about this recipe here.
Servings: 4-6
Ingredients:
- 2 yellow onions
- 4 oz cream cheese
- ½ cup sour cream
- ¼ cup mayonnaise
- 3 tbsp unsalted butter
- 1 tbsp chives, sliced
- ¼ tsp salt, or to taste
- ¼ tsp black pepper, or to taste
Instructions:
- Start by peeling and thinly slicing your onions.
- On medium-high heat melt the butter and add the sliced onions. Stir occasionally. Lower the heat when they start to brown. Then cook some more on medium-low heat. This process can take about 20-25 minutes.
- In a food processor, add the cream cheese, sour cream, mayonnaise, and season with salt and pepper, and process until smooth.
- Once your onions are caramelized, let them cool off for 5 minutes, and then add to the dip in the processor and pulse for just a second to mix the onions in.
- Serve with chip, crackers, or veggie sticks.
19. Corn Dip

This Corn Dip is always a popular choice at any gathering! The sweet, crunchy corn mixed with creamy cheese and zesty ingredients makes for a super flavorful dip that’s perfect for scooping up with chips or fresh veggies. I love how simple it is to put together, but it’s always a hit when I serve it. It’s the kind of dip that you can’t stop eating, and every time I make it, I get asked for the recipe. Whether it’s for a party or a family gathering, this corn dip is always a guaranteed success!
You can read more about this recipe and get a printable recipe card here!
Servings: 4
Ingredients:
- 2 (15 oz) cans of sweet corn kernels
- 4 slices of bacon
- 1 cup mayonnaise
- 1 cup sour cream
- 1 cup Mexican shredded cheese
- 3 scallions
- 1 jalapeno
- ½ tsp black pepper, or to taste
- ¼ tsp garlic powder
- ¼ tsp onion powder
Instructions:
- Drain the corn. Make sure all liquid is drained.
- Start by cooking your bacon in a pan, until it has reached your desired crispiness.
- Chop the scallions, jalapeno, and cooked bacon. Set aside.
- In a medium-large bowl, add the corn, sour cream, mayonnaise, shredded cheese, chopped bacon, chopped scallions, chopped jalapeno and seasoning. Mix until well combined.
- Keep refrigerated until ready for serving.
- Serve with tortilla chips.
20. Slow Cooker Spinach Artichoke Dip
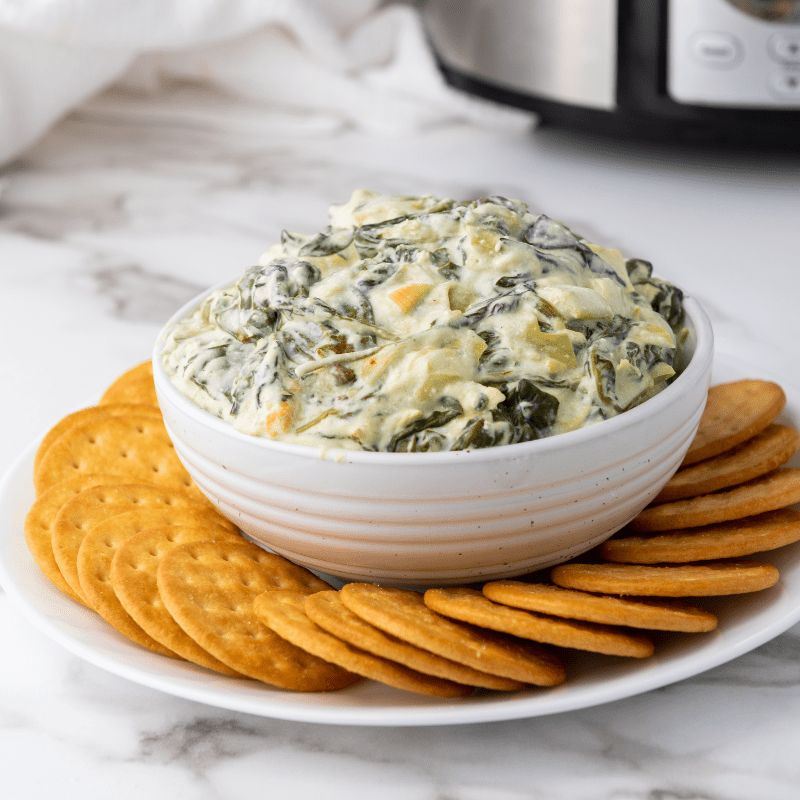
This Slow Cooker Spinach Artichoke Dip is the ultimate comfort food! It’s creamy, cheesy, and packed with flavor, with the perfect balance of spinach and artichokes. I love how easy it is to throw everything into the slow cooker and have a warm, delicious dip ready to serve whenever I need it. It’s always a hit at parties or gatherings, and I love that it’s one of those dips that’s so comforting and satisfying. Whether served with bread, crackers, or veggies, this dip is always gone in no time!
Servings: 4-6
Ingredients:
- 8 oz fresh spinach
- 1 can (14 oz) artichokes
- 1 pack (8 oz) cream cheese
- 1 cup sour cream
- 1 cup mozzarella cheese
- ½ tsp garlic powder
- ½ tsp onion powder
- ¼ tsp salt, or to taste
Instructions:
- Cut the artichokes into small bits.
- Cut the cream cheese in 8 pieces
- In the slow cooker, add the cream cheese, chopped artichokes, sour cream, mozzarella cheese, all seasoning and spinach on top.
- Set the slow cooker to low and let it cook for 2 hours. Make sure to stir after 1 hour to mix in the spinach.
- Serve while warm with crackers, or bread.
21. Smoked Salmon Dip

This Smoked Salmon Dip is a deliciously rich and savory treat that always steals the show! The smoky flavor of the salmon blends perfectly with the creamy base, creating a dip that’s both luxurious and comforting. I love how easy it is to prepare, yet it feels like a special dish that everyone loves. It’s perfect for serving at parties, with crackers, fresh veggies, or even on toast. Every time I make it, I get asked for the recipe!
You can read more about this recipe and get a printable recipe card here.
Servings: 4
Ingredients:
- 8 oz cream cheese
- 4 oz smoked salmon
- ½ lemon, juiced
- ¼ cup mayonnaise
- ¼ cup sour cream
- 2 tbsp dill
- 1 tbsp capers
- Salt, to taste
- Black pepper, to taste
Instructions:
- In a food processor, add the cream cheese, mayonnaise, sour cream, and the juice of the lemon. Process until well combined.
- Then add the smoked salmon, capers, dill (make sure to remove the stems), salt, and pepper. And process. Make sure you don’t let it process for too long, so you keep little chunks of smoked salmon for texture.
- Serve with toast or crostini.
22. Whipped Feta Dip

This Whipped Feta Dip is one of my favorite dip recipes! The creamy, tangy feta cheese blended to perfection with a touch of olive oil creates a smooth, rich dip that’s so addictive. I love how simple it is to make, yet it feels so indulgent and special. It’s perfect for serving with fresh veggies, pita bread, or even crackers. Every time I serve it, it’s always gone in a flash, and I get tons of compliments on how delicious it is! It’s the kind of dip that’s always a hit at any gathering or party.
You can read more about this recipe and get a printable recipe card here.
Servings: 4-6
Ingredients:
- 8 oz. block feta cheese
- 1 cup Greek yogurt
- 4 tbsp olive oil
- 2 cloves of garlic
- ½ lemon, juiced
- ¼ tsp red pepper flakes
- ¼ tsp salt, or to taste
- ¼ tsp black pepper, or to taste
- Parsley, for garnish
Instructions:
- In a food processor, add the feta cheese, yogurt, olive oil, garlic, salt and pepper. Process until well combined.
- Chop the parsley.
- Put the whipped feta dip in a bowl and garnish with red pepper flakes and chopped parsley.
- Serve with chips or vegetables.
With these 22 easy finger foods, your next party will be a breeze! Whether you’re looking for something savory, sweet, or a bit of both, these recipes are designed to be simple, delicious, and crowd-pleasing. Plus, they’re the perfect way to keep your guests satisfied without spending all day in the kitchen.