Easter Mini Cheesecake Tarts with Sweet Short Pastry
Some days I just want to put something homemade on the table that feels a little special without turning the whole kitchen upside down. Between school runs, laundry piles, and three hungry kids wandering through the kitchen asking what’s for dessert, I’ve learned that simple recipes are the ones that actually get made. If it uses basic ingredients and doesn’t send me back to the grocery store for anything fancy, it’s already off to a good start.
That’s exactly why I love making Easter Mini Cheesecake Tarts. The pastry comes together with everyday baking staples, and the creamy filling is just cream cheese, a little sugar, and whipped cream folded together. They look cheerful and festive with those soft pastel colors, but the steps are straightforward enough that you don’t feel like you’re tackling a bakery project. I’ll often make the shells ahead of time and finish the filling later, which makes the whole thing feel manageable even on a busy day.
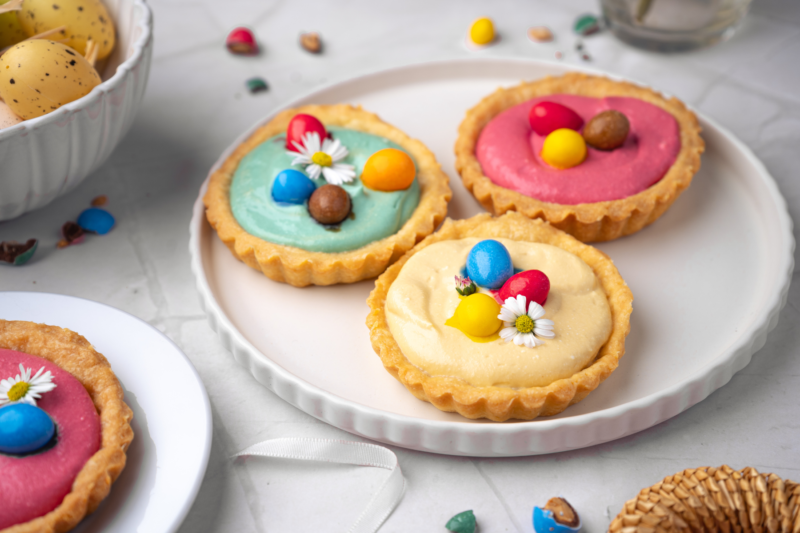
Once they’re chilled and topped with a few chocolate eggs, they’re the kind of dessert that instantly brightens the table. My kids get excited every time they see them, and I like that they’re homemade without costing a fortune to make. Recipes like this are easy to come back to year after year, and they make feeding the family feel a little more fun without adding extra stress to the day.
Why We Love This Recipe
- Made with simple ingredients you can actually find. Most of these are everyday baking staples like flour, butter, cream cheese, and sugar, so you’re not chasing down anything fancy at the store.
- A little goes a long way. Since they’re mini tarts, a small batch feels special and stretches nicely for family dessert or a holiday table without blowing the grocery budget.
- They look impressive but are surprisingly doable. The steps are straightforward, and once the tart shells are baked, the creamy filling comes together in just a few minutes.
- Perfect for making ahead. I love that these chill in the fridge before serving, which means dessert is completely ready before guests arrive.
- Fun and kid-approved. My kids love helping swirl the pastel colors and adding the chocolate eggs on top, which makes the whole thing feel a little more festive.
- Easy to customize for whatever you have. You can switch up the colors, add different toppings, or even use berries if that’s what’s in the fridge.

Equipment
-
Mixing bowls: You’ll need a few medium bowls for mixing the pastry dough, whipping the cream, and combining the cheesecake filling.
-
Food processor (optional): This makes bringing the pastry dough together quick and easy, though a mixing bowl and spoon work just fine too.
-
Rolling pin: Helpful for rolling the chilled dough out evenly so the tart shells bake up nice and uniform.
-
4-inch tart pans: These give the tarts their pretty shape and make it easy to remove them once they’re baked and cooled.
-
Parchment paper: Used to line the tart shells while blind baking so the crust holds its shape.
-
Baking beans or uncooked rice: These act as weights when baking the tart shells so the bottoms don’t puff up.
-
Electric mixer or hand mixer: Makes it much easier to beat the cream cheese smooth and whip the cream to soft peaks.
-
Rubber spatula: Perfect for gently folding the whipped cream into the cheesecake mixture without knocking the air out.
-
Piping bag or spoon: A piping bag makes filling the tarts neat and pretty, but a spoon works just as well if that’s what you have.
-
Wire cooling rack: Allows the tart shells to cool evenly so they stay crisp before you add the filling.

Ingredients
For the Sweet Short Pastry Shell:
-
Pastry flour: This gives the tart shells a tender, delicate texture that’s sturdy enough to hold the creamy filling without being tough.
-
Unsalted butter: Soft butter makes the dough rich and flavorful, and letting it come to room temperature helps everything mix together smoothly.
-
Salt: Just a small amount balances the sweetness and keeps the pastry from tasting flat.
-
Egg yolk: Adds richness and helps bring the dough together into a smooth, workable pastry.
-
Sugar: A touch of sugar gives the crust a light sweetness that pairs nicely with the cheesecake filling.
-
Whole milk: Helps bind the dough and keeps the pastry soft enough to roll out without cracking.

For the Cheesecake-Style Filling:
-
Cream cheese: The creamy base that gives these little tarts that classic cheesecake flavor we all love.
-
Fresh lemon juice: Brightens the filling and keeps the sweetness from feeling too heavy.
-
Powdered sugar: Sweetens the filling while blending in smoothly so the texture stays silky.
-
Heavy cream: Whipped and folded in, this makes the filling light, fluffy, and extra creamy.
-
Vanilla extract: Adds a warm, cozy flavor that rounds everything out beautifully.
-
Gel food colouring: Just a tiny drop creates those soft pastel shades that make the tarts feel festive for Easter.
-
Mini Easter chocolate eggs or edible flowers (optional): A simple topping that makes these tarts look cheerful and ready for the holiday table.


Recipe Instructions
You can find a printable recipe card at the bottom of this post.
Step 1: In a large mixing bowl or food processor, combine the softened butter, salt, egg yolk, sugar, and milk. Mix until smooth and creamy. Gradually sift in the flour, mixing just until the dough starts to come together into a ball. If using a food processor, pulse only until the dough forms.


Step 2: Turn the dough out onto a lightly floured surface and gently knead for 1 to 2 minutes until smooth and uniform. Flatten into a disk, wrap tightly in plastic wrap, and refrigerate for at least 2 hours.

Step 3: Preheat the oven to 350°F (180°C) and generously butter eight 4-inch tart pans. Roll the chilled dough out on a lightly floured surface, ideally between two sheets of parchment, to about ¼-inch thickness. Cut circles slightly larger than the tart pans and gently press the dough into each pan, trimming away any excess.


Step 4: Line each tart shell with parchment paper and fill with baking beans or rice. Prick the dough all over with a fork, place the pans on a baking sheet, and bake for about 30 minutes, until the crusts are lightly golden. Remove from the oven and allow the shells to cool completely on a wire rack.


Step 5: In a medium bowl, beat the cream cheese, lemon juice, and powdered sugar until smooth and creamy. In a separate bowl, whip the heavy cream with the vanilla extract until soft peaks form, then gently fold it into the cream cheese mixture until fully combined.


Step 6: Divide the cheesecake filling between two or more bowls and add a small amount of gel food coloring to each, mixing until evenly tinted in soft pastel shades.


Step 7: Once the tart shells are completely cooled, spoon or pipe the colored cheesecake filling into each shell, filling almost to the top. Refrigerate the tarts for at least 2 hours to firm up and allow the flavors to come together.


Step 8: Just before serving, top each tart with mini chocolate eggs or edible flowers for a cheerful Easter finish.


Serving & Storing
-
Serve them nicely chilled. These little tarts are best after they’ve had plenty of time in the fridge to firm up, which makes the filling creamy and the shells easier to handle.
-
Add the toppings just before serving. I like to pop the chocolate eggs or edible flowers on right before bringing them to the table so everything still looks bright and fresh.
-
Perfect for Easter dessert tables. Since they’re individual tarts, guests can easily grab one without any slicing or fuss, which is always nice when you’ve got a busy house.
-
Store leftovers in the refrigerator. Just place them in an airtight container and they’ll keep well for about 3 days.
-
Keep the tart shells crisp. If you’re making them ahead, store the baked shells and the filling separately and assemble closer to serving time.
-
Great for making the day before. I often prepare these the night before a gathering so dessert is completely taken care of and one less thing to think about the next day.

Variations & Substitutions
-
Change up the colors. You can tint the cheesecake filling in any pastel shades you like, or keep it simple and leave it plain for a classic creamy look.
-
Top with fresh fruit. If you’ve got berries in the fridge, a few strawberries, raspberries, or blueberries on top taste lovely and add a bright pop of color.
-
Use store-bought tart shells in a pinch. If time is tight, ready-made tart shells work just fine and save you the step of making pastry from scratch.
-
Add a little extra flavor. A touch of lemon zest or even a bit of orange zest in the filling gives the cheesecake mixture a fresh, springy flavor.
-
Swap the topping. Mini chocolate eggs are perfect for Easter, but crushed cookies, sprinkles, or shaved chocolate work just as well.
-
Make them mini. If you’re serving a crowd, you can use a mini muffin tin and make bite-sized versions that are easy for parties and dessert tables.

Little Tricks That Make a Big Difference
-
Let the cream cheese soften properly. If it’s still a bit cold, the filling can turn lumpy, so I like to leave it on the counter for a while before mixing.
-
Chill the dough before rolling. It might feel like an extra step, but it makes the pastry much easier to handle and helps the tart shells bake up nicely.
-
Roll the dough between parchment sheets. This saves a lot of sticking and extra flour, and clean-up is quicker too.
-
Don’t skip the blind baking. Those baking beans or rice help the tart shells keep their shape so you end up with sturdy little bases for the filling.
-
Whip the cream to soft peaks only. That keeps the filling light and fluffy once it’s folded into the cream cheese mixture.
-
Use a piping bag if you want a neat finish. A spoon works fine, but piping the filling makes the tarts look a little more polished without much extra effort.

What to Serve with Easter Mini Cheesecake Tarts
-
A pot of fresh coffee or tea. These creamy little tarts pair beautifully with a warm drink, especially after a big Easter meal when everyone’s ready to sit and chat for a while.
-
Fresh spring berries. A bowl of strawberries, raspberries, or blueberries on the table adds a bright, fresh flavor that goes really nicely with the creamy cheesecake filling.
-
A light fruit salad. Something simple with grapes, melon, or pineapple keeps dessert from feeling too heavy and balances the richness of the tarts.
-
Hot cross buns or sweet rolls. If you’re serving these as part of an Easter brunch spread, a basket of warm baked treats fits right in.
-
Lemonade or sparkling punch. For gatherings with kids and family, a chilled pitcher of something fruity and refreshing makes the dessert table feel a little more festive.
-
A simple scoop of whipped cream. If someone in the family loves an extra creamy dessert, a little whipped cream on the side never goes to waste.

FAQs
Can I make Easter Mini Cheesecake Tarts ahead of time?
Yes, and I actually recommend it. The tart shells and filling both hold up well in the fridge, so you can make them a day ahead and just add the chocolate eggs or flowers right before serving
How long do Easter Mini Cheesecake Tarts last in the refrigerator?
Stored in an airtight container in the fridge, they’ll stay fresh for about 3 days. They’re perfect for making ahead for Easter weekend when you’ve got plenty of other things going on.
Can I freeze Easter Mini Cheesecake Tarts?
You can freeze the baked tart shells, but the cheesecake filling is best made fresh. I usually bake the shells ahead and freeze them, then make the filling the day I plan to serve them.
Can I use store-bought tart shells instead of making pastry from scratch?
Absolutely. If you’re short on time, ready-made tart shells work just fine and still give you a lovely little Easter dessert without the extra effort.
What toppings work well for Easter Mini Cheesecake Tarts?
Mini chocolate eggs are always fun for Easter, but fresh berries, sprinkles, or even a little grated chocolate all work beautifully too.
Can I make the cheesecake filling different colors?
Yes, and that’s one of the fun parts of this recipe. Just divide the filling into bowls and add a tiny drop of gel food coloring to create soft pastel shades for a cheerful Easter look.

Easter Mini Cheesecake Tarts
These Easter Mini Cheesecake Tarts are a cheerful little dessert made with buttery sweet pastry shells and a light, creamy cheesecake filling. The pastel colors and simple chocolate egg topping make them perfect for Easter brunch, spring gatherings, or a festive family dessert. They look beautiful on the table but are surprisingly simple to make with everyday ingredients. Make them ahead, chill until set, and enjoy an easy homemade treat that feels just right for the season.
Ingredients
For the sweet short pastry shell:
- 4 cups (500 g) pastry flour, plus extra for dusting
- 1 ⅔ cups (375 g) unsalted butter, at room temperature
- 1 teaspoon (5 mL) salt
- 1 large egg yolk
- 2 teaspoons (10 mL) sugar
- 7 tablespoons (105 mL) whole milk, room temperature
For the cheesecake-style filling:
- 12 oz (340 g) cream cheese, softened at room temperature
- 4 teaspoons (20 mL) fresh lemon juice
- ½ cup (50 g) powdered sugar
- ½ cup (≈120 mL) heavy cream
- 1 teaspoon vanilla extract
- 1 drop gel food colouring of your choice
- Optional: small Easter chocolate eggs or edible flowers to garnish
Instructions
- In a large mixing bowl or food processor, combine the softened butter, salt, egg yolk, sugar, and milk. Mix until smooth and creamy. Gradually sift in the flour, mixing just until the dough starts to come together into a ball. If using a food processor, pulse only until the dough forms.
- Turn the dough out onto a lightly floured surface and gently knead for 1 to 2 minutes until smooth and uniform. Flatten into a disk, wrap tightly in plastic wrap, and refrigerate for at least 2 hours.
- Preheat the oven to 350°F (180°C) and generously butter eight 4-inch tart pans. Roll the chilled dough out on a lightly floured surface, ideally between two sheets of parchment, to about ¼-inch thickness. Cut circles slightly larger than the tart pans and gently press the dough into each pan, trimming away any excess.
- Line each tart shell with parchment paper and fill with baking beans or rice. Prick the dough all over with a fork, place the pans on a baking sheet, and bake for about 30 minutes, until the crusts are lightly golden. Remove from the oven and allow the shells to cool completely on a wire rack.
- In a medium bowl, beat the cream cheese, lemon juice, and powdered sugar until smooth and creamy. In a separate bowl, whip the heavy cream with the vanilla extract until soft peaks form, then gently fold it into the cream cheese mixture until fully combined.
- Divide the cheesecake filling between two or more bowls and add a small amount of gel food coloring to each, mixing until evenly tinted in soft pastel shades.
- Once the tart shells are completely cooled, spoon or pipe the colored cheesecake filling into each shell, filling almost to the top. Refrigerate the tarts for at least 2 hours to firm up and allow the flavors to come together.
- Just before serving, top each tart with mini chocolate eggs or edible flowers for a cheerful Easter finish.
Notes
- Let the tart shells cool completely. If they’re even a little warm, the cheesecake filling can soften too much and won’t hold its shape as nicely.
- Use fully softened cream cheese. This helps the filling mix up smooth and creamy without little lumps.
- Go easy with the food coloring. Gel coloring is strong, so start with the tiniest drop and mix well before adding more.
- Don’t overwhip the cream. Soft peaks are perfect for this recipe and keep the filling light and fluffy once it’s folded into the cream cheese.
- Make them the day before if you can. A few hours in the fridge helps the filling set nicely and gives the flavors time to come together.
- Store leftovers in the refrigerator. Keep the tarts in an airtight container and enjoy them within about 3 days for the best texture.
Nutrition Information:
Yield:
8Serving Size:
1Amount Per Serving: Calories: 820Total Fat: 49gSaturated Fat: 28gUnsaturated Fat: 21gCholesterol: 161mgSodium: 949mgCarbohydrates: 81gFiber: 3gSugar: 41gProtein: 14g