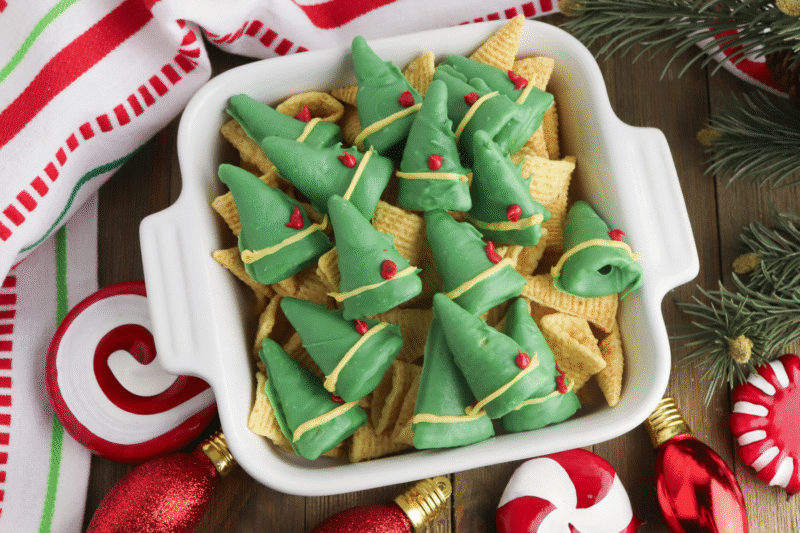
Easy Buddy the Elf Bugles (No-Bake Christmas Treat!)
Every Christmas, I love finding simple, silly, and festive treats that make everyone smile, and these Buddy the Elf Bugles fit that perfectly. They’re crunchy, sweet, and dipped in cheerful colors that look like tiny elf hats. The best part is that they only take a few minutes to make, so they’re great for last-minute holiday fun or a cozy movie night snack while watching Elf.
I’ve always thought the holidays should feel a little magical and a little messy, and that’s exactly what happens when you make these. Melt some candy, dip the Bugles, and let your imagination take over. Kids especially have a blast decorating them, and you’ll end up with a tray full of adorable treats that look like they came straight from Santa’s workshop.
What I love most about these Buddy the Elf Bugles is how easy they are to customize. You can switch up the colors, add sprinkles, or tuck them into small treat bags for gifts. They’re the kind of no-bake recipe that adds instant holiday cheer without any stress, and I can promise they’ll disappear faster than you can say “cotton-headed ninny muggins.”

Ingredients
-
1 (7.5 ounce) package Bugles corn chips – these crunchy cones make the perfect base for our little elf hats.
-
12 ounces green melting chocolate – this gives each Bugle that classic Buddy the Elf look.
-
1/3 cup yellow melting chocolate – you’ll use this to pipe the golden trim around each hat.
-
¼ cup red melting chocolate – this adds the finishing touch with a fun “feather” on the side.

Recipe Instructions
You can find a printable recipe card at the bottom of this post.
1. Melt the green candy melts following the package directions. Dip each Bugle into the melted candy until fully coated, then place them on parchment paper to set and harden.


2. Once the green coating has hardened, melt the yellow candy melts and spoon them into a piping bag.
3. Pipe a thin yellow line across the bottom edge of each Bugle.
4. Next, melt the red candy melts and add them to a piping bag. Pipe a small feather shape on the side of each hat.

5. Let the yellow and red candy decorations cool and harden completely before serving.

Serving & Storing
-
I love serving these on a big platter with other colorful Christmas treats like popcorn mix or dipped pretzels. They look so cheerful together.
-
They make such a fun addition to a holiday movie night snack board, especially if you’re watching Elf.
-
If you’re planning a Christmas party, tuck a few into small cellophane bags and tie them with ribbon for easy take-home treats.
-
Store any leftovers in an airtight container at room temperature. They’ll stay fresh and crunchy for up to a week.
-
Keep them somewhere cool and dry so the candy coating doesn’t melt or get sticky.

Variations
-
Add sprinkles: While the candy coating is still soft, sprinkle on some edible glitter or Christmas sprinkles for extra sparkle.
-
Try different colors: Swap the green for red, blue, or white candy melts to match any holiday theme.
-
Add a drizzle: Once the Bugles are set, drizzle them with melted white chocolate for a fancy touch.
-
Sweet and salty twist: Before dipping, fill the Bugles with a little peanut butter or Nutella for a surprise inside.
-
Minty version: Use green mint-flavored candy melts or add a drop of peppermint extract to the melted chocolate.
-
Elf mix: Toss the finished Bugles with mini marshmallows, red and green M&Ms, and pretzels for a fun snack mix.

Substitutions
-
Bugles: If you can’t find Bugles, try waffle cones broken into small pieces for a similar crunch and shape.
-
Green melting chocolate: White chocolate or almond bark with a few drops of green food coloring works just as well.
-
Yellow melting chocolate: You can melt white chocolate and tint it yellow with food coloring if that’s what you have on hand.
-
Red melting chocolate: Swap in red candy melts, or use white chocolate with a bit of red or pink food coloring for a similar look.
-
Piping bags: If you don’t have one, a zip-top bag with the corner snipped off will do the trick perfectly.

FAQs
Can I make these ahead of time?
Yes! You can make them up to a week in advance. Just store them in an airtight container at room temperature so they stay crisp.
Do I need to refrigerate them?
No, it’s best not to. Refrigeration can cause the candy coating to sweat and lose its smooth finish.
Can I use white chocolate instead of candy melts?
Absolutely. Just add a little vegetable oil or shortening if it’s too thick, and tint it with food coloring if you want bright colors.
How can I keep the Bugles from breaking while dipping?
Handle them gently and dip one at a time. Using a fork or candy-dipping tool helps keep them from cracking.
Can I use microwave-safe bowls to melt the chocolate?
Yes, that’s the easiest way! Just heat in 30-second bursts, stirring between each, until smooth and fully melted.

Buddy the Elf Bugles

These Easy Buddy the Elf Bugles are a fun, no-bake Christmas treat that kids and adults will both love. Crunchy Bugles are dipped in green candy melts, then decorated with yellow trim and a red “feather” to look just like tiny elf hats. Perfect for holiday parties, movie nights, or edible gifts!
Ingredients
- 1 7.5 ounce package Bugles corn chips
- 1 7.5 ounce package Bugles corn chips
- 12 ounces green melting chocolate
- 12 ounces green melting chocolate
- 1/3 cup yellow melting chocolate
- 1/3 cup yellow melting chocolate
- ¼ cup red melting chocolate
- ¼ cup red melting chocolate
Instructions
- Melt the green candy melts following the package directions. Dip each Bugle into the melted candy until fully coated, then place them on parchment paper to set and harden.
- Once the green coating has hardened, melt the yellow candy melts and spoon them into a piping bag.
- Pipe a thin yellow line across the bottom edge of each Bugle.
- Next, melt the red candy melts and add them to a piping bag. Pipe a small feather shape on the side of each hat.
- Let the yellow and red candy decorations cool and harden completely before serving.