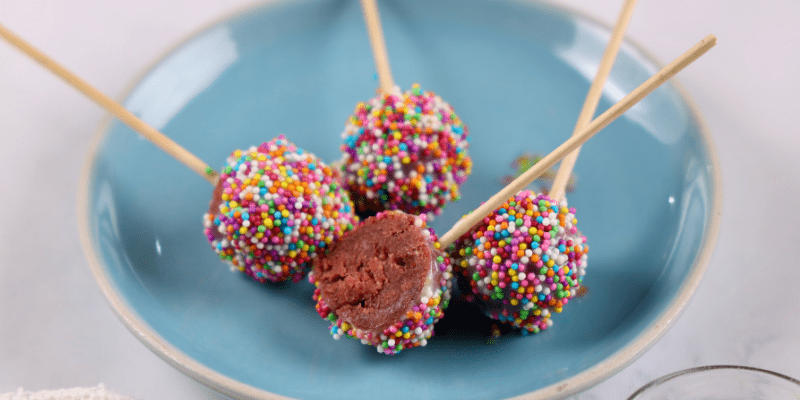
Red Velvet Cake Pops
Red velvet cake is a classic treat that’s always popular, and these Red Velvet Cake Pops bring all the indulgence of the traditional cake into a fun, bite-sized form. I love making these for special occasions or even just when I’m in the mood for something sweet and festive. The soft, moist cake paired with that creamy buttercream frosting creates a perfect combination of flavors that everyone loves. Plus, the added bonus of the bright red color just makes them so cheerful!
The beauty of cake pops is that they’re not only delicious but also super customizable. You can play around with different sprinkles or even drizzle some extra melted white chocolate on top. It’s the little details like these that make cake pops so much fun to make and serve! For me, making these cake pops is the perfect way to spend time with my kids in the kitchen. They love helping roll the cake into balls and sprinkle the toppings, making it a bonding moment as much as a baking adventure.
If you’re looking to impress your friends and family with a treat that’s as beautiful as it is tasty, these Red Velvet Cake Pops are definitely the way to go. Whether for a holiday gathering, birthday party, or just because, they’re sure to be the star of the show.

Ingredients
For the Red Velvet Cake:
- All-purpose flour (¼ cup): This will form the base of your cake and give it the perfect soft texture.
- Sugar (2 tbsp): A little sweetness to balance the richness of the cocoa powder.
- Cocoa powder (1 tsp): Adds a touch of chocolatey goodness to give the red velvet its signature flavor.
- Baking powder (¼ tsp): Helps the cake rise and achieve that light, airy texture.
- Milk (5 tbsp): Moistens the cake and helps bind the ingredients together.
- Apple cider vinegar (½ tsp): This reacts with the baking powder to create a fluffy, tender crumb.
- Butter (melted, 1.5 tbsp): Brings richness and flavor to the cake mix.
- Red food coloring (1 tsp): Gives the cake its vibrant, beautiful red hue.
For the buttercream:
- Sugar (powdered, ¼ cup): This adds the right amount of sweetness and smoothness to the buttercream.
- Butter (room temperature, 50 grams): Creates a creamy, rich frosting that pairs perfectly with the red velvet cake.
- Milk (1 tbsp): Helps achieve the perfect spreadable consistency for the buttercream.
- Vanilla essence (½ tsp): Enhances the flavor of the buttercream with a hint of vanilla.
For the cake pops:
- Prepared red velvet cake: The crumbled cake serves as the base for these irresistible cake pops.
- Prepared buttercream (2 tbsp): The frosting helps bind the cake into perfect, bite-sized balls.
- Wooden sticks: These make it easy to dip and serve your cake pops.
- White chocolate (melted, as required): Coats the cake pops in a sweet, creamy layer and helps hold them together.
- Sprinkles (to garnish): Add a fun, colorful touch to your cake pops for a festive finish.

Recipe Instructions
You can find a printable recipe card at the bottom of this post.
1. Start by making the mug cakes. In a mixing bowl, combine all the ingredients. The mixture should be thick and well-blended.

2. Transfer the batter to a microwave-safe or oven-safe cup.

3. Microwave the mixture for 70 seconds to 1 minute, or until the cake rises. If you’re using an oven, preheat it to 180°C (350°F) and bake the mug cake for 15-20 minutes. Use a toothpick to check if the cake is fully cooked.
4. While the cake is baking, prepare the buttercream. In a bowl, whisk the butter until it forms peaks. If you’re using a hand whisk, this will take about 5 minutes; an electric whisk will make it much quicker.
5. Add the powdered sugar and continue whisking until the texture becomes smooth.

6. Add the milk and vanilla essence, whisking again until the frosting is creamy and smooth.
7. Once the cake is done, remove it from the microwave or oven and allow it to cool to room temperature.
8. When the cake is cool enough, crumble it into a mixing bowl.
9. Add the prepared buttercream frosting to the crumbled cake and mix well.


10. Take small portions of the mixture and roll them into round balls.

11. Dip a wooden stick into the melted white chocolate, then insert it into the center of each cake ball. Refrigerate for about 10 minutes to set.

12. After the cake balls are firm, dip them into the melted white chocolate, covering them evenly. Immediately sprinkle with your choice of sprinkles. Use a Styrofoam block or cake pop stand to keep the cake pops upright.


13. Refrigerate the decorated cake pops for another 15 minutes until they are fully set
14. Once set, your cake pops are ready to enjoy!

FAQs and Top Tips
FAQs:
1. Can I make the red velvet cake in advance?
Yes, you can bake the cake ahead of time! Just let it cool completely, crumble it, and store it in an airtight container until you’re ready to assemble your cake pops.
2. Can I use something other than white chocolate for dipping?
Of course! You can use dark chocolate, milk chocolate, or even colored candy melts for a fun twist. Just make sure the chocolate is melted properly for smooth dipping.
3. How do I prevent the cake pops from falling off the sticks?
To ensure the sticks stay in place, dip them in a little melted chocolate before inserting them into the cake balls. This will create a “glue” effect that holds them in place.
4. How long can I store the cake pops?
Cake pops can be stored in the refrigerator for up to a week. If you want to freeze them, place them in an airtight container and freeze for up to 3 months. Just thaw them in the fridge before serving.
5. Can I use store-bought cake mix for the red velvet cake?
Yes, you can use a store-bought cake mix if you prefer, but I love the homemade version as it adds a fresher, more customized flavor to the cake pops.
Top Tips:
1. Don’t overmix the cake batter:
Overmixing can result in a dense cake. Stir just enough to combine the ingredients and create a smooth batter.
2. Let the cake cool completely:
Make sure the cake is fully cooled before crumbling it. Hot cake will melt the buttercream, making it difficult to form smooth, round cake pops.
3. Keep the cake pops refrigerated:
After dipping the cake pops in chocolate, refrigerate them for at least 15 minutes to help the coating harden. This will ensure they stay intact when you serve them.
4. Use Styrofoam for easy drying:
To keep the cake pops upright while they set, stick the wooden sticks into a piece of Styrofoam. This keeps them from rolling around and ensures the chocolate coating stays neat.
5. Get creative with toppings:
While sprinkles are a classic choice, feel free to experiment with other decorations like edible glitter, crushed nuts, or even mini chocolate chips for added texture and flair!

Red Velvet Cake Pops

These Red Velvet Cake Pops are a delightful twist on the classic red velvet cake, transformed into bite-sized treats that are perfect for any occasion. Made with a moist, soft red velvet cake and creamy buttercream frosting, they’re dipped in melted white chocolate and topped with colorful sprinkles for a fun and festive finish. Easy to make and even easier to enjoy, these cake pops are sure to be a crowd favorite!
Ingredients
For the Red Velvet Cake:
- ¼ cup all-purpose flour
- 2 tbsp sugar
- 1 tsp cocoa powder
- ¼ tsp baking powder
- 5 tbsp milk
- ½ tsp apple cider vinegar
- 1.5 tbsp butter (melted)
- 1tsp red food coloring
For the buttercream:
- ¼ cup sugar (powdered)
- 50 grams butter (room temperature)
- 1 tbsp milk
- ½ tsp vanilla essence
For the cake pops:
- Prepared red velvet cake
- 2 tbsp prepared buttercream
- Wooden sticks
- White chocolate (melted): As required
- Sprinkles: To garnish
Instructions
- Start the recipes by making the mug cakes first. For the mug cakes, mix all the ingredients together. The mixture should be of thick consistency.
- Transfer the mixture to a cup that is microwave/oven friendly.
- Microwave for 70 seconds to 1 minute or until you see the cake rise. If you are using an oven, pre-heat the oven and bake the mug cake at 180°C for 15-20 minutes. Use a toothpick to ensure that the cake is cooked completely.
- While the cake is cooking, let’s prepare the buttercream. Take butter in a bowl and whisk it until it starts forming peaks. If you are using a hand whisk, then it will take you about 5 minutes. If you are using an electric whisk, it should be done in less than half the time.
- Add the sugar next and whisk again. It should turn into a smooth texture.
- Add the milk and vanilla essence and whisk again. You should end up with a smooth textured frosting.
- Once the cake is done, rest it and let it come to room temperature.
- Once the cake is cooled enough, transfer it to a mixing bowl and crumble it.
- Add the prepared buttercream frosting and mix well.
- Take small scoops and make round balls.
- Use a bamboo/ wooden thin stick, dip it in the melted white chocolate and stick it into the prepared balls. Refrigerate for 10 minutes.
- Next, bring them out of the refrigerator and dip the balls in melted white chocolate. Immediately garnish with sprinkles. Use a Styrofoam to keep the cake pops straight.
- Once you have dipped and garnished all the cake pops, refrigerate them for 15 minutes.
- Your cake pops are ready!