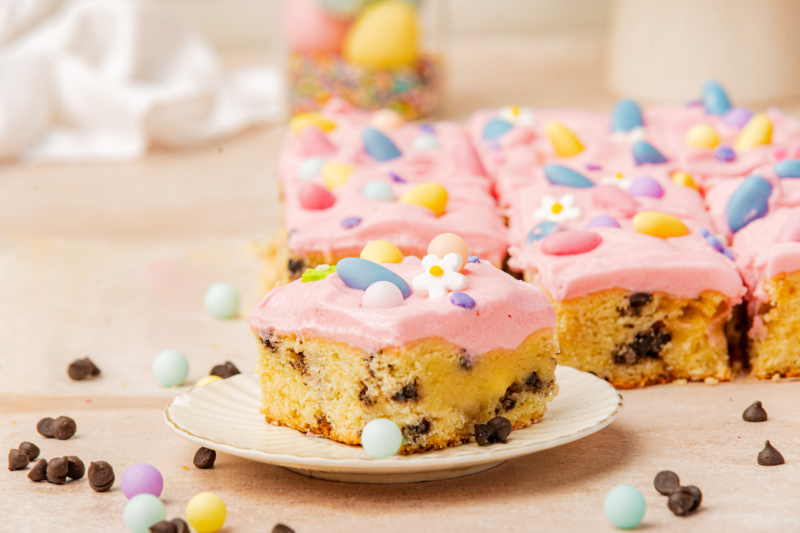
Thick & Chewy Easter Cookie Bars with Buttercream Frosting
If you’re looking for an Easter dessert that feels festive without turning into an all-day baking project, these cookie bars are it. They’ve got that soft, chewy cookie base we all love, packed with chocolate chips and pastel candies, and then topped with a fluffy layer of buttercream that just makes everything better. It’s the kind of treat that looks like you went all out, even though it all comes together in one pan.
I love making these when I need something easy that still feels special. You mix everything in a bowl, press it into a pan, bake, and you’re basically done. Once they’ve cooled, you can keep the frosting simple or have fun with color and sprinkles. They’re perfect for Easter gatherings, school treats, or those days when you just want something sweet on the counter that everyone keeps sneaking slices from.
What really makes these a favorite is how flexible they are. You can swap in your favorite Easter candies, go heavy on the sprinkles, or keep it classic with just chocolate chips and pastel frosting. They slice up beautifully, travel well, and somehow manage to disappear faster than you expect every single time. Honestly, if you want an Easter dessert that feels fun, homemade, and low-stress, this one checks all the boxes.
You might also like:
Why We Love This Recipe
- It’s festive without being fussy. One pan, simple ingredients, and a whole lot of Easter color makes this feel special without extra stress.
- Soft, chewy, and loaded with goodies. The cookie base stays perfectly tender, and every bite has chocolate chips and pastel candy tucked inside.
- That frosting though. Creamy, fluffy buttercream on top takes these from “nice cookie bar” to full-on Easter dessert energy.
- Perfect for sharing. These slice up beautifully, so they’re easy to bring to parties, school events, or just set out on the counter and watch disappear.
- Easy to decorate with kids. Sprinkles, mini eggs, extra candy… this is one of those recipes where little helpers actually make it more fun.
- Make-ahead friendly. You can bake and frost these ahead of time, which is always a win during a busy holiday week.

Equipment
-
9×13-inch baking pan: This gives you nice thick cookie bars that bake evenly and slice up perfectly.
-
Parchment paper: Makes lifting the bars out of the pan so much easier and saves you from any sticking drama.
-
Large mixing bowl: You’ll mix the cookie dough in here, so go with one that gives you plenty of room to stir without flour flying everywhere.
-
Hand mixer or stand mixer: Helps cream the butter and sugar until it’s light and fluffy, which makes the bars soft instead of dense.
-
Rubber spatula: Perfect for folding in the chocolate chips and pastel candies without crushing them.
-
Measuring cups and spoons: Baking is one of those times when eyeballing it just isn’t worth the risk.
-
Offset spatula or butter knife: Makes spreading the frosting smooth and easy, even if you’re not going for a fancy finish.
-
Sharp knife: For slicing clean, neat squares once the bars are fully cooled.
Ingredients
For the Cookie Bars
-
1 cup (226g) unsalted butter, softened: Softened butter is key here, it creams smoothly with the sugar and gives the bars that rich, buttery base.
-
1 cup (200g) granulated sugar: This adds just the right amount of sweetness while helping the cookie bars bake up soft and chewy.
-
2 large eggs: The eggs hold everything together and keep the texture tender instead of crumbly.
-
1 tablespoon vanilla extract: A generous splash of vanilla adds that classic cookie flavor that makes these taste homemade in the best way.
-
2 ½ cups (312g) all-purpose flour: This gives the bars structure without making them dense or dry.
-
1 teaspoon baking soda: Helps the cookie bars rise just enough so they stay soft in the middle.
-
½ teaspoon salt: A little salt balances the sweetness and makes all the flavors pop.
-
1 cup (180g) chocolate chips (semi-sweet or milk): These melt into little pockets of chocolate throughout the bars.
-
1 cup (150g) pastel-colored candy-coated chocolates: These add crunch, color, and that fun Easter look everyone loves.

For the Frosting
-
2/3 cup (150g) butter, softened: This is the base of the frosting and makes it smooth, creamy, and easy to spread.
-
3 1/2 cups (450g) powdered sugar: Powdered sugar gives the frosting its fluffy texture and classic sweetness.
-
Food coloring (gel or powder): Just a few drops turn the frosting into a pretty pastel that feels perfectly Easter-ready.
-
¼ tsp vanilla extract (optional): A little vanilla adds extra flavor, but it’s totally fine to skip if you want a super clean buttercream taste.
-
Sprinkles, mini eggs, pastel color candies: These are where you can really have fun and make the bars as festive as you like.

Recipe Instructions
You can find a printable recipe card at the bottom of this post.
Step 1: Preheat the oven to 350°F (175°C) and line a 9×13-inch baking pan with parchment paper.
Step 2: In a large bowl, beat the butter, granulated sugar, eggs, and vanilla until light and fluffy, about 2 minutes.


Step 3: Add the flour, baking soda, and salt, then mix just until the dough comes together.


Step 4: Gently fold in the chocolate chips and pastel candies until evenly distributed.


Step 5: Press the cookie dough evenly into the prepared pan and sprinkle additional candy pieces over the top.


Step 6: Bake for 22–25 minutes, until the edges are lightly golden and the center is set but still slightly soft.

Step 7: Allow the cookie bars to cool completely in the pan before adding the frosting.
Step 8: In a clean bowl, beat the butter until smooth and creamy. Gradually add the powdered sugar, vanilla, and a few drops of food coloring, beating until light and fluffy.


Step 9: Spread or pipe the frosting over the cooled cookie bars, then decorate with more pastel candies and sprinkles.


Step 10: Slice into squares and serve.

Serving & Storing
-
Let them cool completely before slicing. I know it’s tempting to dig in early, but waiting helps the bars set so you get clean, pretty slices.
-
Serve them at room temperature. The cookie base stays soft and the frosting is perfectly creamy when they’re not too cold.
-
Cut into smaller squares for parties. These are rich, so little squares are perfect for Easter gatherings or dessert tables.
-
Store leftovers in an airtight container. Keep them at room temperature for up to 2 days, or in the fridge for up to 5 days if you want them to last longer.
-
Layer with parchment paper. If you’re stacking the bars, parchment keeps the frosting from sticking and smudging.
-
Bring them back to room temp before serving. If they’ve been chilled, letting them sit out for about 20 minutes makes a big difference in texture.

Variations & Substitutions
-
Switch up the candy. Mini Eggs, pastel M&M’s, chopped chocolate bunnies, or even jelly beans all work great here.
-
Change the chocolate chips. Use milk chocolate for a sweeter bar, dark chocolate for a richer bite, or white chocolate if you want something a little different.
-
Go frosting-free if you want. The cookie bars are delicious on their own if you’re short on time or just not in the mood to frost.
-
Try a different frosting color. Pale pink, soft yellow, mint green, or even a swirl of two colors makes these extra fun for Easter.
-
Make them thicker or thinner. Bake in a smaller pan for thicker bars or a sheet pan for thinner, bakery-style slices.
-
Add a little crunch. Chopped nuts, crushed pretzels, or even toffee bits can be mixed into the dough for extra texture.

Little Tricks That Make a Big Difference
-
Don’t overbake them. Pull the pan out when the edges are just turning golden and the center still looks slightly soft, they’ll set up perfectly as they cool.
-
Press a few candies on top before baking. It makes the bars look extra pretty and gives you that bakery-style finish with zero extra effort.
-
Line the pan with parchment and leave some overhang. You can lift the whole slab out in one piece, which makes frosting and slicing so much easier.
-
Let the bars cool completely before frosting. Warm bars will melt the buttercream, and nobody wants frosting sliding everywhere.
-
Beat the frosting a little longer than you think. An extra minute makes it lighter, fluffier, and easier to spread.
-
Clean the knife between cuts. Wiping it off keeps the frosting neat and gives you clean, picture-perfect squares every time.

FAQs
Can I make these Easter cookie bars ahead of time?
Yes, absolutely. You can bake the bars a day in advance and frost them the next day, or fully frost them and store them until you’re ready to serve.
Do I have to frost them?
Not at all. They’re still soft, chewy, and delicious without frosting if you want to keep things simple.
Can I use different Easter candies?
Definitely. Mini Eggs, pastel M&M’s, chopped chocolate, or any candy you love will work just fine here.
Why do my cookie bars look underbaked in the middle?
That slightly soft center is exactly what you want. They’ll continue to set as they cool and stay chewy instead of dry.
Can I freeze these cookie bars?
Yes. You can freeze the unfrosted bars for up to 2 months. Thaw at room temperature, then frost and decorate when ready.
How do I get clean slices?
Let the bars cool completely, then use a sharp knife and wipe it clean between cuts for neat, tidy squares.

Easter Cookie Bars with Buttercream Frosting

These Easter Cookie Bars are soft, chewy, and loaded with chocolate chips and pastel candies, then topped with a fluffy buttercream frosting and festive sprinkles. Made in one pan with simple ingredients, they’re easy to bake, easy to decorate, and perfect for Easter parties, school treats, or a fun spring dessert everyone will love.
Ingredients
For the Cookie Bars:
- 1 cup (226g) unsalted butter, softened
- 1 cup (200g) granulated sugar
- 2 large eggs
- 1 tablespoon vanilla extract
- 2 ½ cups (312g) all-purpose flour
- 1 teaspoon baking soda
- ½ teaspoon salt
- 1 cup (180g) chocolate chips (semi-sweet or milk)
- 1 cup (150g) pastel-colored candy-coated chocolates
For the Frosting:
- 2/3 cup (150g) butter, softened
- 3 1/2 cups (450g) powdered sugar
- Food coloring (Gel or powder)
- ¼ tsp vanilla extract (optional)
- Sprinkles, mini eggs, pastel color candies
Instructions
- Preheat the oven to 350°F (175°C) and line a 9x13-inch baking pan with parchment paper.
- In a large bowl, beat the butter, granulated sugar, eggs, and vanilla until light and fluffy, about 2 minutes.
- Add the flour, baking soda, and salt, then mix just until the dough comes together.
- Gently fold in the chocolate chips and pastel candies until evenly distributed.
- Press the cookie dough evenly into the prepared pan and sprinkle additional candy pieces over the top.
- Bake for 22–25 minutes, until the edges are lightly golden and the center is set but still slightly soft.
- Allow the cookie bars to cool completely in the pan before adding the frosting.
- In a clean bowl, beat the butter until smooth and creamy. Gradually add the powdered sugar, vanilla, and a few drops of food coloring, beating until light and fluffy.
- Spread or pipe the frosting over the cooled cookie bars, then decorate with more pastel candies and sprinkles.
- Slice into squares and serve.
Notes
- Don’t overbake the cookie bars, they should look just set in the center when you pull them from the oven.
- Let the bars cool completely before frosting to keep the buttercream from melting.
- Gel food coloring works best for vibrant pastel shades without thinning the frosting.
- Line the pan with parchment paper and leave a little overhang so the bars lift out easily.
- These bars can be made without frosting if you prefer a simpler cookie bar.
- For clean slices, wipe the knife between cuts, especially once the frosting is on.
Nutrition Information:
Yield:
16Serving Size:
1Amount Per Serving: Calories: 689Total Fat: 31gSaturated Fat: 19gUnsaturated Fat: 12gCholesterol: 83mgSodium: 259mgCarbohydrates: 101gFiber: 2gSugar: 85gProtein: 4g