This Creamy Coconut Poke Cake Is Pure Tropical Comfort
There are some days when I just want a dessert that feels a little special without turning my kitchen upside down, and this one fits right in. It’s the kind of treat I can pull together between school runs and dinner prep, using simple ingredients I usually already have on hand. My kids get excited the minute they see it in the fridge, and honestly, I love knowing I didn’t have to spend a fortune to make something that feels this indulgent.
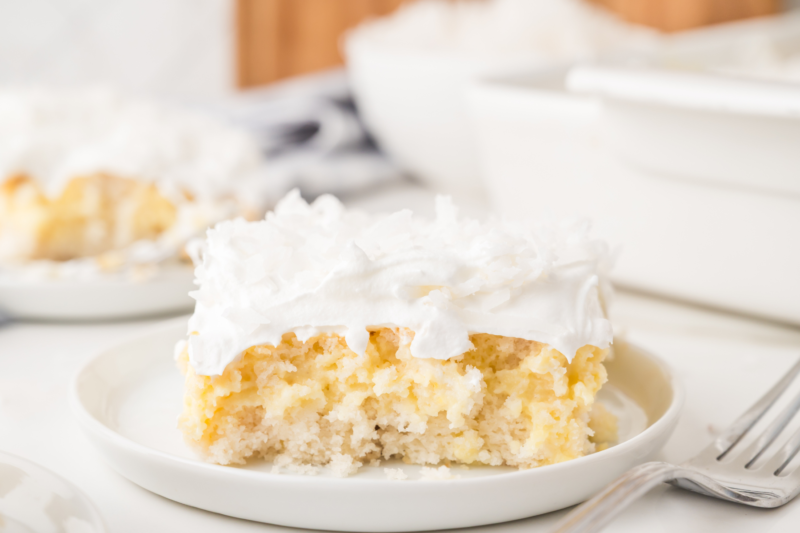
I’ve always had a soft spot for anything coconut, and this recipe really delivers that creamy, cozy flavor in every bite. The cake soaks up that rich filling and turns into something soft and comforting, and it holds up beautifully in the fridge, which makes it so handy for busy weeks. It’s also one of those desserts that tastes even better after a little chill time, so I can make it ahead and not worry about it later.
This is the kind of recipe I come back to again and again when I need something easy that still feels homemade. It’s great for family dinners, get-togethers, or just a quiet night when you want a little treat after a long day. If you’re after something simple, affordable, and guaranteed to disappear quickly, this one’s definitely worth adding to your regular rotation.
Why We Love This Recipe
- So easy to throw together: It starts with a simple cake mix, so you’re not spending ages measuring and mixing when time’s tight.
- Budget-friendly ingredients: Everything here is easy to find and doesn’t cost much, which makes it a great option for feeding a crowd without overspending.
- Perfect make-ahead dessert: You can pop it in the fridge and forget about it for a couple of hours, which is a lifesaver on busy days.
- Super moist and creamy: The coconut filling soaks right in, so every bite stays soft and full of flavor, even the next day.
- Great for sharing: It makes a big tray, so it’s ideal for family get-togethers, potlucks, or when the kids have friends over.
- A little taste of something special: It feels like a treat without needing fancy ingredients, and that’s always a win in my kitchen.

Equipment
- 9×13-inch baking dish: This is perfect for baking the cake evenly and gives you plenty of servings for the whole family.
- Mixing bowl: You’ll need a good-sized bowl to quickly stir together the cake batter without making a mess.
- Whisk or wooden spoon: Either works well for mixing everything until smooth and combined.
- Measuring cups: Handy for keeping everything accurate, especially when you’re trying to avoid wasting ingredients.
- Fork or skewer: This is what you’ll use to poke holes in the cake so all that creamy coconut mixture can soak right in.
- Small mixing bowl: Useful for whisking together the coconut milk and pudding before pouring it over the cake.
- Spatula: Makes it easy to spread the topping evenly without pulling up the soft cake underneath.

Ingredients
- 1 (15.25 ounce) white cake mix: This keeps things simple and gives you a soft, fluffy base without a lot of extra work.
- 1 cup water: Helps bring the batter together so everything mixes up nice and smooth.
- ¼ cup vegetable oil: Adds moisture so the cake stays tender and doesn’t dry out.
- ¼ cup coconut yogurt: Gives a gentle coconut flavor and helps make the cake extra soft.
- 1 (15 ounce) can coconut milk: Soaks into the cake and adds that rich, creamy coconut taste in every bite.
- 1 (3.4 ounce) package coconut cream instant pudding mix: Thickens the filling and makes it wonderfully creamy without any fuss.
- 1 (8 ounce) container cool whip, thawed: Adds a light, fluffy topping that’s quick and easy to spread.
- 1 cup sweetened shredded coconut: Sprinkled on top for a little texture and an extra boost of coconut flavor.

Recipe Instructions
You can find a printable recipe card at the bottom of this post.
Step 1: Start by preheating your oven to 350℉ and greasing your baking dish with butter.
Step 2: Then stir together the cake mix, water, vegetable oil, and yogurt.


Step 3: Pour the cake batter into your greased baking dish and bake for about 30 minutes.

Step 4: Once the cake is done in the oven, poke holes all throughout the cake, about 1 inch apart.


Step 5: Then whisk together the coconut milk and coconut pudding mix until smooth and pour into the holes in the cake.


Step 6: Place the cake in the fridge and let chill for at least 2 hours.
Step 7: After the two hours, and once the pudding has thickened, top the cake with cool whip and coconut shreds before slicing and serving!


Serving & Storing
- Serve it chilled: This cake really shines after it’s had time to sit in the fridge, so I like to serve it nice and cold straight from the dish.
- Cut into simple squares: It’s easy to slice and serve, which makes it great for busy evenings or when you’ve got a few extra mouths to feed.
- Add a little extra topping if you like: A sprinkle of extra coconut or even a few berries on top can make it feel a bit more special without much effort.
- Store in the fridge: Keep any leftovers covered in the fridge, and it’ll stay fresh and creamy for up to 3 days.
- Perfect for making ahead: You can make this earlier in the day or even the night before, which takes one thing off your plate when you’ve got a lot going on.
- Keep it covered well: I usually pop a lid on the dish or use wrap so it doesn’t dry out or pick up any fridge smells.

Variations & Substitutions
- Swap the yogurt if needed: If you don’t have coconut yogurt, plain or vanilla yogurt works just fine and still keeps the cake nice and soft.
- Use a different cake mix: A yellow cake mix or even a coconut-flavored one can change things up a bit while still keeping it simple.
- Try homemade whipped cream: If you prefer, you can use freshly whipped cream instead of Cool Whip for a more from-scratch feel.
- Add a fruity twist: A layer of crushed pineapple or a handful of berries on top can give it a fresh, summery flavor.
- Adjust the coconut level: If your family isn’t big on coconut texture, you can sprinkle less on top or leave it off altogether.
- Make it dairy-free: Use a dairy-free whipped topping and double-check your pudding mix to keep everything suitable for your needs.

Little Tricks That Make a Big Difference
- Let the cake cool slightly before poking: If it’s too hot, it can fall apart, but just a little cooling time helps it hold together nicely.
- Don’t rush the poking step: Take a minute to space the holes evenly so that creamy filling soaks into every bite.
- Pour the filling slowly: Giving it a moment to soak in as you go helps prevent it from pooling on top.
- Chill it long enough: It really needs that fridge time to set properly, and it’s worth the wait for that soft, creamy texture.
- Spread the topping gently: The cake will be very soft, so using a light hand keeps everything looking neat.
- Toast the coconut if you have time: A quick toast in a pan adds a little extra flavor and makes it feel just a bit more special.

What to Serve with Coconut Poke Cake
- Fresh berries on the side: A handful of strawberries or raspberries adds a nice fresh contrast to all that creamy coconut.
- A simple scoop of vanilla ice cream: This turns it into a more indulgent dessert without any extra work.
- Hot coffee or tea: Something warm balances the sweetness and makes it feel like a cozy little treat after dinner.
- Light fruit salad: If you’re serving this for a get-together, a bowl of mixed fruit keeps things from feeling too heavy.
- A drizzle of chocolate or caramel: Just a little on top can make it feel extra special for birthdays or celebrations.
- Whipped cream on the side: Great if you’ve got a few big sweet tooths in the family who like an extra fluffy topping.

FAQs
Can I make coconut poke cake ahead of time?
Yes, this is actually a great make-ahead dessert. It needs time to chill, so making it a few hours in advance or even the night before works perfectly.
How long does coconut poke cake last in the fridge?
It will stay fresh for about 3 days when covered and stored in the fridge. After that, it can start to lose its texture.
Can I freeze coconut poke cake?
You can freeze it, but the texture may change a little once thawed because of the creamy filling and topping. If you do freeze it, wrap it tightly and thaw it in the fridge.
What makes a poke cake so moist?
The holes allow the filling to soak deep into the cake, which keeps it soft and full of flavor instead of drying out.
Can I use homemade whipped cream instead of Cool Whip?
Yes, homemade whipped cream works just fine and gives it a more from-scratch feel. Just make sure it’s whipped to a nice, stable texture before spreading.
Do I have to use coconut pudding mix?
No, you can use vanilla pudding if that’s what you have on hand. It will still be creamy and delicious, just with a milder coconut flavor.
Can I make this cake dairy-free?
Yes, you can swap in dairy-free whipped topping and check that your pudding mix and cake mix fit your needs.
Why didn’t my filling soak into the cake?
This usually happens if the cake wasn’t poked enough or the holes weren’t deep enough. Make sure to poke plenty of holes so the mixture can soak in properly.

Creamy Coconut Poke Cake

A soft and creamy coconut poke cake that’s simple to make and perfect for sharing. Made with a fluffy cake base, rich coconut filling, and a light whipped topping, this chilled dessert is full of flavor and comes together with budget-friendly ingredients. Great for family dinners, potlucks, or any time you want an easy make-ahead treat.
Ingredients
- 1 (15.25 ounce) white cake mix
- 1 cup water
- ¼ cup vegetable oil
- ¼ cup coconut yogurt
- 1 (15 ounce) can coconut milk
- 1 (3.4 ounce) package coconut cream instant pudding mix
- 1 (8 ounce) container cool whip, thawed
- 1 cup sweetened shredded coconut
Instructions
- Start by preheating your oven to 350℉ and greasing your baking dish with butter.
- Then stir together the cake mix, water, vegetable oil, and yogurt.
- Pour the cake batter into your greased baking dish and bake for about 30 minutes.
- Once the cake is done in the oven, poke holes all throughout the cake, about 1 inch apart.
- Then whisk together the coconut milk and coconut pudding mix until smooth and pour into the holes in the cake.
- Place the cake in the fridge and let chill for at least 2 hours.
- After the two hours, and once the pudding has thickened, top the cake with cool whip and coconut shreds before slicing and serving!
Notes
- Let the cake cool slightly before poking holes so it holds together and doesn’t crumble.
- Use the handle of a wooden spoon or a thicker skewer to make evenly spaced holes that will hold plenty of filling.
- Pour the coconut mixture slowly over the cake to give it time to soak in properly.
- Make sure the cake chills for at least 2 hours so the filling can set and the texture turns nice and creamy.
- Spread the topping gently since the cake will be very soft after soaking.
- Toast the shredded coconut in a dry pan for a few minutes if you’d like a little extra flavor on top.
- Keep leftovers covered in the fridge and enjoy within 2 to 3 days for the best texture.
Nutrition Information:
Yield:
12Serving Size:
1Amount Per Serving: Calories: 219Total Fat: 16gSaturated Fat: 10gUnsaturated Fat: 6gCholesterol: 1mgSodium: 120mgCarbohydrates: 18gFiber: 2gSugar: 11gProtein: 2g


