2-Ingredient Reese’s Cookie Cups You’ll Make on Repeat
If you’re anything like me, there are days when you just want a warm, gooey treat without dragging out half the pantry. That’s exactly why I adore these 3-ingredient Reese’s cookie cups. They’re the kind of little dessert that looks like you spent way more time on them than you actually did, and honestly, they always get a big “wow” when you set them out. You can whip up a batch while dinner’s in the oven, during a commercial break, or right before friends pop over. They’re that easy.
What really seals the deal is the melty peanut butter cup tucked inside each warm cookie. It softens just enough to get all cozy and chocolatey, and suddenly you’ve got this dreamy, bite-size treat no one can resist. I find myself making them for everything from last-minute bake sales to movie nights at home, and they disappear every single time. Trust me, once you try them, you’ll be hooked too.
If you’re as peanut-butter-obsessed as I am, you’ll probably want to check out a few more of my Reese’s favorites too. I’ve got Reese’s Muddy Buddies for a quick snack fix, Reese’s Pieces Protein Bars for something a little more wholesome, and my over-the-top 7 Layer Reese’s Bars when you’re really in the mood to indulge. They all hit that same chocolate-and-peanut-butter sweet spot, so feel free to click around and find your next treat!
Why we love this recipe
• Only two ingredients: You can throw these together in minutes with almost no prep.
• Crowd-pleasing flavor: That warm cookie base and melty Reese’s center never fail to impress.
• Perfect for any occasion: Great for parties, bake sales, holidays, or a last-minute dessert fix.
• Kid- and adult-approved: Everyone loves a bite-size treat that’s fun to eat.
• Foolproof to make: No special skills needed, and they turn out delicious every time.
Ingredients
- 1 package Reese’s cookie dough (24-count): This gives you perfectly portioned dough that bakes into soft, golden cookie cups every time.
- 24 mini Reese’s peanut butter cups: These melt into the warm cookies and create that irresistible chocolate-peanut-butter center.

Recipe Instructions
You can find a printable recipe card at the bottom of this post.
Step 1: Preheat your oven to 350°F and lightly coat a mini muffin pan with nonstick spray.
Step 2: Roll the cookie dough pieces into small balls and place one ball into each muffin cup.

Step 3: Bake for 10 to 14 minutes, or until the edges turn golden brown.
Step 4: As soon as the cookies come out of the oven, press a peanut butter cup into the center of each one.

Step 5: Let the cookies cool in the pan before removing and serving.

Serving & Storing
Serving
- Serve slightly warm: The centers get extra soft and melty when they’re still a little warm.
- Add a fun topping: A drizzle of melted chocolate or a sprinkle of crushed peanuts makes them extra cute.
- Pair with something cold: A glass of milk or a scoop of vanilla ice cream takes them over the top.
- Perfect for sharing: Set them out on a platter and watch them disappear fast.
Storing
- Store in an airtight container: They’ll stay soft and fresh at room temperature for up to 4 days.
- Refrigerate for longer storage: If you want them to last up to a week, pop the container in the fridge.
- Freeze for later: These freeze beautifully for up to 2 months, so make a double batch and save some.
- Warm before eating: A quick 5–10 seconds in the microwave brings back that fresh-baked softness.

Variations
- Try different cookie dough: Swap in sugar cookie, chocolate chip, or peanut butter dough for a fun twist.
- Use seasonal Reese’s cups: Holiday shapes or flavored versions add a cute, festive touch.
- Add a chocolate drizzle: Melted chocolate or white chocolate on top gives them a bakery-style finish.
- Mix in candy pieces: Press a few Reese’s Pieces or mini chocolate chips into the tops for extra crunch.
- Make them jumbo-sized: Use a regular muffin pan for oversized cookie cups with an even gooier center.

Substitutions
- Swap the cookie dough: Any store-bought dough works, like chocolate chip, sugar cookie, or peanut butter.
- Use mini chocolate candies: If you’re out of Reese’s cups, mini peanut butter cups from other brands work just as well.
- Try nut-free options: Use a mini chocolate candy or caramel-filled chocolate for a peanut-free alternative.
- Go homemade: If you prefer, roll your own cookie dough instead of using store-bought.
- Switch to dark chocolate: Dark chocolate peanut butter cups add a richer, less-sweet flavor.

FAQs
Can I use regular-sized Reese’s cups instead of mini?
You can, but you’ll need to use a regular muffin pan and slightly increase the bake time to fit the bigger size.
Do I need to chill the cookie dough first?
Nope. Store-bought dough works perfectly straight from the package without any chilling.
Why did my cookie cups stick to the pan?
Make sure the muffin pan is well-greased. You can also use mini cupcake liners for easy release.
Can I make these ahead of time?
Absolutely. Bake them a day in advance and store them in an airtight container. They’ll stay soft and delicious.
Can I freeze the finished cookie cups?
Yes. Freeze them in a single layer, then move them to a freezer bag. They thaw quickly and taste just as good.
How do I keep the peanut butter cups from melting too much?
Press them in gently right after baking, then let the cookie cups cool in the pan. This helps them set nicely.

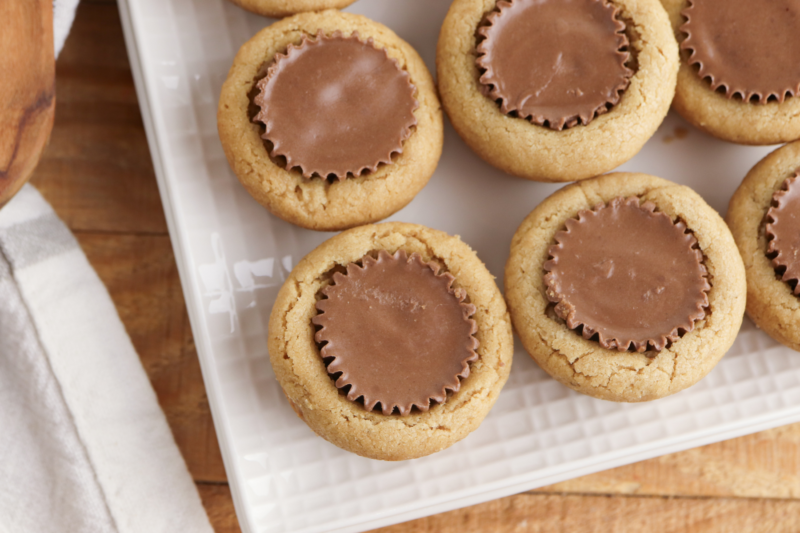
Reese’s Cookie Cups

These 2-Ingredient Reese’s Cookie Cups are the easiest bite-size treats you’ll ever make. Soft, golden cookie dough hugs a melty mini Reese’s cup in the center, creating an irresistible chocolate-peanut-butter combo everyone loves. Perfect for parties, bake sales, or a quick sweet fix.
Ingredients
- 1 package Reese’s cookie dough (24-count)
- 24 mini Reese’s peanut butter cups
Instructions
- Preheat your oven to 350°F and lightly coat a mini muffin pan with nonstick spray.
- Roll the cookie dough pieces into small balls and place one ball into each muffin cup.
- Bake for 10 to 14 minutes, or until the edges turn golden brown.
- As soon as the cookies come out of the oven, press a peanut butter cup into the center of each one.
- Let the cookies cool in the pan before removing and serving.
Notes
- Spray the pan well: A little nonstick spray helps the cookie cups pop out cleanly.
- Press gently: When adding the Reese’s cup, push just until it settles into the warm cookie.
- Cool before removing: Letting them sit in the pan helps them firm up and hold their shape.
- Watch the bake time: Every oven is different, so pull them out as soon as the edges turn golden.
- Store airtight: They stay soft and chewy for several days when stored properly.