20+ Patriotic Memorial Day Desserts
Memorial Day is such a meaningful holiday, a time to honor and remember those who served while gathering with family and friends to enjoy the beginning of summer. One of the sweetest ways to add a festive touch to the day is with patriotic desserts decked out in red, white, and blue. They’re fun, colorful, and always a hit at any get-together.
This list of 20 patriotic Memorial Day desserts is full of treats that are both eye-catching and delicious. From berry-packed pies to star-shaped cookies and flag-inspired cakes, there’s something for every level of baker. Some are quick and easy, perfect if you’ve got lots to prep, while others let you get a little more creative in the kitchen.
Dessert might not be the main event of the day, but it sure does make things feel extra special. Whether you’re planning a backyard cookout or a quiet meal with loved ones, these sweet treats help bring a festive and thoughtful touch to the table. And if they happen to disappear fast – well, that’s always a good sign.
1. Red, White & Blue S’mores Dip

If you’re looking for a fun and delicious way to celebrate Memorial Day, this Patriotic S’mores Dip is a must-try! Combining classic s’mores flavors with a festive twist, it’s the perfect snack for your summer gatherings. With gooey marshmallows, melty chocolate, and crunchy graham crackers, it’s a treat that will have everyone coming back for more!
You can read more about this recipe and get a printable recipe card here.
Servings: 10
Ingredients:
- 4 (1.55 ounce) Hershey’s bars
- 19 square shaped marshmallows (jet puffed smore marshmallows)
- 1 cup water
- Red, white, and blue sanding sugar
- Graham crackers, for serving
Instructions:
- Preheat oven to 450 degrees.
- In an 8×8 square pan, place down your chocolate bars to cover the bottom of the pan.
- Dip 5 marshmallows in water and roll them in the blue sanding sugar.
- Place on parchment paper to dry.
- Repeat this process to make 6 red marshmallows and 8 white marshmallows.
- Place marshmallows on the chocolate to form a flag.
- Bake for 8 to 10 minutes watching very closely. You want the chocolate to melt but you do not want your marshmallows to burn.
- Serve with graham crackers for dipping.
2. Red, White, and Blue Drunken Cherries

These Red, White & Blue Drunken Cherries are the ultimate Memorial Day treat! With just 4 simple ingredients, they’re the perfect way to add a festive touch to your holiday spread. The combination of vodka-soaked cherries, creamy white chocolate, and colorful sprinkles makes them a fun and flavorful addition to any BBQ or gathering. They’re easy to make ahead, so you can spend more time enjoying the day with family and friends!
You can read more about this recipe and get a printable recipe card here.
Servings: About 36 cherries
Ingredients:
- 2 Jars Maraschino Cherries with Stems (10 ounces each)
- 12 Ounces Whipped Cream Vodka
- ⅓ Cup White Chocolate Chips
- 2 Ounces Red White and Blue Nonpareils
Instructions:
-
Pour both jars of maraschino cherries into a bowl. Pick out any cherries that don’t have stems or are broken, like halves or any that won’t be good for dipping.
-
Transfer the good cherries into a mason jar. Pour the vodka over the cherries, making sure they’re completely covered.
-
Seal the jar and place it in the fridge overnight to allow the cherries to soak up the vodka.
-
After the cherries have soaked, drain them and gently lay them out on paper towels. Pat them dry to remove any excess moisture.
-
Place the white chocolate chips in a small microwave-safe bowl. Microwave in 30-second intervals, stirring each time, until the chocolate is smooth and lump-free (about 1 ½ minutes total).
-
Pour the red, white, and blue nonpareils into a small bowl and line a plate or small sheet pan with parchment paper.
-
Using the stem, pick up one cherry at a time and dip the bottom half into the melted white chocolate. Gently run the bottom of the cherry along the edge of the bowl to remove any excess chocolate.
-
Immediately dip the cherry into the nonpareils, then place it onto the parchment paper. Repeat this process with all the cherries.
-
Allow the cherries to sit for about 5 minutes to let the chocolate harden. Most of them will dry by the time you’re done, but this will give the last ones a chance to set. Enjoy!
3. Vegan Berry Frojo Cups

These Vegan Berry Frojo Cups are such a fun little treat – and honestly, kind of a lifesaver when the weather’s warm and everyone’s craving something cool. I used sweetened coconut yogurt for a creamy, tropical vibe, but any vegan yogurt you like will work. Just blend it with a handful of berries, freeze it in mini cups, and boom – cute, patriotic treats that also happen to be dairy-free.
You can read more about this recipe and get a printable recipe card here.
Servings: 6-8
Ingredients:
- 1 cup vegan yogurt (I used sweetened coconut yogurt)
- ¼ cup blueberries
- ¼ cup raspberries
Instructions:
-
Spoon the yogurt into mini cupcake liners, filling each about ¾ of the way.
-
Top each yogurt cup with berries.
-
Place the cups in the freezer and freeze for at least 2-3 hours.
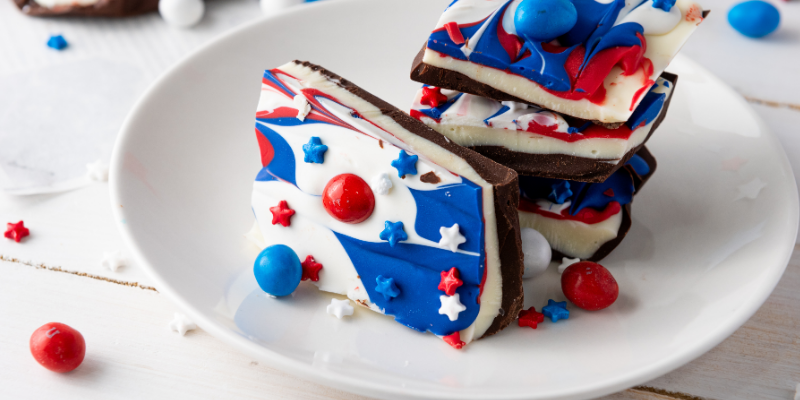
4. Red, White & Blue Chocolate Bark
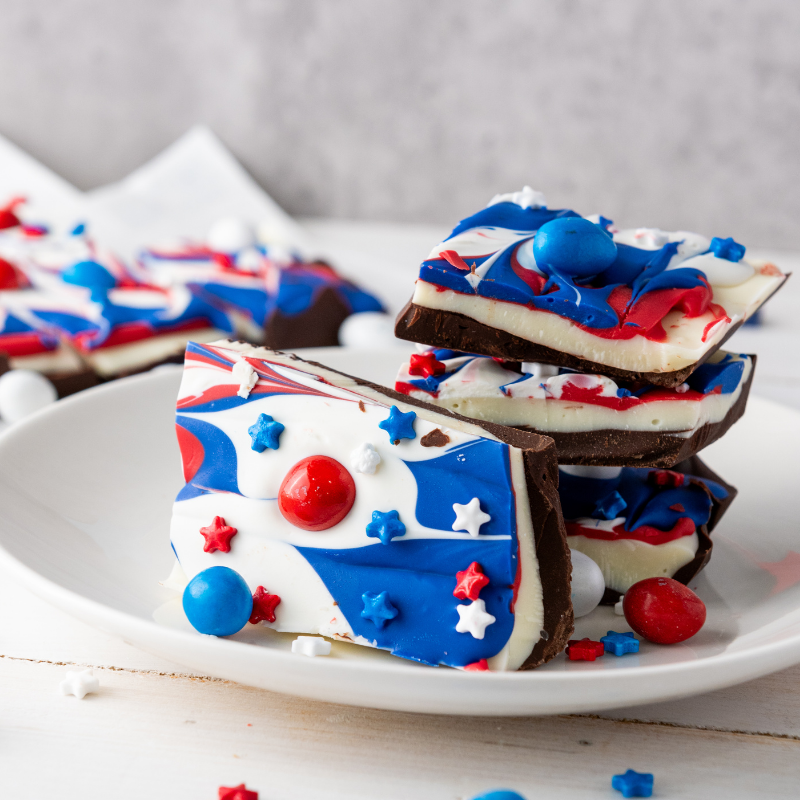
This Red, White & Blue Chocolate Bark is one of those desserts that looks super impressive but is actually really easy to throw together. I love how the colorful swirls and sprinkles make it feel so festive – and the kids always go straight for the M&Ms on top. It’s a fun one to make ahead and break into pieces just before serving (though a few pieces always seem to disappear early around here).
You can read more about this recipe and get a printable recipe card here.
Servings: 12
Ingredients:
- 2 cups white chocolate morsels
- 2 cups semi-sweet chocolate morsels
- 1/2 cup red candy melts
- 1/2 cup white candy melts
- 1/2 cup blue candy melts
- 1 tbsp red, white, and blue star sprinkles
- 1/4 cup red, white, and blue M&Ms
Instructions:
- Line a 13×9 baking tray with parchment paper to prevent sticking.
- Begin by melting the semi-sweet chocolate morsels. You can do this in a microwave in 30-second bursts, stirring between each, until smooth.
- Pour the melted semi-sweet chocolate onto the prepared tray, spreading it into an even layer.
- Allow this layer to harden completely. You can speed up this process by placing the tray in the refrigerator.
- Melt the white chocolate morsels using the same method as before. Once melted, pour it over the hardened semi-sweet chocolate layer.
- Let this white chocolate layer harden completely before proceeding.
- Melt the red, white, and blue candy melts separately. You can use small piping bags or a spoon to drizzle each color over the hardened white chocolate layer.
- Use a toothpick to swirl the colors gently, creating a marbled effect. Do this before the candy melts harden to ensure a smooth pattern.
- Sprinkle the red, white, and blue star sprinkles and M&Ms over the top while the candy melts are still slightly soft to ensure they stick.
- Allow the entire tray to harden completely, either at room temperature or in the refrigerator if you’re in a hurry.
- Once fully set, lift the bark out of the tray using the edges of the parchment paper and break it into pieces by hand.
- Your colorful chocolate bark is ready to be served! Store any leftovers in an airtight container at room temperature or in the fridge.
5. Patriotic Popcorn
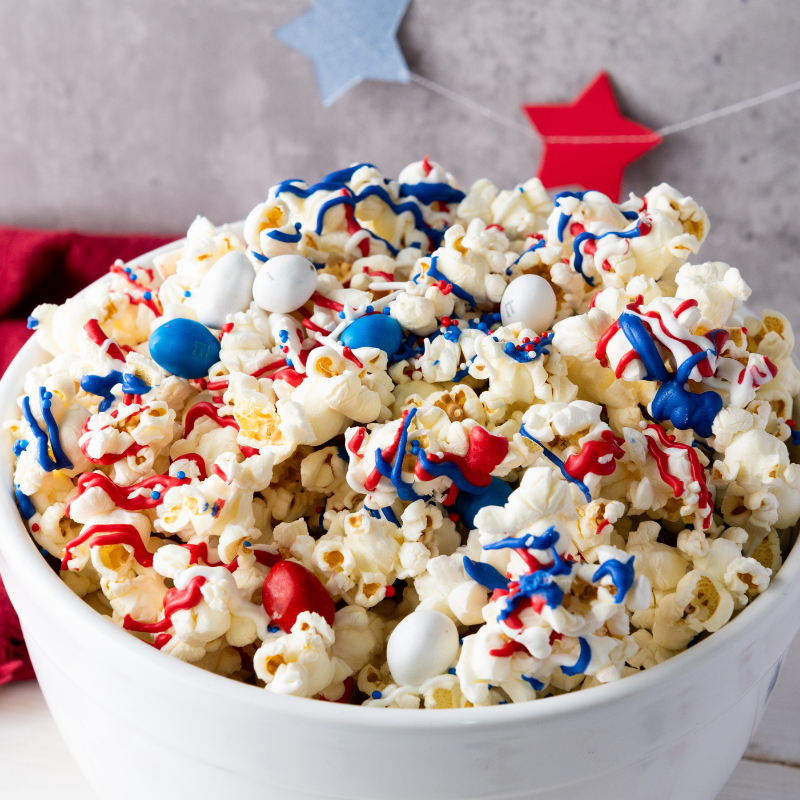
Patriotic Popcorn is one of my favorite snacks to make for Memorial Day because it’s just the right mix of salty, sweet, and so fun to look at. It works really well as a low-key dessert too. I usually make a big batch the night before and let the kids help with the drizzling and sprinkling – it gets a little messy, but they love it. The red, white, and blue candy melts give it that festive flair, and the M&Ms and sprinkles make it totally party-worthy. It never lasts long once it hits the table!
You can read more about this recipe and get a printable recipe card here!
Servings: 8
Ingredients:
- 1/2 cup popcorn kernels
- 1/4 cup red candy melts
- 1/4 cup white candy melts
- 1/4 cup blue candy melts
- 1/4 cup M&Ms (preferably red, white, and blue)
- 1 tbsp sprinkles (stars and stripes themed if available)
Instructions:
- Use an air popper to pop the 1/2 cup of popcorn kernels according to the manufacturer’s instructions.
- Alternatively, place the popcorn kernels in a brown paper bag, fold the top over a few times to seal it, and microwave on high for 2-3 minutes or until the popping slows to about 5 seconds between pops.
- Place the red, white, and blue candy melts in separate microwave-safe bowls. Microwave each bowl for 1 minute, stir, and continue microwaving in 30-second intervals, stirring in between, until fully melted. Transfer each color to a separate small piping bag or a zip-top bag with a tiny corner snipped off for drizzling.
- Spread the popped popcorn on a large baking sheet lined with parchment paper. Drizzle the melted red, white, and blue candy melts over the popcorn in a back-and-forth motion.
- While the candy is still melted, sprinkle the M&Ms and decorative sprinkles evenly over the popcorn to ensure they stick.
- Allow the candy melts to harden at room temperature, which should take about 15-20 minutes. You can also place the tray in the refrigerator for about 10 minutes to speed up the hardening process.
- Once the candy has set, break the popcorn into clusters. Serve in a large bowl or distribute into individual serving bags for a party.
6. Patriotic Jell-O Shots (Non-Alcoholic)

These Patriotic Jell-O Shots (non-alcoholic, of course) are always such a hit with both kids and adults. They’re layered with bright red, white, and blue, and topped with whipped cream and sprinkles – so fun and festive! They do take a little time to chill between layers, but they’re totally worth the wait. I usually make them the night before so they’re all set and ready to go by party time. Honestly, they disappear faster than I can say “don’t eat them yet!”
You can read more about this recipe and get a printable recipe card here.
Servings: 40-50
Ingredients:
Blue Layer (Bottom):
- 1 box of blue Jell-O (e.g., berry blue)
- 1 cup boiling water
- 1 cup cold water
White Layer (Middle):
- 2 packets of unflavored gelatin
- ½ cup cold water (for blooming the gelatin)
- 1 cup boiling water
- 1 can (14 oz) sweetened condensed milk
Red Layer (Top):
- 1 box of red Jell-O (e.g., cherry or strawberry)
- 1 cup boiling water
- 1 cup cold water
For Garnish:
- Whipped cream
- Red, white, and blue sprinkles
Instructions:
Blue Layer (Bottom):
- Dissolve the blue Jell-O in 1 cup of boiling water.
- Mix in 1 cup cold water.
- Pour the mixture into 1 oz shot glasses, filling up to one-third of the way. Place in the refrigerator to set for 2-3 hours.
White Layer (Middle):
- Sprinkle 2 packets of unflavored gelatin over ½ cup of cold water. Let it sit for a few minutes to “bloom.”
- Add 1 cup boiling water and stir until the gelatin is completely dissolved.
- Stir in the sweetened condensed milk until well mixed. Allow the mixture to cool to room temperature.
- Once the blue layer is set, gently pour the white gelatin mixture over it, filling another third of the glasses. Return to the refrigerator and let set for another 2-3 hours.
Red Layer (Top):
- Dissolve the red Jell-O in 1 cup of boiling water.
- Mix in 1 cup cold water.
- Once the white layer is set, carefully add the red layer on top, filling up to the top of the glasses. Refrigerate until set, about 2-3 hours or overnight for best results.
Garnish:
- Just before serving, top each Jell-O shot with a small dollop of whipped cream.
- Sprinkle red, white, and blue sprinkles over the whipped cream for a festive finish.
7. Patriotic Jell-O Shots (Alcoholic)

If you’re planning a grown-up version of your Memorial Day celebration, these Patriotic Jell-O Shots are such a fun little addition. They’ve got all the festive flair of the non-alcoholic version, but with a little boozy twist that makes them extra party-ready. The red, white, and blue layers come together beautifully – and yes, the whipped cream and sprinkles on top are totally necessary! Just make sure to give them plenty of time to chill between layers (I’ve rushed it before and, well… let’s just say it wasn’t my neatest batch).
You can read more about this recipe and get a printable recipe card here!
Servings: 40-50
Ingredients:
Blue Layer (Bottom):
- 1 box of blue Jell-O (e.g., berry blue)
- 1 cup boiling water
- ½ cup cold water
- ½ cup vodka
White Layer (Middle):
- 2 packets of unflavored gelatin
- ½ cup cold water (for blooming the gelatin)
- 1 cup boiling water
- 1 can (14 oz) sweetened condensed milk
Red Layer (Top):
- 1 box of red Jell-O (e.g., cherry or strawberry)
- 1 cup boiling water
- ½ cup cold water
- ½ cup vodka
For Garnish:
- Whipped cream
- Red, white, and blue sprinkles
Instructions:
Blue Layer (Bottom):
- Dissolve the blue Jell-O in 1 cup of boiling water.
- Mix in ½ cup vodka and ½ cup cold water.
- Pour the mixture into 1 oz shot glasses, filling up to one-third of the way. Place in the refrigerator to set for 2-3 hours.
White Layer (Middle):
- Sprinkle 2 packets of unflavored gelatin over ½ cup of cold water. Let it sit for a few minutes to “bloom.”
- Add 1 cup boiling water and stir until the gelatin is completely dissolved.
- Stir in the sweetened condensed milk until well mixed. Allow the mixture to cool to room temperature.
- Once the blue layer is set, gently pour the white gelatin mixture over it, filling another third of the glasses. Return to the refrigerator and let set for another 2-3 hours.
Red Layer (Top):
- Dissolve the red Jell-O in 1 cup of boiling water.
- Mix in ½ cup vodka and ½ cup cold water.
- Once the white layer is set, carefully add the red layer on top, filling up to the top of the glasses. Refrigerate until set, about 2-3 hours or overnight for best results.
Garnish:
- Just before serving, top each Jell-O shot with a small dollop of whipped cream.
- Sprinkle red, white, and blue sprinkles over the whipped cream for a festive finish.
8. Vegan Vanilla Overnight Oats
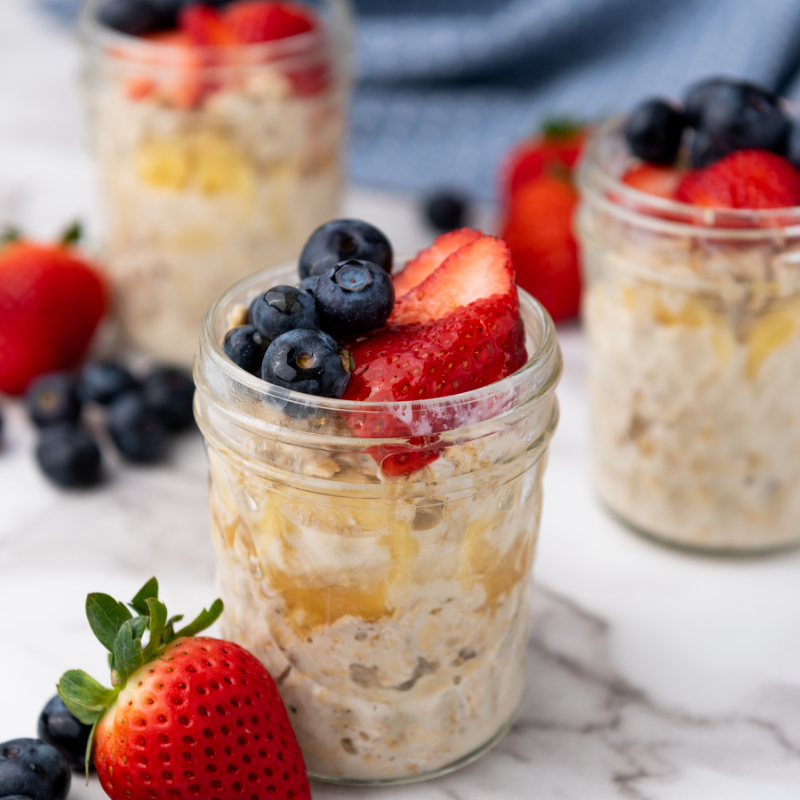
These overnight oats are a healthy and delicious breakfast or dessert option. They are packed with nutrients and can be customized with your favorite toppings. These are perfect for Memorial Day celebrations when you add blueberries and strawberries!
You can read more about this recipe and get a printable recipe card here.
Servings: 2
Ingredients:
- 1 cup rolled oats
- 1 cup vanilla soy milk
- 1 tbsp maple syrup
- 1 banana
- ¼ cup blueberries
- ¼ cup strawberries
Instructions:
-
Combine the oats and vanilla soy milk in a container, mixing well. Cover with a lid and refrigerate overnight.
-
The next morning, divide the soaked oats between two jars and layer with your desired toppings.
9. Cap’n Crunch French Toast

This Cap’n Crunch French Toast is pure breakfast fun – it’s crunchy on the outside, soft and custardy on the inside, and totally over-the-top in the best way. The crushed cereal gives it that golden, crispy coating that makes every bite feel like a treat. We love serving it with fresh berries and a drizzle of syrup, but honestly, a scoop of ice cream turns it into full-blown brunch dessert territory.
You can read more about this recipe and get a printable recipe card here.
Servings: 6
Ingredients:
- 6 slices of Texas Toast Bread
- 3 eggs
- 2 cups of Cap’n Crunch Cereal
- 1 cup heavy cream
- 4 tbsp butter
- 2 tbsp granulated sugar
- 1 tsp vanilla extract
- 1 tsp cinnamon
Instructions:
-
Place the cereal in a Ziploc bag and crush it using a rolling pin.
-
In a medium bowl, whisk together the eggs, heavy cream, vanilla extract, sugar, and cinnamon until well combined.
-
Set up two bowls: one with the egg mixture and the other with the crushed cereal.
-
Take a slice of bread, dip it into the egg mixture, then coat it with the crushed cereal. Repeat until all the slices are coated.
-
Heat 2 tablespoons of butter in a large pan and cook the French toast for about 6-8 minutes, flipping halfway, until the outside is crispy.
-
Serve with syrup, ice cream, or fresh berries and enjoy!
10. Independence Rice Krispie Treats

These Independence Rice Krispie Treats are such a nostalgic, crowd-pleasing dessert with a fun patriotic twist. They’re soft, gooey, and drizzled with red, white, and blue candy melts that make them perfect for the holiday. I usually let the kids help with the decorating part – they go way overboard with the sprinkles, but honestly, that just makes them even more festive. It’s a great no-bake option when you want something easy but still super cute for the dessert table.
Read more about this recipe and get a printable recipe card here!
Servings: 12
Ingredients:
- 5 cups rice Krispies cereal
- ¼ cup butter
- 4 cups mini marshmallows (about 10 ounces)
- ½ cup red meltable candies
- ½ cup white meltable candies
- ½ cup blue meltable candies
- Sprinkles: as desired, can be any type of your choosing
Instructions:
- Melt the butter in a large pot over low heat. Add the mini marshmallows, stirring until completely melted and the mixture is smooth.
- Remove the pot from heat and immediately mix in the Rice Krispies cereal until well coated.
- Press the mixture firmly into a 9×13 inch baking pan lined with parchment paper or lightly greased. Flatten it evenly across the pan.
- Let the Rice Krispie treat cool and set in the refrigerator for at least one hour.
- Once set, lift the whole treat out of the pan using the edges of the parchment paper. Place it on a cutting board and cut into squares or rectangles to your preferred size.
- Separately melt the red, white, and blue meltable candies according to the package instructions. Use bowls deep enough for easy dipping.
- Drizzle each Rice Krispie square with each of the melted candy colors. You can do this with a spoon or a piping bag.
- Place the treats onto a sheet of parchment paper. While the candy coating is still wet, sprinkle with your chosen sprinkles for a decorative touch.
- Allow the treats to set completely at room temperature, or in the refrigerator for a faster setting.
11. Firecracker Pretzel Rods

These Firecracker Pretzel Rods are such a fun little project to make with the kids – and they double as both a sweet treat and a festive table decoration. I love how quick they come together, and the red, white, and blue candy melts give them that perfect patriotic pop. The sprinkles are where the magic happens though – no two rods ever look the same, which kinda adds to the charm. They’re crunchy, sweet, and totally addictive (I always end up snacking on a few before they even make it to the platter).
You can read more about this recipe and get a printable recipe card here!
Servings: 12
Ingredients:
- 12 pretzel rods
- ½ cup of red candy melts
- ½ cup of white candy melts
- ½ cup of blue candy melts
- 2 tablespoons of patriotic sprinkles (red, white, and blue)
Instructions:
- Line a baking sheet with parchment paper to place the dipped pretzels on to set.
- Work with one color of candy melts at a time.
- Place ½ cup of candy melts in a microwave-safe bowl and microwave at 50% power or on the defrost setting for 30 seconds, then stir. Continue microwaving in 30-second intervals, stirring between, until the candy melts are fully melted and smooth.
- Dip a pretzel rod into the melted candy, tilting the bowl and using a spoon to help coat the pretzel evenly. Coat about half the length of the pretzel rod or as much as desired.
- Gently shake off any excess candy before placing the pretzel rod on the parchment paper.
- While the coating is still wet, add patriotic sprinkles by hand or roll the wet, candy-coated part of the pretzel in a bowl of sprinkles for fuller coverage.
- Let the candy harden completely at room temperature, which should take about 15-30 minutes. For faster setting, place the baking sheet in the refrigerator for about 10 minutes.
- Once the candy melts have set, serve the pretzel rods or store them in an airtight container at room temperature to keep the pretzels from becoming soft.
12. Granola Berry Cups