25 Delicious Desserts Dad Will Love This Father’s Day
Father’s Day is just around the corner, and if you’re like me, you want to make it extra special with a little sweetness. As a mom of three, I’ve realized that there’s no better way to show the dads in our lives how much we appreciate them than with a homemade treat. My husband, in particular, has a really sweet tooth! Whether it’s my kids’ favorite chocolate cake or a batch of cookies we’ve all been loving lately, dessert always seems to steal the show. So I’ve rounded up 25 desserts I know my husband and I bet your dad too will love this Father’s Day.
Over the years, I’ve tried so many different desserts to make Father’s Day memorable, and I’ve found a few favorites that are always a hit. Some are simple, some are a bit more unique, but all of them are guaranteed to make everyone at the table smile. From rich, fudgy brownies to fresh, fruity pies, there’s something here for every dad, whether he’s all about chocolate or prefers something a little lighter. And the best part is that these recipes are easy to make, so you can spend more time enjoying the day and less time in the kitchen.
I’m excited to share these 25 dessert ideas with you. I know how important it is to make Father’s Day memorable, and nothing wraps up a celebration quite like a delicious homemade dessert. Whether you’re looking for something indulgent and rich or light and refreshing, there’s a recipe here that’s sure to suit every taste. The beauty of these desserts is that they don’t require a ton of time or complicated ingredients, so you can spend less time in the kitchen and more time enjoying the day with the people who matter most. I hope one of these treats becomes a new tradition in your family and that you can create some sweet memories together as you celebrate dad. After all, food has a way of bringing people together, and there’s nothing like sharing a dessert you made with love to make a special occasion feel even more meaningful.
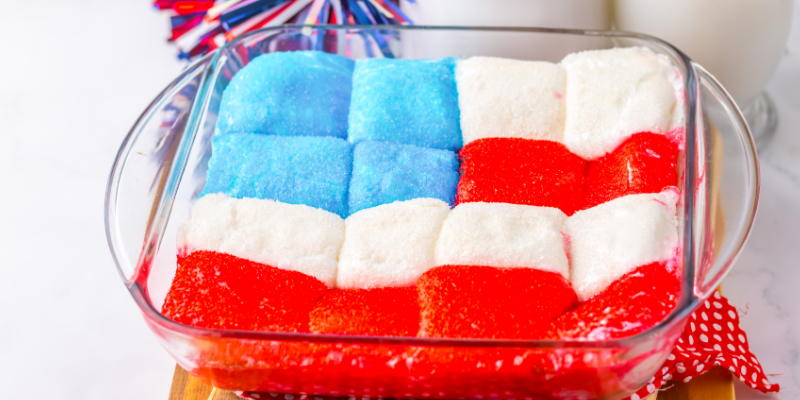
1. Kool Aid Pie

One of my favorite easy desserts to make for Father’s Day is this Kool Aid Pie. It’s a fun and colorful treat that always brings a little nostalgia to the table. With just a handful of ingredients, it comes together quickly and has a creamy, refreshing flavor that everyone loves. This pie is perfect for dads who enjoy something a little different and a lot of sweetness. I love using orange, classic cherry or even tropical punch to give it a fun twist, and I’m sure it will be a hit at your celebration too!
You can read more about this recipe and get a printable recipe card here.
Servings: 8
Ingredients:
- 1 0.13 oz packet of orange Kool Aid mix
- 1 14 oz can of sweetened condensed milk
- 1 8 oz container of whipped topping (thawed)
- 1 9 inch graham cracker pie crust
Instructions:
- In a large bowl add the Kool Aid mix and sweetened condensed milk, stir until the color is completely mixed.
- Add the whipped topping and fold using a wooden spoon or silicone spoon. Don’t stir. Make sure to stir until there are no more white streaks.
- Pour into the pie crust and spread around gently. Refrigerate for 1 hour then slice and serve with whipped cream (optional)!
2. Key Lime Pie

Key Lime Pie is a classic Father’s Day dessert that never disappoints. It’s one of those recipes that feels both light and indulgent at the same time, with the perfect balance of tart and sweet. I’ve made this pie for years, and it’s always a crowd-pleaser, especially with the buttery graham cracker crust and smooth, tangy filling. If you’re looking for something refreshing to end your Father’s Day meal, this is the pie to make. It’s simple, but it has that wow factor that makes it feel extra special.
You can read more about this recipe and get a printable recipe card here.
Servings: 8
Ingredients:
For the Graham Cracker Crust:
- 1 ½ cups (180 g) graham cracker crumbs
- ⅓ cup (65 g) granulated sugar
- ½ teaspoon salt
- 6 tablespoons (85 g) unsalted butter, melted
For the Key Lime Filling:
- 4 large egg yolks
- 1 can (14 oz / 396 g) sweetened condensed milk
- ½ cup (120 ml) fresh key lime juice (about 12 key limes)
- 1 tablespoon key lime zest (or regular lime zest)
- ½ teaspoon vanilla extract
- ⅛ teaspoon salt
For the Whipped Cream Topping:
- 1 cup (240 ml) heavy whipping cream
- 2 tablespoons (15 g) powdered sugar
- ½ teaspoon vanilla extract
- Key lime zest, for garnish
Instructions:
-
Preheat oven to 350°F (175°C).
-
In a bowl, mix graham cracker crumbs, sugar, salt, and melted butter until evenly combined.
-
Press the mixture firmly into the bottom and sides of a 9-inch (23 cm) pie pan.
-
Bake for 8 minutes, then let cool while preparing the filling.
-
In a large bowl, whisk the egg yolks until slightly thickened.
-
Whisk in the sweetened condensed milk, key lime juice, lime zest, vanilla extract, and salt until smooth.
-
Pour the filling into the cooled crust and smooth the top.
-
Bake at 350°F (175°C) for 12-15 minutes, until the center is just set (a slight jiggle is fine).
-
Let the pie cool at room temperature for 30 minutes, then refrigerate for at least 3 hours (or overnight) until fully set.
-
Using a hand mixer or stand mixer, beat heavy whipping cream, powdered sugar, and vanilla on medium-high speed until stiff peaks form.
-
Spread or pipe the whipped cream on top of the chilled pie.
-
Garnish with key lime zest and extra graham cracker crumbs if desired.
-
Slice, serve, and enjoy!
3. Lemon Meringue Pie Dip

Lemon Meringue Pie Dip is one of those desserts that’s both easy to make and totally fun to serve. It has all the classic flavors of lemon meringue pie: tart, sweet, and creamy, without the fuss of making an entire pie. I love how simple it is to whip up, yet it still feels special enough for a Father’s Day treat. Paired with graham crackers or fruit for dipping, this dip is always a hit. It’s perfect for a laid-back dessert that still delivers on flavor and nostalgia.
You can read more about this recipe and get a printable recipe card here.
Servings: 6
Ingredients:
- 1 cup fresh lemon juice
- 2 (14 ounce) cans of sweetened condensed milk
- Refrigerated pie crust
- 4 egg whites
- ¾ cup sugar
Instructions:
- In a mixing bowl whisk together the lemon juice and sweetened condensed milk until well combined.
- Pour into a pie dish and set in the refrigerator to chill about 2 hours.
- Meanwhile slice your pie crust into triangles, about chip size and place on a baking sheet.
- Bake for 10-12 minutes until golden and crisp.
- Next prepare your meringue.
- In the bowl of your stand mixer add the sugar and egg whites, whip with the whisk attachment until stiff glossy peaks form.
- Once you have your stiff peaks spoon the meringue on top of the dip and spread out into peaks with a spoon.
- Use a kitchen torch to broil the meringue.
- Serve!
4. M&M Cookie Bars

M&M Cookie Bars are always a crowd favorite in our house and the perfect treat for Father’s Day. These bars combine the best parts of a cookie: chewy, buttery goodness with the fun pop of colorful M&Ms. I love how easy they are to make, and they’re always a hit with both kids and adults. The combination of textures makes these bars so irresistible. These M&M Cookie Bars are definitely a sweet treat that’s sure to please everyone at the table!
You can read more about this recipe and get a printable recipe card here.
Servings: 9
Ingredients:
- 1/2 cup softened butter
- 1/2 cup brown sugar
- 1/4 cup white sugar
- 1 tsp vanilla extract
- 1 egg
- 1/3 tsp baking soda
- 1/3 tsp salt
- 1 cup flour
- 1/2 cup chocolate chips
- 1/2 cup M&Ms
Instructions:
- Preheat the oven to 350°F (175°C). In a bowl, place together the softened butter, brown sugar, and white sugar until smooth.
- Beat until fully incorporated. Add vanilla extract and the egg to the creamed mixture, beat again.
- In a separate bowl, mix the dry ingredients: flour, baking soda, and salt. Gradually add them to the wet mixture, beating until combined.
- Stir in the chocolate chips and most of the M&Ms, reserving some for topping.
- Spread the dough evenly into an 8×6 inch (or 9*7) baking pan. Sprinkle the reserved M&Ms on top.
- Bake in the preheated oven for 18–20 minutes, or until the surface is golden brown.
- Allow the cookie bars to cool in the pan before slicing into squares.
5. Pecan Pie Dip

Pecan Pie Dip is a fun and delicious twist on a classic dessert. It has all the rich, nutty flavors of a traditional pecan pie but in a dip form that’s perfect for sharing. I love how easy it is to make and how quickly it disappears once it’s set out. The creamy base paired with the crunchy pecans gives it the perfect texture, and it’s sweet enough to satisfy any dessert craving. Serve it with graham crackers or apple slices for a simple yet indulgent treat that’s perfect for Father’s Day.
You can read more about this recipe and get a printable recipe card here.
Servings: 6-12
Ingredients:
- 8 oz cream cheese, softened
- ½ cup brown sugar
- 2 tsp maple syrup
- 8 oz whipped topping
- ⅓ cup chopped pecans, reserve about 1 tablespoon for topping
Instructions:
- Beat the cream cheese, brown sugar, and maple syrup in a large bowl or bowl of a stand mixer.
- Stir in the pecans.
- Fold in the whipped topping.
- Chill for 1 hour then top with reserved pecans and serve.
6. Brownie Batter Dip

Brownie Batter Dip is one of those desserts that feels indulgent yet surprisingly easy to make. It tastes just like the best part of brownies, the rich, chocolatey batter, without the need to bake anything. I love how creamy and decadent it is, and it’s always a hit at family gatherings. The best part is that it’s ready in minutes, and you can dip anything from graham crackers to fruit into it. This Brownie Batter Dip is perfect for satisfying any sweet tooth, making it a great addition to your Father’s Day spread.
You can read more about this recipe and get a printable recipe card here.
Servings: 6-10
Ingredients:
- 8 oz cream cheese, softened
- 8 oz whipped topping, thawed
- 1 – 18 oz box brownie mix
- 3 tbsp milk
- 1-2 tbsp mini chocolate chips for garnish
Instructions:
- Add the brownie mix to a medium microwave safe bowl and heat treat it by heating in 15 second intervals for 90 seconds total, stirring between each heat session.
- Beat the cream cheese in a large bowl, then beat the whipped topping in.
- Add the brownie mix and milk, then stir until well mixed.
- Top with mini chocolate chips.
- Refrigerate for 1 hour, or until ready to serve.
7. Butterfinger Cookie Bars

Butterfinger Cookie Bars are a fun and delicious treat that combines the best of both cookies and candy. These bars are packed with crunchy Butterfinger bits, making each bite a perfect balance of chewy and crispy. I love how simple they are to make and how quickly they come together, but they still feel special enough for a celebration. The buttery flavor of the cookie base and the sweet, peanut-buttery crunch of the Butterfingers make these bars a real crowd-pleaser.
You can read more about this recipe and get a printable recipe card here.
Servings: 16 bars
Ingredients:
- 2 sticks of unsalted butter (1 cup) (room temp)
- 1/2 cup of sugar
- 1 cup of brown sugar
- 2 eggs
- 1 tsp vanilla extract
- 2 1/2 cups of flour
- 1 tsp salt
- 1 tsp baking soda
- 1/2 cup of butterfinger bars (chopped) (3 big sized bars)
- 3/4 cup of peanut butter
- 1 stick of unsalted butter (room temp)
- 1 tsp vanilla extract
- 1 1/2 cups of powdered sugar
- 3 tbsp milk
- 1 1/2 cup of Butterfinger bars (chopped) (5 big sized bars) for the topping
Instructions:
- Preheat the oven to 350°.
- Line a 9×13 baking dish with parchment paper and spray with cooking spray, set aside.
- In a large bowl add in the 1 cup of butter, sugar and brown sugar, beat using a hand mixer until it becomes light and creamy.
- Add in the eggs and vanilla and beat again until mixed together.
- Add the flour, salt and baking soda and beat using the hand mixer until everything is combined.
- Add in the 1/2 cup of Butterfinger bits and mix once more.
- Scoop the mixture into the lined baking dish and spread around evenly. Bake in the oven for 25 minutes or until golden brown.
- Remove from the oven and let cool completely.
- In another large bowl add the peanut butter and 1 stick of butter and beat using a hand mixer until completely smooth and no chunks.
- Add the vanilla in and mix once again.
- Add in the powdered sugar and milk and beat again until it becomes smooth and creamy.
- Spread all over the top of the cooled cookie layer evenly.
- Sprinkle the leftover Butterfinger bits all over top and slice into bars, serve and enjoy!
8. Cake Mix Chocolate Chip Cookie Bars

Cake Mix Chocolate Chip Cookie Bars are a quick and easy dessert that delivers big on flavor. By using a cake mix as the base, these bars come together in no time and have a soft, chewy texture that everyone loves. I like how simple they are to make, but they still taste homemade, with plenty of melty chocolate chips in every bite. These bars are perfect for Father’s Day when you want a delicious treat without spending too much time in the kitchen.
You can read more about this recipe and get a printable recipe card here.
Servings: 12 bars
Ingredients:
- 1 Box Yellow Cake Mix (13.25 ounces)
- 2 Large Eggs
- ½ Cup Vegetable Oil
- ⅓ Cup Water
- ¾ Cup Chocolate Chips + Extra for topping
Instructions:
- Preheat the oven to 350 degrees fahrenheit. Spray a 9×13 baking pan with nonstick cooking spray and set aside.
- In a large mixing bowl, combine all the ingredients except the chocolate chips and mix until no lumps appear.
- Fold in the ¾ cup chocolate chips.
- Pour the batter into the prepared pan and spread evenly.
- Sprinkle a few chocolate chips over the top and bake for 24 minutes or until a toothpick inserted into the center comes out just barely gooey. You don’t want them to be 100% finished as they will continue to cook once pulled out of the oven.
- When the toothpick comes back just barely gooey, pull the pan from the oven and let the bars rest in the pan for 20-30 minutes. If sliced before they’ve cooled a bit, they will tend to fall apart.
- Once cool, slice the bars, serve, and enjoy!
9. Chocolate Chip Party Dip

Chocolate Chip Party Dip is a fun and irresistible treat that’s perfect for any celebration, especially Father’s Day. This dip combines the creamy sweetness of a dessert dip with the classic flavor of chocolate chip cookies, making it a crowd favorite. I love how easy it is to make, and it’s always a hit with both kids and adults. Paired with graham crackers, pretzels, or fruit, it’s the kind of dip that disappears quickly at the table. It’s sweet, creamy, and just the right amount of indulgent for a special day.
You can read more about this recipe and get a printable recipe card here.
Servings: 8-12
Ingredients:
- 8 oz block of cream cheese, softened
- ½ cup (1 stick) unsalted butter, softened
- ¾ cup powdered sugar
- 2 tablespoons brown sugar
- 1 teaspoon vanilla extract
- 1 cup miniature semisweet chocolate chips
Instructions:
- Add the cream cheese and butter to a medium bowl or bowl of a stand mixer, and beat until smooth.
- Next, add the powdered sugar, brown sugar and vanilla, and beat until it’s well combined.
- Fold in the chocolate chips.
- Refrigerate for 1 hour, or until ready to serve. Top with extra chocolate chips before serving.
10. Nutella Dip

Nutella Dip is one of those desserts that’s as simple as it is delicious. With the rich, creamy flavor of Nutella, it’s a treat that’s always a crowd-pleaser. I love how quick and easy it is to make, yet it feels indulgent enough for a special occasion like Father’s Day. This dip pairs perfectly with fruits, cookies, or even pretzels for a fun contrast of flavors.
You can read more about this recipe and get a printable recipe card here.
Servings: 6-8
Ingredients:
- 8 oz cream cheese, softened
- ⅓ cup powdered sugar
- ¾ cup Nutella
- 8 oz whipped topping, thawed
- 2 tbsp mini chocolate chips
Instructions:
- Beat the cream cheese and powdered sugar in a medium bowl, then beat in the Nutella.
- Fold in the whipped topping.
- Spread into a serving bowl or dish, then top with chocolate chips.
- Cover and refrigerate for 1 hour or until ready to serve.
11. Chocolate Churro Rice Krispie Treats

Chocolate Churro Rice Krispie Treats are a fun twist on the classic treat we all know and love. These bars combine the crispy, gooey goodness of Rice Krispie treats with a rich chocolate layer and a dusting of cinnamon sugar, giving them that churro flavor we can’t resist. I love how easy they are to make, and the chocolate adds a little extra indulgence to an already amazing treat. These Chocolate Churro Rice Krispie Treats are perfect for Father’s Day, offering something a little different while still being familiar and comforting. They’re sure to be a hit with everyone!
You can read more about this recipe and get a printable recipe card here.
Servings: 12
Ingredients:
- 1 box (12.6oz) Cocoa Krispies cereal (8-½ cups)
- 2 bags (10oz) miniature marshmallows
- 12 tbsp butter (¾ cup)
- 1 tsp vanilla
- ¾ cup mini chocolate chips
- ⅓ cup cinnamon sugar (⅓ cup sugar + 2 tsp cinnamon mixed together)
- 20 unwrapped caramel squares
- 1-½ tbsp heavy cream
Instructions:
- Line a 9×13 pan with parchment paper and spray with nonstick spray (or grease with butter).
- Melt the 12 tablespoons of butter in a large pot on the stove over low heat.
- Set aside one cup of the mini marshmallows.
- Once the butter is melted, add the remaining mini marshmallows to the pot.
- Melt the marshmallows into the butter over low heat until melted and creamy.
- Remove from heat.
- Add the vanilla and stir until smooth.
- Add the cocoa krispies cereal and stir until the cereal is fully coated with the marshmallow mixture.
- Add ¼ cup of the cinnamon sugar mixture, the reserved one cup of mini marshmallows, and the mini chocolate chips. Carefully mix it all together until everything is combined and evenly incorporated.
- Pour the mixture into your 9×13 pan and use your spatula to press it down into the pan evenly.
- Sprinkle the remaining cinnamon sugar mixture all over the top.
- Allow the rice krispie treats to sit for at least 1 hour to set.
- Drizzle the caramel over top if desired (see directions below), then cut into squares and enjoy!
Directions for Caramel Drizzle:
- Place your unwrapped caramel squares into a glass measuring cup or dish.
- Microwave on medium to high power in 15-20 second intervals, stirring between each interval, until the caramel is fully melted and smooth.
- Add the heavy cream and stir until combined and smooth.
- Using a fork or spoon, carefully drizzle the caramel over the top of the rice krispies.
12. Funfetti Dip

Funfetti Dip is a lighthearted and colorful dessert that’s perfect for Father’s Day. With its creamy texture and fun bursts of rainbow sprinkles, it’s as fun to look at as it is to eat. I love how simple it is to make, and it always brings a smile to everyone’s face. This dip pairs perfectly with graham crackers, cookies, or fruit, making it a versatile treat for any gathering. If you want something sweet, festive, and easy to throw together, Funfetti Dip is a must-try!
You can read more about this recipe and get a printable recipe card here.
Servings: 6-10
Ingredients:
- 25 oz box of Funfetti cake mix
- 1 cup vanilla pudding, prepared (I use the snack packs)
- 8 oz whipped topping, thawed
- 1-2 tbsp rainbow sprinkles
Instructions:
- Heat treat the cake mix in the microwave for 30 second intervals. Stir between each heat session. It will be safe to eat once it reaches 165 degrees. I usually heat for 1-2 minutes total.
- Mix cake mix and pudding, in a large bowl, then fold in whipped topping.
- Cover and refrigerate for 1 hour, or until ready to serve.
- Top with sprinkles right before serving.
13. Pina Colada Mini Tarts

Pina Colada Mini Tarts are a tropical treat that’s perfect for bringing a little sunshine to your Father’s Day celebration. These mini tarts combine the sweet flavors of pineapple and coconut in a bite-sized, buttery crust that’s as refreshing as it is delicious. I love how they offer the taste of a pina colada without needing to mix up any drinks, and they’re so easy to make. These little tarts are the ideal dessert for a fun, laid-back gathering and are sure to impress with their tropical flair. They’re a perfect way to end a summer meal with something light, fruity, and indulgent.
You can read more about this recipe and get a printable recipe card here.
Servings: 18-24
Ingredients:
For the tart shell:
- 1 cup unsalted butter, cold and cut into cubes
- 3 cup flour
- ½ cup sugar
- ½ tsp salt
- 2 egg yolks
- ¼ cup cold water
For the filling:
- ¼ cup coconut oil
- 1 – 13.5 oz can coconut milk, shaken well
- 1 tsp vanilla
- 1 cup heavy cream
- 1 egg
- 4 egg yolks
- 3 tbsp corn starch
- ¼ tsp salt
- ½ cup sugar
For the topping:
- 2 cans pineapple slices (rings)
- ¼ cup brown sugar
- 2 tbsp dark rum
- ½ cup flaked coconut
Instructions:
- In a food processor, combine the butter, flour, sugar and salt. Pulse until combined and it appears crumbly.
- Add in the egg yolks and cold water and process just until the dough combines.
- Transfer the dough to a sheet of plastic wrap and wrap tightly. Chill for about an hour.
- Meanwhile, make the filling.
- Place the coconut oil in a medium bowl and cover with a fine mesh strainer. Set aside.
- In a large saucepan, combine the coconut milk and vanilla. Heat over medium for about 10 minutes or until mix is reduced to about 1 cups worth.
- Add in the heavy cream and bring to a simmer again.
- In another medium bowl, combine the egg, egg yolk, corn starch, salt and sugar.
- Whisk briskly for about a minute or until pale yellow in color.
- Once the coconut cream mixture is simmering, remove from the heat. Very slowly, pour over the egg mixture, whisking constantly to temper the eggs without curdling them.
- Once the mixtures are combined and thoroughly mixed, transfer the filling back to the saucepan and heat over medium low for an additional 2-3 minutes. Stir constantly until the mix thickens and leaves track marks from the whisk.
- Remove the filling from the heat and pour over the strainer into the coconut oil bowl. Press the curd through the strainer to remove any potential clumps or curdled egg pieces.
- Stir the mix very well to incorporate the oil.
- Cover with plastic wrap touching the surface and chill until set and ready to assemble the tarts.
- Preheat the oven to 325 degrees.
- Remove the shell dough from the fridge and roll out on a lightly floured work surface until about ¼ inch thick.
- Use a 4 inch round cookie cutter to cut as many rounds as possible. Save the scraps to reroll.
- Press the dough rounds into the 3 inch tart pans.
- Poke the dough with a fork several times to prevent bubbles in the dough.
- Place the tart pans on a baking sheet.
- Bake in the preheated oven for 20-25 minutes or just until starting to brown around the edges and the center is set. Allow to cool before removing from tart pans.
- For the topping – line a baking sheet with sides with a sheet of parchment. Spread out the pineapple rings with a little space between them.
- In a small bowl, combine the brown sugar and rum.
- Using a pastry brush, brush each pineapple ring with the rum mixture.
- Under the broil setting on the oven, bake for 5-7 minutes or until the rings are slightly browned and toasted. Allow to cool.
- On another baking sheet lined with parchment, spread the coconut flakes in an even layer.
- Under the broil setting on the oven, toast the coconut for 2-3 minutes or until slightly browned around the edges. Watch closely as it can brown quickly once it starts to go. Remove from the oven and allow to cool.
- To assemble – once all the components are ready, assemble the tarts.
- Scoop the curd into the tart shell. Top with a third of a pineapple ring and a sprinkling of toasted coconut.
14. Caramel Apple Sheet Cake

Caramel Apple Sheet Cake is a comforting and indulgent dessert that’s perfect for Father’s Day. This cake combines the warmth of spiced apples with a rich, gooey caramel topping that melts in your mouth. I love how moist and flavorful the cake is, and the caramel drizzle adds the perfect touch of sweetness. It’s the kind of dessert that feels like a cozy fall treat but works just as well for a summer celebration. Caramel Apple Sheet Cake is easy to make, feeds a crowd, and is sure to be a hit with everyone at the table!
Servings: 24
Ingredients:
- 1 cup butter
- 1 cup water
- 2 cups all-purpose flour
- 2 cups granulated sugar
- 1 teaspoon baking soda
- 1 teaspoon ground cinnamon
- 1/2 teaspoon salt
- 2 large eggs, lightly beaten
- 1/2 cup sour cream
- 1 teaspoon vanilla extract
For the Frosting:
- 1/2 cup butter
- 1/3 cup milk
- 4 cups powdered sugar
- 1 teaspoon vanilla extract
- 1 teaspoon ground cinnamon
Apple Topping:
- 2 tablespoons butter
- 8 cups apples, peeled and cored and diced into ½-inch chunks (a tart baking apple such as Granny Smith works well)
- ½ cup brown sugar, packed
- 1 tablespoon corn starch
- 1 teaspoon ground cinnamon
- Caramel sauce
Instructions:
- Preheat the oven to 375F. Prepare a 10×15-inch jelly roll pan by spraying with non-stick cooking spray; set aside.
- In a large bowl whisk together the flour, sugar, baking soda, cinnamon, and salt.
- Heat the butter and water in a medium saucepan over medium-high heat until the butter is melted and the mixture begins to simmer.
- Remove from heat and pour into the dry ingredients mixture. Stir just until combined.
- Add the eggs, sour cream, and vanilla extract; mix until combined.
- Pour the batter into the prepared jelly roll pan.
- Bake the cake at 375F for 18-22 minutes, or until a toothpick inserted in the center comes out clean. Cool the cake in the pan for 5-10 minutes until warm.
For the frosting:
- Melt the butter and milk together in a medium saucepan over medium heat, then raise the temperature to medium-high until the mixture begins to simmer.
- In a large bowl, combine the powdered sugar, vanilla extract, cinnamon, and the melted butter and milk mixture. Whisk together until smooth.
- Pour the frosting over the warm cake and spread out evenly.
- Cool the cake completely before slicing and serving.
For the apple topping:
- In a large pot, melt 2 tablespoons butter over medium heat.
- Add the diced apples and cook over medium heat for 5 minutes, stirring often.
- In a small bowl, combine the brown sugar, corn starch, and cinnamon. Stir the mixture into the apples.
- Cook the apples over medium heat until tender, stirring occasionally (do not over-cook or it will turn into apple sauce).
- Set the apples aside to cool completely to room temperature.
- Spread the cooled apples over the cake and drizzle with caramel sauce if desired.
15. Apricot Cheesecake Tart

Apricot Cheesecake Tart is a beautifully simple yet elegant dessert that’s perfect for Father’s Day. The creamy, smooth cheesecake filling paired with the sweet, tangy apricot topping creates a delightful balance of flavors. I love how the buttery, flaky crust holds everything together while adding a little extra texture. This tart is light enough to enjoy after a hearty meal but rich enough to feel like a special treat. It’s a great way to impress your guests with something that’s both refreshing and indulgent!
You can read more about this recipe and get a printable recipe card here.
Servings: 12-14
Ingredients:
- 1lbs fresh apricot plus 3 apricots for decoration
- 8oz graham cracker crumbs
- ½ cup unsalted butter
- 10oz cream cheese
- 1 cup heavy cream
- 1 cup powdered sugar
- 1 ½ tbsp. light brown sugar
- 1tsp vanilla extract
- 2 peas of cardamom
- two slices of lemon
Instructions:
- In a blender, combine the graham cracker crumbs and unsalted butter. Blend until the crumbs are finely crushed and evenly coated with butter.
- Pour the mixture into a tart pan, spreading it out evenly and pressing it down firmly with your hands.
- In a small saucepan, add the peeled apricots, light brown sugar, cardamom, and lemon slices. Heat over medium heat, stirring occasionally, until the apricots soften and the sugar dissolves, about 15 minutes. If needed, add 2 tablespoons of water to help with the cooking.
- While the apricot mixture cools, beat the cream cheese, heavy cream, and vanilla extract together in a bowl until soft peaks form.
- Once the apricot mixture has cooled, blend it until smooth.
- To assemble the tart, spread the cream cheese mixture evenly over the prepared crust.
- Spoon the smooth apricot mixture on top, spreading it in the center and leaving a 2-inch border around the edges.
- Thinly slice 3 apricots and arrange them on top for decoration.
- Refrigerate the tart for 3-4 hours to set. For best results, let it chill for 24 hours before serving.
- Serve and enjoy!
16. Carrot Cake Cruffins

Carrot Cake Cruffins are a fun and unique twist on traditional carrot cake that’s perfect for Father’s Day. These delightful pastries combine the soft, spiced goodness of carrot cake with the flakiness of a croissant, making them a treat everyone will love. I love how they have all the flavors of carrot cake: cinnamon, nutmeg, and of course, the carrots, wrapped up in a light, buttery pastry. They’re easy to make but feel like something special, and the cream cheese glaze on top adds the perfect finishing touch.
You can read more about this recipe and get a printable recipe card here.
Servings: 12
Ingredients:
For the dough:
- 3 cups all- purpose flour
- 3 eggs
- ½ cup unsalted butter melted
- ½ cup milk
- 4tbsp granulated sugar
- 1 package instant yeast
- Pinch of salt
For the filling:
- 2 cups carrots, grated
- 2tbsp unsalted butter
- ½ cup brown sugar
- 2tbsp raisins
- 2tbsp walnuts chopped
- 1tbsp lemon zest
- 1tsp cinnamon
- 2 cardamom pods crushed
For the topping:
- 1 cup cream cheese
- 1 cup powdered sugar
- 1 ½ tbsp. lemon juice
Instructions:
-
In a large bowl, combine the flour, granulated sugar, salt, and instant yeast. Mix them together to ensure they’re evenly distributed.
-
Add the eggs, melted butter, and milk to the dry ingredients. Stir the mixture until combined.
-
Knead the mixture into a soft, smooth dough. You can do this by hand or with a stand mixer. Make sure the dough is elastic and not sticky.
-
Once the dough is smooth, cover the bowl with a clean towel or plastic wrap. Let the dough rise in a warm place for about 1 hour, or until it has doubled in size.
-
While the dough is rising, prepare the filling. Heat a skillet over medium heat and add the butter. Allow it to melt.
-
Once the butter is melted, add the grated carrots to the skillet. Sauté them for about 3-4 minutes until they soften slightly.
-
Stir in the brown sugar, raisins, walnuts, cinnamon, cardamom, and lemon zest. Continue to cook the mixture until the carrots are tender, about 5-7 minutes. If the mixture seems dry, add 1 tablespoon of water or milk to help soften the carrots. Once the filling is ready, remove it from the heat and let it cool completely.
-
While the filling is cooling, prepare the topping. In a medium bowl, combine the cream cheese, powdered sugar, and lemon juice. Mix the cream cheese, powdered sugar, and lemon juice together until smooth and creamy. Set the topping aside until you’re ready to use it.
-
Once the dough has finished rising, roll it out on a floured surface into a rectangle about 15 x 8 inches. Trim any uneven edges if necessary to form a neat rectangle.
-
Spread the cooled carrot filling evenly over the dough, leaving a small border around the edges.
-
Carefully roll the dough into a log, starting from one long side. Make sure the filling stays inside the dough as you roll it up.
-
Once rolled, slice the log into 12 equal pieces, each about 2-3 inches thick.
-
Grease a cruffin pan with butter or non-stick spray. Place each dough slice into a slot in the pan.
-
Allow the cruffins to rise for 30-40 minutes in a warm place, or until they’ve doubled in size.
-
Preheat your oven to 375°F (190°C) while the cruffins are rising.
-
Once the cruffins have risen, bake them in the preheated oven for 25-30 minutes, or until they are golden brown on top. After baking, let the cruffins cool in the pan for about 10 minutes. Then, transfer them to a wire rack to cool completely.
-
Once the cruffins have cooled, drizzle or spread the cream cheese topping over each one.
-
Serve the cruffins and enjoy the delicious, sweet, and tangy combination!
17. Carrot Cupcakes with Cream Cheese Frosting

Carrot Cupcakes with Cream Cheese Frosting are a classic dessert that’s always a hit for Father’s Day. These cupcakes are moist, flavorful, and packed with warm spices like cinnamon and nutmeg, which pair perfectly with the rich cream cheese frosting. I love how they’re just the right size for a sweet treat without feeling too heavy, and the cream cheese frosting adds the perfect tang to balance out the sweetness.
You can read more about this recipe and get a printable recipe card here.
Servings: 18
Ingredients:
Cupcakes:
- 1 1/2 cups all-purpose flour
- 1 teaspoon baking powder
- 1/2 teaspoon baking soda
- 1/2 teaspoon salt
- 1 teaspoon ground cinnamon
- 1/2 cup vegetable oil
- 3/4 cup granulated sugar
- 1/2 cup brown sugar, packed
- 3 large eggs
- 1 teaspoon vanilla extract
- 2 cups grated carrots
- 1/2 cup chopped walnuts or pecans (optional)
Cream Cheese Frosting:
- 8 oz (225g) cream cheese, softened
- 1/4 cup unsalted butter, softened
- 4 cups powdered sugar
- 1 teaspoon vanilla extract
Instructions:
- Preheat your oven to 350°F (175°C) and line a cupcake tin with paper liners.
- In a medium bowl, whisk together the flour, baking powder, baking soda, salt, and cinnamon. Set this aside for now.
- In a large mixing bowl, combine the vegetable oil, granulated sugar, brown sugar, eggs, and vanilla extract. Mix everything until smooth and slightly creamy.
- Slowly add the dry ingredients to the wet mixture, stirring until just combined. Be careful not to overmix.
- Gently fold in the grated carrots and chopped nuts (if you’re using them) until evenly distributed throughout the batter.
- Spoon the batter into the cupcake liners, filling each about 3/4 full.
- Bake in the preheated oven for 20-24 minutes, or until a toothpick inserted into the center of a cupcake comes out clean.
- Once done, let the cupcakes cool in the tin for a few minutes before transferring them to a wire rack to cool completely.
- To make the cream cheese frosting: Beat the softened cream cheese and butter together until smooth and well blended.
- Gradually add the powdered sugar, one cup at a time, mixing well after each addition to ensure a creamy consistency.
- Stir in the vanilla extract and mix until fully combined.
- Once the cupcakes are completely cooled, frost each one generously with the cream cheese frosting using a piping bag or offset spatula.
- If you like, sprinkle some chopped nuts on top of the frosting for an extra touch.
18. Chocolate Chip Skillet Cookie

Chocolate Chip Skillet Cookie is the ultimate dessert for Father’s Day, offering a warm, gooey treat that’s perfect for sharing. This giant cookie has all the comforting, chocolatey goodness of your favorite chocolate chip cookies, but baked in a skillet for that extra chewy, crispy edge. I love how simple it is to make, and the best part is you can serve it straight from the skillet with a scoop of ice cream on top for an indulgent finish. It’s a fun and casual way to celebrate, and I’m sure it will be the star of your Father’s Day spread!
You can read more about this recipe and get a printable recipe card here.
Servings: 6-8
Ingredients:
- 1/2 cup (115 g) unsalted butter, softened
- 1/2 cup (100 g) light brown sugar, packed
- 1/4 cup (50 g) granulated sugar
- 1 large egg (50 g)
- 1 tsp vanilla extract (5 ml)
- 1 cup (125 g) all-purpose flour
- 1/2 tsp baking soda (2 g)
- 1/4 tsp salt (1.5 g)
- 3/4 cup (130 g) semisweet chocolate chips
- 1/4 cup (40 g) dark chocolate chunks (optional)
- Vanilla ice cream, for serving (optional)
Instructions:
-
Preheat your oven to 350°F (175°C) and lightly grease an 8-inch (20 cm) cast iron skillet with butter or nonstick spray.
-
In a medium bowl, use a hand or stand mixer to cream the softened butter, brown sugar, and granulated sugar until light and fluffy, about 2–3 minutes.
-
Beat in the egg and vanilla extract until fully combined.
-
In a separate bowl, whisk together the flour, baking soda, and salt. Gradually add the dry ingredients to the wet mixture, mixing until just combined. Be careful not to overmix.
-
Fold in the semisweet chocolate chips and dark chocolate chunks (if using).
-
Transfer the cookie dough to the prepared skillet and spread it evenly with a spatula, smoothing the top.
-
Bake in the preheated oven for 20–25 minutes, or until the edges are golden brown and the center is just set. For a gooier cookie, bake for less time; for a firmer cookie, bake slightly longer.
-
Remove the skillet from the oven and let the cookie cool for about 5 minutes. The skillet will continue to cook the cookie slightly as it cools.
-
Serve warm, directly from the skillet, with scoops of vanilla ice cream on top if desired.
19. Churros Cheesecake Bars

Churros Cheesecake Bars are a delicious combination of two desserts that everyone loves. These bars bring together the crispy, cinnamon-sugar-coated goodness of churros with the creamy, rich texture of cheesecake. I love how easy they are to make compared to traditional churros, but they still have that irresistible crunch and sweetness. The cheesecake filling adds the perfect touch of indulgence, making these bars a real showstopper. They’re a fun and unique way to bring a little extra flavor to your Father’s Day celebration!
Servings: 12
Ingredients:
- 2 cans (8 oz each) Crescent Roll Dough
- 16 oz (2 packages) Cream Cheese, softened
- 1 cup Sugar, divided
- 1 tsp Vanilla Extract
- Pinch of sea salt
- 1/4 cup Butter, unsalted, melted
- 2 tbsp Ground Cinnamon
Instructions:
- Preheat your oven to 350°F (175°C) and grease a 9×13-inch baking dish with butter or non-stick spray.
- Unroll one can of crescent roll dough and press it into the bottom of the prepared dish, stretching it to cover the entire surface.
- In a small bowl, mix together the cinnamon and sugar. Sprinkle half of this mixture over the dough.
- Drizzle the dough with 2 tablespoons of melted butter.
- In a large bowl, beat the softened cream cheese, 1/2 cup sugar, vanilla extract, and a pinch of sea salt until smooth and creamy.
- Spread the cream cheese mixture evenly over the dough layer.
- Unroll the second can of crescent roll dough and gently lay it over the cream cheese filling, stretching it to cover the entire surface. If needed, use strips of the remaining dough to ensure it’s fully covered.
- Brush the top dough layer with the remaining melted butter and evenly sprinkle the rest of the cinnamon-sugar mixture over the top.
- Bake for 25-30 minutes, or until the dough is golden brown and the center is set.
- Let the bars cool for about 30 minutes before slicing into squares. Serve warm or at room temperature, and drizzle with syrup if you like.
20. Cinnamon Rolls with Cream Cheese Glaze

Cinnamon Rolls with Cream Cheese Glaze are a comforting and indulgent treat that’s perfect for Father’s Day morning. The warm, soft cinnamon rolls are filled with a sweet cinnamon swirl and topped with a creamy, tangy glaze that takes them to the next level. I love how they’re the perfect balance of sweet and creamy, and the cream cheese glaze adds a deliciously smooth finish.
You can read more about this recipe and get a printable recipe card here.
Servings: 12
Ingredients:
For the Dough:
- 4 cups Flour
- 1 cup Milk
- 2 tsp Yeast
- 1/4 cup Sugar
- 1/4 cup Butter, melted
- 1 large Egg
- 1/2 tsp Salt
For the Filling:
- 3/4 cup Brown sugar
- 2 tbsp Cinnamon
- 1/4 cup Butter, melted
For the Glaze:
- 4 tbsp Cream cheese
- 2 tbsp Butter, softened
- 1/2 cup Powdered sugar
- 1 tsp Vanilla extract
- 1-2 tbsp Milk (as needed to achieve the desired consistency)
Instructions:
-
Warm the milk slightly until it’s just above room temperature (do not exceed 40°C/104°F). Stir in the yeast and 1 tablespoon of sugar. Let it sit for 5–10 minutes until it becomes frothy.
-
In a large mixing bowl, combine the flour, remaining sugar, and salt. Add the melted butter, egg, and the frothy yeast mixture to the dry ingredients.
-
Mix until a soft dough forms. Knead the dough on a floured surface for 5–7 minutes until it becomes smooth and elastic.
-
Transfer the dough to a greased bowl, cover it with a towel, and allow it to rise in a warm place for 1 to 1.5 hours, or until it has doubled in size.
-
Once the dough has risen, roll it out on a floured surface into a large rectangle, about 1/4 inch thick.
-
Brush the entire surface of the dough with melted butter. Mix the brown sugar and cinnamon together, then evenly sprinkle the mixture over the buttered dough.
-
Carefully roll the dough into a tight log, starting from the long side. Slice the log into 12 equal pieces.
-
Arrange the rolls in a greased or parchment-lined baking dish, leaving a little space between each one. Cover the dish with a towel and let the rolls rise for another 30 minutes.
-
Preheat your oven to 350°F. Once the rolls have risen, bake them for 20–25 minutes, or until they are golden brown.
-
While the rolls are baking, mix the cream cheese and softened butter together until smooth.
-
Gradually add the powdered sugar and vanilla extract, mixing until fully combined. If the glaze is too thick, add milk a little at a time until you reach the desired consistency.
-
After baking, let the rolls cool slightly in the pan. Spread the cream cheese glaze over the warm rolls. Serve immediately and enjoy!
21. Danish Pastries with Cream Cheese and Cherries

Danish Pastries with Cream Cheese and Cherries are a delightful and indulgent treat that’s perfect for Father’s Day. The flaky, buttery pastry is filled with a creamy, tangy cream cheese mixture and topped with sweet, juicy cherries, creating the perfect balance of textures and flavors.
You can read more about this recipe and get a printable recipe card here.
Servings: 8
Ingredients:
- 1 sheet of puff pastry, thawed
- 4 oz (115 g) cream cheese, softened
- 3 tbsp granulated sugar
- 1 tsp vanilla extract
- 1 cup frozen cherries, thawed and drained
- 1 egg, beaten (for egg wash)
- 1 tbsp powdered sugar (for garnish)
Instructions:
- Preheat your oven to 375°F (190°C) and line a baking sheet with parchment paper.
- In a small bowl, combine the cream cheese, granulated sugar, and vanilla extract, mixing until smooth and creamy.
- Roll out the puff pastry sheet on a lightly floured surface, smoothing the edges. Cut the pastry into 8 equal squares. Save any leftover pastry to make decorative leaves, if desired.
- Place a spoonful of the cream cheese mixture in the center of each square.
- Top each square with a few cherries.
- Fold the corners of each square toward the center, slightly overlapping, to form either a pinwheel or diamond shape. Press gently to seal the edges. You can also use the extra pastry to make decorative leaves and place them on top.
- Brush the edges of each pastry with the beaten egg for a golden finish.
- Arrange the pastries on the prepared baking sheet and bake for 18-20 minutes, or until they are puffed and golden brown.
- Let the pastries cool for 5 minutes, then dust with powdered sugar before serving.
22. Lemon Loaf Cake

Lemon Loaf Cake is a light and refreshing dessert that’s perfect for Father’s Day. This cake is soft, moist, and packed with bright lemon flavor, making it the ideal treat to balance out a rich meal. I love how simple it is to make, yet it feels so special with its tangy lemon glaze on top. The refreshing citrus flavor makes it a great option for a spring or summer celebration, and it’s light enough to enjoy after a hearty meal.
You can read more about this recipe and get a printable recipe card here.
Servings: 8-10
Ingredients:
For the Cake:
- 1 ½ cups all-purpose flour
- 1 teaspoon baking powder
- ½ teaspoon baking soda
- ½ teaspoon salt
- 1 cup granulated sugar
- 2 tablespoons lemon zest (from about 2 lemons)
- 4 large eggs
- 1 cup sour cream (8 ounces)
- ½ cup fresh lemon juice
- ⅓ cup whole milk
- ⅓ cup vegetable oil
- 1 teaspoon vanilla extract
For the Glaze:
- 2 ¾ cups powdered sugar
- 4 tablespoons fresh lemon juice, or to taste
Instructions:
- Prepare the Cake:
- Preheat your oven to 350°F (175°C). Grease a 9×5-inch loaf pan and line it with parchment paper, leaving an overhang on the sides for easy removal.
- In a medium bowl, whisk together the flour, baking powder, baking soda, and salt. Set aside.
- In a large mixing bowl, combine the sugar and lemon zest. Rub the zest into the sugar using your fingers until it becomes fragrant and slightly moist.
- Add the eggs to the lemon-sugar mixture, one at a time, beating well after each addition until the mixture is light and fluffy.
- Stir in the sour cream, lemon juice, milk, vegetable oil, and vanilla extract until well combined.
- Gradually add the dry ingredients to the wet ingredients, mixing until just combined. Be careful not to overmix.
- Pour the batter into the prepared loaf pan and smooth the top with a spatula.
- Bake for 55-60 minutes, or until a toothpick inserted into the center of the cake comes out clean. Allow the cake to cool in the pan for 20 minutes, then use the parchment paper overhang to lift the cake out of the pan and transfer it to a wire rack. Let the cake cool completely.
- Make the Glaze:
- While the cake cools, prepare the glaze by whisking together the powdered sugar and lemon juice in a medium bowl. Start with 4 tablespoons of lemon juice and add more if you prefer a thinner glaze.
- Once the cake is completely cool, drizzle the glaze evenly over the top, allowing it to drip down the sides. Let the glaze set for about 30 minutes before slicing the cake.
- Store the cake in an airtight container at room temperature for up to 2 days, or refrigerate for up to a week. You can also freeze the cake for up to 3 months.
23. Mango Cheesecake

Mango Cheesecake is a tropical twist on a classic dessert that’s perfect for Father’s Day. The smooth, creamy cheesecake filling is complemented by the sweet, juicy mango topping, creating a refreshing and indulgent treat. I love how the mango adds a bright, fruity flavor that pairs so well with the rich, creamy texture of the cheesecake.
Servings: 10
Ingredients:
For the Crust:
- 1 ½ cups digestive biscuits crushed into crumbles
- 1/3 cup melted unsalted butter
For the Filling:
- 24 oz (680g) cream cheese, softened
- 1 cup powdered sugar
- 2 teaspoons vanilla extract
- 1 ½ cups mango puree
- 1 tablespoon lemon juice
- 1 ½ cups whipped cream
For the Topping:
- 1 cup diced mango
- 2 tablespoons sugar
- 1 tablespoon lemon juice
Instructions:
-
In a medium mixing bowl, combine the digestive biscuit crumbs with the melted butter.
-
Press the mixture into the base of a springform pan to create an even crust.
-
Place it in the refrigerator to set while preparing the filling.
-
In a large mixing bowl, beat the cream cheese with a spatula to soften, until smooth.
-
Add the powdered sugar and vanilla extract, beating until well combined.
-
Mix in mango puree and lemon juice until the mixture is smooth.
-
Gently fold in the whipped cream until the filling is light and airy.
-
Pour the filling over the crust, spreading it evenly.
-
Refrigerate for at least 4 hours or until set.
-
In a saucepan, combine the diced mango, sugar, and lemon juice.
-
Cook over medium heat until the mango is softened, and the sugar is dissolved.
-
Allow the mixture to cool before spreading it over the chilled cheesecake.
-
Scatter the mango pieces over the cheesecake.
-
Slice and serve.
24. Meyer Lemon Curd Galette

Meyer Lemon Curd Galette is a wonderfully rustic and refreshing dessert that’s perfect for Father’s Day. The flaky, buttery crust is filled with a smooth, tangy Meyer lemon curd that’s both sweet and tart, creating the perfect balance of flavors. I love how easy it is to make compared to a traditional pie, yet it feels so special with its golden, crispy edges and vibrant lemon filling. The Meyer lemons give it a unique twist, offering a softer, sweeter citrus flavor. This galette is a great way to bring a little elegance to your celebration while keeping things simple and delicious.
Servings: 8
Ingredients:
Homemade Pastry:
- 1 ¼ cups all-purpose flour
- ½ cup unsalted butter (cold, cubed)
- 1 tablespoon granulated sugar
- ¼ teaspoon salt
- ¼ cup ice water
Meyer Lemon Curd:
- Zest from 2 Meyer lemons
- 1 cup fresh Meyer lemon juice (4-6 lemons)
- 1 cup granulated sugar
- ½ cup unsalted butter (room temperature)
- 4 medium eggs
- Pinch of salt
Galette:
- Powdered sugar, lemon slices for garnish (optional)
Instructions:
-
Blend flour, sugar, and salt in a food processor.
-
Add cold butter; pulse until mixture resembles coarse crumbs.
-
Gradually add ice water; pulse until dough forms.
-
Form into a ball, wrap in cling film, and chill for 30 minutes.
-
Roll out on a floured surface into a rustic, uneven circle. Set aside.
-
In a bowl over simmering water, whisk lemon zest, juice, sugar, butter, eggs, and a pinch of salt.
-
Whisk until thickened (10-12 minutes).
-
Let cool to room temperature.
-
Preheat oven to 400°F (200°C). Line a baking sheet with parchment paper.
-
Spread lemon curd over pastry, leaving a border.
-
Fold edges over the curd, pressing to seal.
-
Bake for 45 minutes or until golden and set.
-
Serve the galette warm or at room temperature, garnished with powdered sugar and lemon slices if desired.
25. Passion Fruit Cheesecake

Passion Fruit Cheesecake is a tropical twist on a classic favorite that’s perfect for Father’s Day. The creamy, rich cheesecake is balanced by the tangy and fragrant passion fruit topping, creating a delightful burst of flavor in every bite. I love how the sweetness of the cheesecake pairs so beautifully with the exotic tartness of the passion fruit, making it feel like a refreshing treat.
You can read more about this recipe and get a printable recipe card here.
Servings: 12
Ingredients:
Graham Cracker Crust:
- 18 graham cracker (crumbs)
- 1/2 cup unsalted butter, melted
- 1/4 cup granulated sugar
Cheesecake Filling:
- 3 (8 oz) packages cream cheese, softened
- 1 cup granulated sugar
- 1 tsp vanilla extract
- 3 large eggs
- 1/2 cup sour cream
- 1/2 cup heavy cream
- 1/2 cup seedless passion fruit pulp (sifted to remove seeds)
Passion Fruit Coulis Topping:
- ½ cup passion fruit pulp
- ¼ cup sugar
- 1 tablespoon cornstarch
- 1 tablespoon lemon juice
Instructions:
-
Preheat your oven to 350°F (175°C).
-
In a medium bowl, mix graham cracker crumbs, melted butter, and sugar until well combined.
-
Press the mixture evenly into the bottom of a 9-inch springform pan.
-
Bake for 10 minutes, then set aside to cool while preparing the filling.
-
Lower the oven heat to 325°F (160°C).
-
To prepare the seedless passion fruit pulp, cut the passion fruits in half and scoop the pulp into a fine mesh sieve placed over a bowl. Press the pulp through the sieve with the back of a spoon to extract the juice and pulp, leaving the seeds behind.
-
In a large bowl, beat the cream cheese and sugar together until smooth and creamy.
-
Add the vanilla extract and mix until combined.
-
Add the eggs one at a time, beating well after each addition.
-
Mix in the sour cream and heavy cream until fully incorporated.
-
Sift and fold in the seedless passion fruit pulp until evenly distributed.
-
Pour the cheesecake filling over the cooled crust, smoothing the top with a spatula.
-
Bake in the preheated oven for 60 minutes, or until the center is almost set (it should still be slightly jiggly in the middle).
-
Turn off the oven, crack the door open, and let the cheesecake cool in the oven for 1 hour.
-
Remove from the oven and let it cool completely at room temperature. Then refrigerate for at least 4 hours or overnight.
-
In a small saucepan, combine the passion fruit pulp and sugar.
-
Cook over medium heat until the sugar is dissolved.
-
In a small bowl, mix the cornstarch with the lemon juice to make a slurry.
-
Add the cornstarch slurry to the passion fruit mixture, stirring constantly until it thickens, about 3-5 minutes.
-
Remove from heat and let it cool to room temperature.
-
Once the cheesecake is set, pour the cooled passion fruit coulis over the top, spreading it evenly.
-
Refrigerate the cheesecake for another hour to allow the topping to set.
-
Carefully remove the cheesecake from the springform pan and transfer it to a serving plate.
-
Slice and serve chilled.
I hope these 25 Father’s Day desserts give you some great ideas for celebrating the day. Whether you’re making a classic like carrot cake cupcakes or something a little different like passion fruit cheesecake, there’s something here for every taste.