30 Irresistible Bite-Size Snacks to Keep You Going
If you’re anything like me, you know that sometimes a full meal just isn’t what you need, but a little something to nibble on definitely hits the spot. That’s where bite-size snacks come in. They’re perfect for those moments when you want a quick boost without the fuss of sitting down for a big meal. Plus, they’re super fun to make and even more fun to share!
Over the years, I’ve tried all kinds of mini snacks, from sweet little bites that satisfy my dessert cravings to savory nibbles that keep me fueled during a busy day. What I love most is how versatile these little snacks are, they’re great for snacking solo, but also fantastic for parties, road trips, or whenever you just want something tasty in small doses. And honestly, there’s something kind of addictive about having a bunch of tiny treats to munch on throughout the day.
So, whether you’re looking for quick ideas to stash in your bag or fun finger foods to wow your friends, I’ve rounded up 30 irresistible bite-size snacks that will keep you going. They’re easy to make, full of flavor, and guaranteed to hit that snack craving just right.
1. Golden Caramel No Bake Cookies

Okay, these Golden Caramel No Bake Cookies are basically snack magic in bite-size form. They come together super quickly, no oven required, and pack this amazing combo of rich caramel, toasted coconut, chewy oats, and a little crunch from pecans or almonds if you’re feeling fancy. Plus, that sprinkle of flaky sea salt on top? It’s the perfect salty-sweet finishing touch that makes these little bites totally addictive. Whether you need a quick sweet fix or something to impress at your next get-together, these cookies are definitely the snack to keep handy.
You can read more about this recipe and get a printable recipe card here.
Servings: 20
Ingredients:
- ½ cup unsalted butter
- ¾ cup brown sugar, packed
- ¼ cup honey (or maple syrup for a twist)
- ½ teaspoon salt
- ½ cup heavy cream
- 1 teaspoon vanilla extract
- 2 ½ cups toasted shredded coconut
- 1 cup quick oats
- ½ cup chopped pecans or almonds (optional)
- ¼ teaspoon flaky sea salt for garnish
Instructions:
-
Line a baking sheet with parchment paper.
-
In a medium saucepan over medium heat, melt the butter, then add brown sugar, honey, and salt. Stir constantly until the mixture bubbles. Let it simmer for 3 minutes.
-
Remove from heat, stir in heavy cream and vanilla extract. Mix well.
-
In a large bowl, mix the toasted coconut, oats, and nuts (if using). Pour the warm caramel over the mixture and stir until fully coated.
-
Drop spoonfuls onto the prepared baking sheet. Sprinkle with flaky sea salt.
-
Allow to cool at room temperature for 30 minutes until firm. For faster setting, refrigerate for 15 minutes.
2. Melted Ice Cream Cake Pops

These Melted Ice Cream Cake Pops are just about the cutest little treats ever, and honestly, they taste as fun as they look! Imagine all the sweetness of those soft Lofthouse cookies blended with creamy cream cheese, rolled into perfect little balls, and then dipped in a gorgeous pink candy shell that drips just like melting ice cream. Plus, the sugar cookie cone adds that classic ice cream vibe without any mess. I love how easy they are to make, and those sprinkles on top? Totally the cherry on top of a seriously adorable, bite-size dessert that’s perfect for parties or anytime you want to feel a little fancy with minimal effort.
You can read more about this recipe and get a printable recipe card here.
Servings: 12 pops
Ingredients:
- 10 Lofthouse cookies
- 4 ounces cream cheese softened
- ½ tablespoon sprinkles
- 8 ounces pink candy melts
- 12 sugar cookie cones
- Sprinkles for garnish
Instructions:
- Using an electric mixer combine the cookies, ½ tablespoon of sprinkles and cream cheese.
- Blend until well combined.
- Prepare a tray with parchment paper.
- Roll 1.5 tablespoons of the cookie mixture into a ball and place onto the parchment.
- Repeat with all the mixture.
- Place the tray with the cake balls into the freezer to chill for at least 30 minutes.
- Meanwhile using a serrated knife carefully cut off the ends of the sugar cones.
- In a microwave safe dish in 30 second intervals melt the pink candy melts.
- Dip the end of each cone into the melted chocolate and place onto a cake ball.
- The chocolate should set very quickly and once it has, dip your cake ball into the chocolate and place onto the parchment paper.
- No need to let the excess drip off because you want a little puddle to look like the ice cream is melting.
- Immediately sprinkle with extra sprinkles.
- Let set or place in the fridge for 5 minutes to speed up the setting process.
- Serve!
3. Microwave Banana Oatmeal Cookie Balls

These Microwave Banana Oatmeal Cookie Balls are basically my go-to when I want something quick, tasty, and just a little bit wholesome. Seriously, they come together in minutes with just a ripe banana, peanut butter, oats, and some chocolate chips to satisfy that sweet tooth. You pop them in the microwave, and boom, warm, soft little cookie balls ready to eat in no time. They’re perfect for those moments when you want a snack that feels like a treat but without any of the fuss or guilt. Plus, they’re totally kid-friendly, which is always a win in my book!
You can read more about this recipe and get a printable recipe card here.
Servings: 6
Ingredients:
- 1 banana, make sure it’s ripe
- 1/4 cup peanut butter
- 1 cup quick oats
- 1/4 cup chocolate chips
Instructions:
- Mash the banana really good with a fork in a small bowl. You want it to be smooth, not chunky. That’s why it’s important to use a ripe banana.
- Stir in the peanut butter, oats, and chocolate chips.
- Form the dough into 6 equal size balls and arrange on a microwave safe plate.
- Transfer the plate to the microwave and heat for 1 minute and 10 seconds on high.
- Allow to cool completely before enjoying.
4. Starbucks Copycat Vanilla Cake Pops

If you love Starbucks’ vanilla cake pops but don’t want to splurge every time, these Starbucks Copycat Vanilla Cake Pops are an absolute game changer. They’re surprisingly simple to make at home using a classic cake mix and a little vanilla frosting to keep everything nice and moist. Once you’ve rolled those cake crumbs into perfect little balls, the fun really begins, dipping them in pink candy melts and topping with cute white sprinkles feels just like a mini celebration! I swear, these cake pops are so adorable and delicious, they’re perfect for parties, treats for the kids, or just when you want a fancy little dessert without leaving the house.
You can read more about this recipe and get a printable recipe card here.
Servings: 24
Ingredients:
- 1 box classic cake mix (I used Duncan Hines)
- 3 eggs (as required by the cake mix – this can vary with different brands)
- 1/3 cup oil (as required by the cake mix– this can vary with different brands)
- 1 cup water (as required by the cake mix– this can vary with different brands)
- 1/4 cup vanilla frosting (pre-made)
- 12 oz pink candy melts
- White sprinkles
Instructions:
-
Preheat your oven to the temperature specified on the cake mix box.
-
In a large mixing bowl, combine the cake mix, eggs, oil, and water. Mix until well combined and smooth.
-
Pour the batter into a greased baking pan and bake according to the instructions on the box.
-
Once baked, remove the cake from the oven and allow it to cool completely.
-
Once the cake is completely cooled, crumble it into fine crumbs using your hands or a food processor.
-
Add the vanilla frosting to the cake crumbs and mix until the mixture is well combined and holds together when pressed.
-
Using your hands, scoop out small portions of the cake mixture and roll them into balls. Place them on a baking sheet lined with parchment paper.
-
Freeze the cake balls for about 15-20 minutes, or until they are firm.
-
Melt the pink candy melts according to the package instructions, either in a microwave or using a double boiler.
-
Dip the tip of a cake pop stick into the melted candy, then insert it into a cake ball (about halfway through). This helps secure the stick in the cake ball.
-
Dip the entire cake ball into the melted candy, turning it to coat evenly. Allow any excess coating to drip off.
-
While the coating is still wet, sprinkle the white sprinkles over the top for decoration.
-
Place the cake pop upright in a styrofoam block or cake pop stand to set. Repeat with the remaining cake balls.
-
Allow the cake pops to set completely at room temperature or in the fridge.
-
Once set, the cake pops are ready to be enjoyed! Store any leftovers in an airtight container.
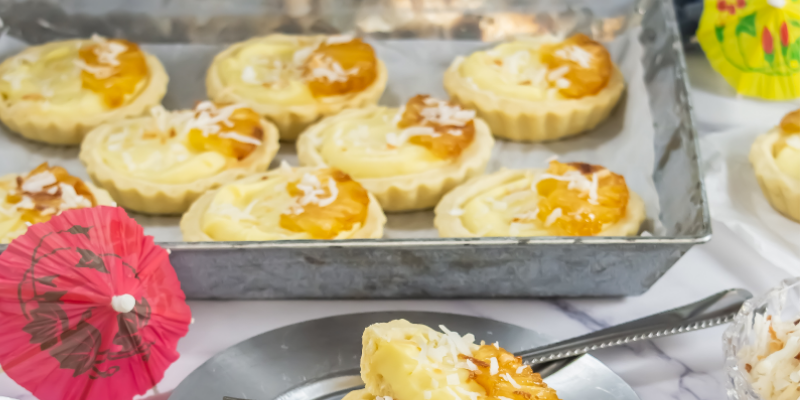
5. Pina Colada Mini Tarts

If you’re dreaming of a tropical escape but stuck at home, these Pina Colada Mini Tarts are the perfect bite-size vacation you didn’t know you needed. The buttery tart shells are crisp and flaky, holding a luscious, creamy coconut filling that’s rich with hints of vanilla and coconut milk. Then there’s the topping. Sweet pineapple slices caramelized with brown sugar and a splash of dark rum, plus a sprinkle of toasted coconut that adds just the right crunch. Every bite feels like a mini tropical party in your mouth, and honestly, making these feels like your own little culinary getaway.
You can read more about this recipe and get a printable recipe card here.
Servings: 18-24
Ingredients:
For the tart shell:
- 1 cup unsalted butter, cold and cut into cubes
- 3 cup flour
- ½ cup sugar
- ½ tsp salt
- 2 egg yolks
- ¼ cup cold water
For the filling:
- ¼ cup coconut oil
- 1 – 13.5 oz can coconut milk, shaken well
- 1 tsp vanilla
- 1 cup heavy cream
- 1 egg
- 4 egg yolks
- 3 tbsp corn starch
- ¼ tsp salt
- ½ cup sugar
For the topping:
- 2 cans pineapple slices (rings)
- ¼ cup brown sugar
- 2 tbsp dark rum
- ½ cup flaked coconut
Instructions:
- In a food processor, combine the butter, flour, sugar and salt. Pulse until combined and it appears crumbly.
- Add in the egg yolks and cold water and process just until the dough combines.
- Transfer the dough to a sheet of plastic wrap and wrap tightly. Chill for about an hour.
- Meanwhile, make the filling.
- Place the coconut oil in a medium bowl and cover with a fine mesh strainer. Set aside.
- In a large saucepan, combine the coconut milk and vanilla. Heat over medium for about 10 minutes or until mix is reduced to about 1 cups worth.
- Add in the heavy cream and bring to a simmer again.
- In another medium bowl, combine the egg, egg yolk, corn starch, salt and sugar.
- Whisk briskly for about a minute or until pale yellow in color.
- Once the coconut cream mixture is simmering, remove from the heat. Very slowly, pour over the egg mixture, whisking constantly to temper the eggs without curdling them.
- Once the mixtures are combined and thoroughly mixed, transfer the filling back to the saucepan and heat over medium low for an additional 2-3 minutes. Stir constantly until the mix thickens and leaves track marks from the whisk.
6. Red White & Blue Chocolate Covered Chips

If you love that perfect salty-crunchy snack but want to take it up a notch, these Red White & Blue Chocolate Covered Chips are absolute fireworks in snack form. Imagine crispy wavy potato chips dipped in silky white chocolate, then drizzled with vibrant red and blue chocolate zigzags, all topped off with a festive sprinkle mix that screams party time. They’re so fun to make (and eat!), a total crowd-pleaser whether you’re gearing up for a holiday, game day, or just craving something sweet and salty all at once.
Read more about this recipe and get a printable recipe card here.
Servings: 8
Ingredients:
- 1 Bag of Wavy Potato Chips
- 10 Ounce White Melting Chocolate
- 1 Ounce Blue Melting Chocolate
- 1 Ounce Red Melting Chocolate
- Red, White, and Blue Sprinkle Mix
Instructions:
- Start by melting the white chocolate melts. Put them in a medium size microwave safe bowl and heat them in the microwave in 30 second increments until the chocolate is melted smooth.
- Dip the potato chips in the chocolate either half or all the way. Use a fork to take the fully dipped chips out of the chocolate. Wipe off the excess chocolate and place the chips on a baking sheet lined with parchment paper.
- Let the chips sit out to dry.
- Next place the red and the blue chocolate melts in their own microwave safe bowls, one a time, melt them in 30 second increments until its liquid.
- Pour the red chocolate in a piping bag, tie the end and do the same with the blue chocolate. Cut a small hole in the tip.
- Pipe the red and blue chocolate in a zig zag pattern over the half and fully covered chocolate chips.
- While the chocolate is still wet sprinkle the sprinkles mix randomly over the chips. Let them sit out to dry.
- Serve and Enjoy!
7. No Bake Oreo Cake Pops

If you’re a fan of Oreo cookies and cheesecake, these No Bake Oreo Cake Pops are basically snack heaven in bite-size form. They’re super simple to make. Just crush up Oreos, mix them with cream cheese until it feels like cookie dough, then roll into little balls. After a quick chill, you dunk them in melted chocolate and jazz them up with sprinkles or crushed nuts. I love how they’re rich and creamy but still totally fun to eat, plus no oven needed, which means less fuss and more time enjoying these delicious bites!
Servings: 20 pops
Ingredients:
- 2 cups Oreo cookies, crushed (250 g)
- 4.5 oz cream cheese (125 g)
- 7 oz chocolate (milk, dark, or white) (200 g)
- 1 tbsp coconut oil (optional, for a smoother coating) (15 ml)
- Decorations: sprinkles, crushed cookies, chopped nuts, chocolate shavings
Instructions:
-
Use a food processor to blend Oreo cookies into fine crumbs.
-
Add cream cheese and mix until a smooth, uniform dough forms.
-
Roll the mixture into balls, about 1 inch (3 cm) in diameter.
-
Place the balls on a plate and refrigerate for 20–30 minutes or freeze for 10 minutes to firm up.
-
Melt chocolate in a double boiler or microwave in 15–20 second intervals, stirring until smooth.
-
Stir in coconut oil, if using, for added shine and smoothness.
-
Insert a stick or skewer into each chilled ball.
-
Dip each ball into the melted chocolate, rotating to coat evenly.
-
While the chocolate is still soft, sprinkle with your choice of toppings.
-
Place the pops on parchment paper and let them set at room temperature or in the fridge.
-
Once the coating is fully hardened, serve and enjoy your no-bake Oreo cheesecake treats!
8. Red Velvet Cake Pops

If you love all things red velvet but want to enjoy it in a fun, bite-size way, these Red Velvet Cake Pops are seriously the perfect treat. I’m obsessed with how easy they come together. Just whip up a quick mug cake, crumble it up, mix in some creamy homemade buttercream, and then roll it all into little balls. Dunking those cake balls in silky white chocolate and topping them with colorful sprinkles makes them look almost too cute to eat (almost!). They’re fancy enough for parties but simple enough to whip up on a whim whenever that red velvet craving hits.
You can read more about this recipe here.
Servings: 8-10
Ingredients:
For the Red Velvet Cake:
- All-purpose flour: ¼ cup
- Sugar: 2 tbsp
- Cocoa powder: 1 tsp
- Baking powder: ¼ tsp
- Milk: 5 tbsp
- Apple cider vinegar: ½ tsp
- Butter (melted): 1.5 tbsp
- Red food coloring: 1 tsp
For the butter cream:
- Sugar (powdered): ¼ cup
- Butter (room temperature): 50 grams
- Milk: 1 tbsp
- Vanilla essence: ½ tsp
For the cake pops:
- Prepared red velvet cake
- Prepared buttercream: 2 tbsp
- Wooden sticks
- White chocolate (melted): As required
- Sprinkles: To garnish
Instructions:
- Start by making the mug cakes. In a mixing bowl, combine all the ingredients. The mixture should be thick and well-blended.
- Transfer the batter to a microwave-safe or oven-safe cup.
- Microwave the mixture for 70 seconds to 1 minute, or until the cake rises. If you’re using an oven, preheat it to 180°C (350°F) and bake the mug cake for 15-20 minutes. Use a toothpick to check if the cake is fully cooked.
- While the cake is baking, prepare the buttercream. In a bowl, whisk the butter until it forms peaks. If you’re using a hand whisk, this will take about 5 minutes; an electric whisk will make it much quicker.
- Add the powdered sugar and continue whisking until the texture becomes smooth.
- Add the milk and vanilla essence, whisking again until the frosting is creamy and smooth.
- Once the cake is done, remove it from the microwave or oven and allow it to cool to room temperature.
- When the cake is cool enough, crumble it into a mixing bowl.
- Add the prepared buttercream frosting to the crumbled cake and mix well.
- Take small portions of the mixture and roll them into round balls.
- Dip a wooden stick into the melted white chocolate, then insert it into the center of each cake ball. Refrigerate for about 10 minutes to set.
- After the cake balls are firm, dip them into the melted white chocolate, covering them evenly. Immediately sprinkle with your choice of sprinkles. Use a Styrofoam block or cake pop stand to keep the cake pops upright.
- Refrigerate the decorated cake pops for another 15 minutes until they are fully set.
- Once set, your cake pops are ready to enjoy!
9. Firecracker Fudge

If you’re craving a snack that’s sweet, creamy, and just a little bit explosive, this Firecracker Fudge is exactly what you need. It’s super simple to make. Just melt together white chocolate chips and frosting for that rich, smooth base, then stir in some colorful blue and red Pop Rocks for a fun, fizzy surprise with every bite. I love how this fudge looks festive and tastes like a party in your mouth, making it perfect for holidays, game days, or anytime you want to add a little sparkle to your snack game.
You can read more about this recipe and get a printable recipe card here.
Servings: 24
Ingredients:
- 1 Can White Frosting (16 ounces)
- 1 ½ Cups White Chocolate Chips
- 3 Packages Blue Pop Rocks
- 3 Packages Red Pop Rocks
Instructions:
-
Line an 8×8-inch pan with parchment paper and set aside.
-
Place the chocolate chips in a medium microwave-safe bowl.
-
Microwave in 30-second intervals for up to 3 minutes, stirring each time and adjusting the chocolate chips from the bottom to the top.
-
Once the chocolate chips are smooth and creamy with no lumps, set the bowl aside.
-
Remove the lid and film from the frosting container and microwave for 1 minute.
-
Immediately pour the melted frosting into the bowl with the white chocolate and stir until fully combined.
-
Add two packets of blue Pop Rocks and two packets of red, folding gently until evenly distributed.
-
Pour the mixture into the prepared pan and spread it out evenly.
-
Sprinkle the remaining Pop Rocks on top of the fudge.
-
Let the fudge sit at room temperature for 8 hours, or until fully hardened.
-
Slice and enjoy!
10. Red White & Blue Drunken Cherries

If you’re looking for a grown-up snack that’s both fun and festive, these Red White & Blue Drunken Cherries are absolute perfection. I love how simple they are to make. Just soak maraschino cherries in whipped cream vodka overnight, then dip them in creamy white chocolate and roll them in patriotic nonpareils. They’re sweet, boozy, and totally bite-size, making them the perfect party treat or just a little cheeky indulgence when you want something special. Plus, holding a cherry by the stem just adds that extra bit of fun while you snack!
You can read more about this recipe and get a printable recipe card here.
Servings: About 36 cherries
Ingredients:
- 2 Jars Maraschino Cherries with Stems (10 ounces each)
- 12 Ounces Whipped Cream Vodka
- ⅓ Cup White Chocolate Chips
- 2 Ounces Red White and Blue Nonpareils
Instructions:
-
Pour both jars of maraschino cherries into a bowl. Pick out any cherries that don’t have stems or are broken, like halves or any that won’t be good for dipping.
-
Transfer the good cherries into a mason jar. Pour the vodka over the cherries, making sure they’re completely covered.
-
Seal the jar and place it in the fridge overnight to allow the cherries to soak up the vodka.
-
After the cherries have soaked, drain them and gently lay them out on paper towels. Pat them dry to remove any excess moisture.
-
Place the white chocolate chips in a small microwave-safe bowl. Microwave in 30-second intervals, stirring each time, until the chocolate is smooth and lump-free (about 1 ½ minutes total).
-
Pour the red, white, and blue nonpareils into a small bowl and line a plate or small sheet pan with parchment paper.
-
Using the stem, pick up one cherry at a time and dip the bottom half into the melted white chocolate. Gently run the bottom of the cherry along the edge of the bowl to remove any excess chocolate.
-
Immediately dip the cherry into the nonpareils, then place it onto the parchment paper. Repeat this process with all the cherries.
-
Allow the cherries to sit for about 5 minutes to let the chocolate harden. Most of them will dry by the time you’re done, but this will give the last ones a chance to set. Enjoy!
11. Mini Pigs in a Blanket

Mini Pigs in a Blanket are my ultimate snack-time comfort food. They’re super easy to whip up and always disappear fast! Using that trusty refrigerated croissant dough means you get perfectly flaky, buttery wraps around juicy little cocktail sausages in no time. I love brushing them with egg wash and sprinkling poppy seeds on top because it makes them look so golden and irresistible straight out of the oven. They’re perfect for parties, movie nights, or just whenever you want a tasty finger food that hits all the right savory notes. Plus, dunking them in your favorite sauce just takes them over the edge!
You can read more about this recipe and get a printable recipe card here.
Servings: 24 mini pigs in blankets
Ingredients:
- 1 refrigerated can of croissant dough (with 12 croissants)
- 24 cocktail sausages (pre-cooked)
- 1-2 eggs, beaten (for egg wash)
- 1 tsp poppy seeds, for sprinkling
Instructions:
- Preheat your oven to the temperature indicated on the croissant dough package, usually around 350°F (175°C).
- Open the refrigerated can of croissant dough and carefully unroll it. You’ll find 12 triangular pieces of dough.
- Cut along the perforated lines of the dough triangles to make 24 smaller triangles. This will provide enough dough to wrap around each mini sausage.
- Take one of the smaller dough triangles and place a mini sausage at the wide end. Roll the dough around the sausage. Repeat with all the sausages and dough triangles.
- In a small bowl, beat the eggs. Using a pastry brush or your fingers, lightly brush each wrapped sausage with the beaten egg to help the dough brown nicely during baking.
- Sprinkle poppy seeds over the egg-washed dough-wrapped sausages for a pleasant visual appeal and a subtle nutty flavor.
- Place the prepared mini pigs in a blanket on a baking sheet lined with parchment paper, leaving some space between each one for even baking.
- Bake for about 15-18 minutes, or until the pigs in a blanket are golden brown and the dough is cooked through.
- Once baked, remove from the oven and let them cool slightly before serving.
- Enjoy your delicious homemade mini pigs in a blanket with your favorite dipping sauces like ketchup, mustard, or barbecue sauce!
12. Pizza Bagel Bombs

Pizza Bagel Bombs are basically my idea of the perfect snack – like a pizza and a bagel had a little love child, and it’s pure deliciousness in every bite. The dough is super simple with just self-rising flour and Greek yogurt, which makes it soft but sturdy enough to hold all that melty cheese, tangy pizza sauce, and pepperoni goodness inside. I love brushing them with butter and topping with bagel seasoning for that extra flavor punch and golden finish. They’re fun to make, even more fun to eat, and seriously perfect for snack time, game day, or whenever you want a little pizza party without the fuss of slicing up a whole pie.
Servings: 8-10
Ingredients:
- 1 ½ cups self-rising flour
- 1 cup plain Greek yogurt (full fat works best)
- ¼ tsp oregano
- ¼ tsp garlic powder
- Pinch of salt
Instructions:
-
Preheat your oven to 375°F (190°C). Line a baking sheet with parchment paper.
-
Divide the dough into 8-10 equal pieces.
-
Flatten each piece into a small disc (about 3-4 inches in diameter).
-
Spoon about 1-2 tsp pizza sauce in the center, then add some cheese and a few pepperoni slices.
-
Carefully pull the edges of the dough up around the filling, pinching and sealing the dough fully to make a ball.
-
Place each stuffed ball seam-side down on the baking sheet.
-
Brush the tops with either melted butter or beaten egg for a golden finish.
-
Sprinkle bagel seasoning (everything bagel seasoning or your favorite mix) on top.
-
Bake for about 18-22 minutes, or until golden brown and cooked through.
-
Let cool for 5 minutes before serving.
13. Twinkie Corn Dogs

Twinkie Corn Dogs are seriously one of those fun, nostalgic snacks that instantly put a smile on my face, and they’re crazy easy to make! Basically, you just pop a skewer into a Twinkie to give it that classic corn dog look, then get creative with red and yellow icing to mimic ketchup and mustard. It’s such a silly, sweet twist on a classic fair food, and perfect for parties, kids’ snacks, or just whenever you want something cute and totally unexpected. Plus, decorating them is half the fun! Who doesn’t love a little edible art?
Servings: 6 corn dogs
Ingredients:
- 6 Twinkies
- ¼ cup red decorating icing
- ¼ cup yellow decorating icing
- Bamboo skewers
Instructions:
-
Gently unwrap each Twinkie and insert a wooden skewer into one end to create the “corn dog” handle.
-
Lay the skewered Twinkies on a flat surface or tray.
-
Using red icing, pipe a wavy line across the top of each Twinkie to resemble ketchup.
-
Repeat with yellow icing to mimic mustard. You can do both colors or just one, your choice!
14. Air Fryer Accordion Potatoes

Air Fryer Accordion Potatoes are hands-down one of my favorite snack discoveries — they’re crispy, golden, and just so fun to eat! I love how the thin slices fan out like a little potato accordion, making every bite perfectly crispy on the edges but soft and tender inside. You just toss them with olive oil and salt, pop them in the air fryer, and let it work its magic without any mess or fuss. They’re a total crowd-pleaser, whether you’re snacking solo or serving up something impressive at your next get-together.
Servings: 4
Ingredients:
- 2 lbs Golden potatoes
- 5 tbsp olive oil
- Salt, to taste
Instructions:
- Peel the potatoes and rinse them under cold water. Then dab them dry using kitchen towels.
- Slice the potatoes in about a quarter, to a half inch.
- Place the potato slices on your cutting board and thinly slice them on one side. Make sure to place chopsticks on each side, so you don’t fully cut the potatoes through.
- Then flip the potato slices over and cut the other side diagonally.
- Cover the potatoes with olive oil and season with salt.
- Put them in the air fryer for 30-35 minutes on 350 degrees, or until golden brown. Make sure to flip them over halfway.
- Serve while hot.
15. Apple Hand Pies

Apple Hand Pies are like little pockets of fall magic that you can hold in your hand, and honestly, they’re my absolute favorite when I want something sweet but portable. The combo of tart Granny Smiths and sweet Honeycrisp apples cooked down with cinnamon and sugars makes the filling perfectly cozy and comforting. I love using store-bought pie crust because it keeps things easy but still flaky and golden when baked. Then, the best part is drizzling that sweet vanilla glaze on top for just the right touch of indulgence. They’re perfect for snacking on the go, sharing at gatherings, or just treating yourself to a homemade sweet bite that feels extra special.
Servings: 12 pies
Ingredients:
For the Filling:
- 2 smaller Granny Smith apples, peeled, cored, and diced
- 1 Honeycrisp apple, peeled, cored, and diced
- 3 tablespoons granulated sugar
- 1 tablespoon brown sugar
- 1 teaspoon ground cinnamon
- 1 tablespoon lemon juice
- 1 tablespoon butter
For the Assembly:
- 2 sheets of store-bought pie crust
- 1 egg, beaten (for egg wash)
For the Glaze:
- 1 cup powdered sugar
- 1-2 tablespoons milk
- 1/4 teaspoon vanilla extract
Instructions:
-
In a medium saucepan, melt the butter over medium heat. Add the diced Granny Smith and Honeycrisp apples, granulated sugar, brown sugar, cinnamon, and lemon juice.
-
Cook for about 5-7 minutes, until the apples have softened slightly.
-
Remove from heat and let the filling cool.
-
Preheat your oven to 400°F (200°C) and line a baking sheet with parchment paper.
-
Roll out the store-bought pie crust and cut out circles (about 4-5 inches in diameter) using a cookie cutter or the rim of a glass.
-
Place a spoonful of apple filling in the center of one dough circle.
-
Top with a second dough circle, gently pressing down around the edges to seal.
-
Crimp the edges with a fork to fully seal the pie.
-
Brush the tops with beaten egg for a golden finish.
-
Use a small knife to cut two small slits on top of each pie to allow steam to escape while baking.
-
Place the assembled hand pies on the prepared baking sheet and bake for 20-25 minutes, or until golden brown.
-
Remove from the oven and let cool slightly.
-
In a small bowl, whisk together powdered sugar, milk, and vanilla extract until smooth.
-
Drizzle the glaze over the cooled hand pies and allow it to set for a few minutes.
16. Air Fryer Meatballs (from Frozen)

Air Fryer Meatballs from frozen are basically my lifesaver when I want a quick, no-fuss snack that’s still super satisfying. I love how easy they are. Just toss them in the air fryer, spray a little oil, and in less than 10 minutes you’ve got perfectly browned, juicy meatballs ready to pop in your mouth. They’re great on their own, or you can jazz them up with your favorite dipping sauce or toss them into a slider or pasta. Honestly, having a bag of these in the freezer means I’m always just minutes away from a tasty bite!
Servings: 4
Ingredients:
- 1 bag (approx. 1lb) frozen meatballs
- spray oil
Instructions:
- Preheat your air fryer to 390°F for about 3-5 minutes.
- Place the frozen meatballs in the air fryer basket, arranging them in a single layer.
- Spray the meatballs.
- Cook the meatballs in the air fryer at 390°F for 5-6 minutes, shaking the basket halfway through the cooking time for even heating.
- Once the meatballs are heated through and browned, carefully remove them from the air fryer.
- Serve immediately.
17. Air Fryer Garlic Butter Steak Bites

Air Fryer Garlic Butter Steak Bites are basically my idea of snack perfection. They’re juicy, flavorful little chunks of steak cooked to tender, bite-size glory and then drenched in rich, garlicky butter. I love how easy it is to toss the steak pieces in a quick marinade with spices and a hint of brown sugar, which adds just the right touch of sweetness and depth. Then the air fryer does its magic, cooking them up perfectly in minutes without any hassle. Drizzling that melted garlic butter over the top is the ultimate finishing move that turns these steak bites into a seriously indulgent snack or appetizer
Servings: 2-4
Ingredients:
- 16 oz sirloin steak
- 2 tsp olive oil
- 1/4 tsp salt
- 1/4 tsp pepper
- 1/4 tsp onion powder
- 1/4 tsp garlic powder
- 1/2 tsp brown sugar
For the Garlic Butter:
- 1-2 cloves of garlic, minced
- 3 tbsp salted butter
- 1 tsp chopped parsley
Instructions:
-
Begin by cutting the sirloin steak into bite-sized pieces, making sure they’re roughly the same size for even cooking.
-
In a bowl, mix together the olive oil, salt, pepper, onion powder, garlic powder, and brown sugar to create a marinade.
-
Add the steak pieces to the marinade and toss until they’re fully coated. Let them marinate for 15 to 20 minutes to soak up the flavors.
-
While the steak marinates, preheat your air fryer to 400°F (200°C).
-
When preheated, arrange the steak pieces in a single layer inside the air fryer basket, avoiding overcrowding to allow proper air circulation.
-
Cook the steak bites at 400°F for 4 to 6 minutes, adjusting time based on how well done you like your meat.
-
While the steak cooks, melt the salted butter in a microwave-safe bowl. Stir in the minced garlic and chopped parsley until combined.
-
Once the steak is cooked, transfer it to a serving plate.
-
Drizzle the garlic butter sauce evenly over the steak bites.
-
Let the steak rest for a few minutes to let the flavors blend.
-
Serve your air fryer garlic butter steak bites hot and enjoy!
18. Avocado Deviled Eggs

Avocado Deviled Eggs are my go-to when I want a snack that feels a little fancy but is super simple to whip up. Creamy avocado mashed with egg yolks and a bit of sour cream makes the filling extra smooth and rich, while the hint of lemon juice keeps everything bright and fresh. I love how these deviled eggs take a classic favorite and give it a fresh, creamy twist that’s both satisfying and a little lighter. Plus, a sprinkle of paprika and parsley on top makes them look as good as they taste. They’re perfect for brunch, parties, or just whenever you want a snack that feels a bit special!
You can read more about this recipe and get a printable recipe card here!
Servings: 12 halves (6 eggs)
Ingredients:
- 6 eggs
- 1 avocado
- 2 tbsp sour cream
- ½ lemon, juiced
- Salt, to taste
- Black pepper, to taste
- Parsley, for garnish
- Paprika powder, for garnish
Instructions:
- Fill a pot with water and bring it to a boil over medium-high heat.
- Once the water is boiling, carefully add the eggs and cook for 8-10 minutes.
- After the eggs are done, remove them from the boiling water and place them in a bowl of ice water to cool.
- While the eggs cool, peel and mash the avocado in a separate bowl.
- Slice the cooled eggs in half lengthwise, removing the yolks and adding them to the mashed avocado.
- Stir in the sour cream, lemon juice, salt, and pepper until the mixture is smooth and well combined.
- Gently rinse the egg whites to remove any leftover residue and pat them dry.
- Spoon or pipe the avocado and yolk mixture back into the egg whites.
- If desired, garnish with paprika powder and parsley for a burst of flavor and color.
19. Coconut Fudge

Coconut Fudge is one of those ridiculously easy treats that tastes way fancier than it really is. It’s pure comfort in every bite. The combo of creamy white frosting and melted white chocolate creates this rich, smooth base that’s perfectly balanced by the sweet shredded coconut and a little splash of coconut extract for that extra tropical vibe. I love how simple it is to whip up, with just a few ingredients and no baking required, and chilling it until firm means you get these perfectly chewy, melt-in-your-mouth squares that are totally addictive. Seriously, keep a batch of this fudge on hand for whenever you want a quick sweet escape!
Servings: 16 pieces
Ingredients:
- 1 16-Ounce Can White Frosting
- 10 Ounces White Chocolate Chips
- ½ Cup Sweetened Shredded Coconut
- ½ Teaspoon Coconut Extract
Instructions:
-
Line an 8×8 pan with parchment paper. Avoid using nonstick spray.
-
Put the chocolate chips in a medium mixing bowl and microwave on high for 2 minutes, stirring every 30 seconds, even if the chips haven’t fully melted yet—to prevent overheating.
-
When the chocolate is smooth, remove the lid and foil from the frosting and microwave it on high for 1 minute without stirring.
-
Stir the coconut extract into the melted frosting gently.
-
Pour the frosting mixture into the melted chocolate, then add the shredded coconut. Stir vigorously until fully combined.
-
Transfer the mixture into the prepared pan and refrigerate for 4 hours or until the fudge is set.
-
Cut into 1-inch squares, or your preferred size. Serve and enjoy!
20. Loaded Tater Tots

Loaded Tater Tots are basically the ultimate snack hack when you want something crispy, cheesy, and totally indulgent without any complicated steps. I love how you bake the tots until they’re perfectly golden and crunchy, then top them with crispy chopped bacon, gooey queso, and a drizzle of cool ranch dressing. It’s like a flavor party in every bite! Throw in some fresh scallions for a little pop of color and freshness, and you’ve got a snack that’s just as good for sharing at a game day as it is for treating yourself on a chill night in.
You can read more about this recipe and get a printable recipe card here.
Servings: 4-6
Ingredients:
- 1 package of frozen tater tots (about 32 oz)
- 8 slices of bacon, chopped
- 1 cup queso
- 1/2 cup ranch dressing
- 2 scallions, thinly sliced
- Salt and pepper to taste
Instructions:
-
Preheat your oven to 425°F (220°C), or follow the temperature recommended on your tater tot package if it’s different.
-
Spread the tater tots in a single layer on a baking sheet.
-
Line another baking sheet with foil and place a rack on top. Arrange the bacon slices in a single layer on the rack for even cooking.
-
Place both baking sheets in the oven. Bake the tater tots for 20–25 minutes or until golden and crispy.
-
Bake the bacon for 15–20 minutes, checking around the 12-minute mark to avoid overcooking. Once crisp, remove the bacon and let it cool slightly before chopping.
-
While everything bakes, slice the scallions and chop the cooled bacon.
-
Warm the queso in a microwave-safe bowl or on the stovetop until hot and pourable, about 2–3 minutes.
-
Once the tater tots are done, transfer them to a large serving dish.
-
Drizzle the warm queso evenly over the crispy tater tots.
- Drizzle ranch dressing over the queso.
21. Strawberry Tanghulu

Strawberry Tanghulu is hands-down one of my favorite snacks when I want something that’s both sweet and a little fancy without the fuss. Imagine fresh, juicy strawberries coated in a glossy, crunchy shell of caramelized sugar – that perfect snap every time you bite in is seriously addictive! I love how fun it is to dip each skewer into the hot sugar syrup and then pop them in ice water to get that perfect crackly coating. These skewers are not only gorgeous but also such a unique treat that’s perfect for impressing guests or just treating yourself to something a little special.
You can read more about this recipe and get a printable recipe card here.
Servings: 4-6
Ingredients:
- 10-12 large fresh strawberries
- 1 cup sugar
- 1/2 cup water
- Ice cubes
- Wooden skewers
Instructions:
- Wash and dry the strawberries, leaving the stems intact. Skewer 2-3 strawberries on each wooden skewer.
- In a small saucepan, combine the sugar and water. Cook over medium heat, stirring occasionally, until the mixture reaches 300°F on a candy thermometer (hard crack stage).
- Remove from heat and allow to cool slightly.
- Prepare a bowl filled with ice water.
- Dip each skewered strawberry into the hot sugar mixture, coating it thoroughly. Allow any excess sugar to drip off.
- Immediately dip the coated strawberries into the ice water bath to cool and harden the sugar coating. Remove and pat dry.
- Serve the strawberry tangulu skewers chilled and crispy, as a delicious and unique treat. Enjoy!
22. Mandarine Tanghulu

Mandarine Tanghulu is such a fun twist on the classic sugar-coated snack, and honestly, it’s one of my favorite ways to enjoy mandarins when I want something sweet but a little extra special. The segments get all glossy and translucent after simmering in that simple sugar syrup, making them look almost jewel-like, and the best part is that tangy-sweet burst you get with every bite. I love how easy it is to make, and dipping the mandarins into an ice bath gives them that perfect candy-coated finish that’s crispy on the outside and juicy inside. These are perfect for a refreshing snack or a little fancy treat whenever you’re craving something fresh with a sugary kick!
You can read more about this recipe and get a printable recipe card here.
Servings: 4-6
Ingredients:
- 4 mandarines
- 1/3 cup water
- 1 cup sugar
- Ice cubes
- Wooden Skewers
Instructions:
- Peel the mandarines and separate them into segments.
- In a saucepan, combine the water and sugar over medium heat. Once the sugar is dissolved, do not stir the mixture as it will cause the sugar to crystallise.
- Add the mandarine segments to the sugar mixture, making sure they are evenly coated.
- Allow the mixture to simmer for 7-10 minutes, or until the mandarines are translucent and the syrup has thickened. Dip them in an ice bath for a short while.
- Remove the mandarine segments from the ice bath and place them on a baking sheet lined with parchment paper. Allow them to cool and harden.
- Enjoy your homemade mandarin tanghulu as a sweet and tangy treat!
23. Mini Salmon Quiches

Mini Salmon Quiches are such a delightful little snack that feels fancy but comes together pretty easily. They’re perfect for when you want something savory and satisfying in bite-size form. I love the flaky, buttery crust that holds a rich filling of smoked salmon, creamy eggs, and melty cheese, all topped off with a sprinkle of fresh dill that adds just the right pop of flavor. Baking them in a mini muffin tin means they’re perfectly portioned for parties, brunch, or just a quick snack that feels special without any fuss. Honestly, these little quiches are one of those snacks that always impress but never stress me out in the kitchen!
You can read more about this recipe and get a printable recipe card here!
Servings: 12 mini quiches
Ingredients:
For the Crust:
- 1 cup all-purpose flour
- 1/4 cup unsalted butter, chilled and cubed
- 2-3 tablespoons ice cold water
- Pinch of salt
For the Filling:
- 1/2 cup smoked salmon, chopped
- 1/2 cup grated cheddar or Gruyere cheese
- 4 medium eggs
- 1/2 cup heavy cream
- Salt and pepper to taste
- Chopped dill to garnish
Instructions:
- Preheat the oven to 350°F (175°C).
- Grease and flour a mini muffin tin.
- In a bowl, combine the flour and salt. Add the cubed butter and blend until the mixture resembles coarse crumbs.
- Gradually add the ice-cold water, 1 tablespoon at a time, mixing until the dough starts to come together.
- Roll out the dough on a floured surface and cut into circles to fit the cups of your mini muffin tin.
- Press the dough circles into the cups to form mini crusts. Use a fork to prick the bottoms to prevent puffing. Place the tin in the fridge while you prepare the filling.
- In a bowl, whisk together the eggs, cream, salt, and pepper until fully combined.
- Add a small amount of chopped salmon and grated cheese into each mini crust.
- Pour the egg mixture over the salmon and cheese, filling each crust almost to the top.
- Place the muffin tin in the oven and bake for 15-20 minutes, or until the quiches are set and golden on top.
- Once done, allow the quiches to cool for a few minutes before carefully removing them from the muffin tin.
- Garnish with chopped dill before serving.
24. Nutella Bonbons

Nutella Bonbons are basically little bites of heaven that are way easier to make than you’d think! I love how the combination of smooth Nutella, roasted hazelnuts, and rich melted chocolate comes together to create these creamy, crunchy, and totally indulgent treats. Roasting the hazelnuts adds that amazing nutty flavor, and coating everything in silky chocolate just takes them over the edge.
Servings: 20-25
Ingredients:
- 1 cup semi-sweet chocolate chip morsels
- ½ cup Nutella
- ¼ cup raw hazelnuts
- 3 tbsp unsalted butter
- 1 tbsp powdered sugar
Instructions:
-
Preheat your oven to 350°F.
-
Roast the hazelnuts in the oven for about 5 minutes, then let them cool. Once cool, rub them with your hands to remove the skins.
-
Pulse the hazelnuts in a food processor until finely chopped.
-
In a microwave-safe bowl, combine Nutella and butter. Microwave for about 30 seconds until the butter melts, then stir until smooth.
-
Add powdered sugar to the Nutella mixture and mix well.
-
In a separate bowl, melt the chocolate chips in the microwave for about 2 minutes, stirring every 30 seconds until fully melted.
-
Using the melted chocolate, coat your bonbon mold thoroughly, making sure every cavity is covered. Flip the mold over and let excess chocolate drip out, then scrape off any leftover chocolate.
-
Chill the chocolate-coated mold in the fridge for about 10 minutes, until slightly firm.
-
Place the roasted hazelnuts into the mold cavities.
-
Spoon the Nutella mixture into each cavity, leaving space for more chocolate on top.
-
Pour the remaining melted chocolate over the filled molds, fully covering them. Tap the mold on the table a few times to release air bubbles and help the chocolate settle.
-
Scrape off any excess chocolate from the mold once more.
-
Refrigerate the bonbons for at least 30 minutes, or until completely set.
-
Once firm, pop the chocolates out of the mold and enjoy!
25. Rice Krispie Treats for One

Rice Krispie Treats for One are my ultimate little indulgence when I want that classic childhood snack but without making a giant batch. They come together super fast, just melting marshmallows and butter, then mixing in that crispy puffed rice, and boom, you’ve got a gooey, crunchy treat that’s just the right size to satisfy your sweet tooth without any leftovers. I’m all about adding rainbow sprinkles on top because, let’s be honest, they make everything instantly more fun and festive. Plus, you can enjoy these warm right away or let them set for a bit if you like them firmer. Perfect solo snack vibes!
Servings: 1
Ingredients:
- ½ Cup Puffed Rice Cereal
- ½ Cup Mini Marshmallows
- 1 Teaspoon Salted Butter
- Rainbow Jimmy Sprinkles
Instructions:
-
In a small bowl, combine the butter and mini marshmallows.
-
Microwave for 10-15 seconds, until the marshmallows begin to puff up.
-
Stir well; it may clump into a ball, and that’s perfectly fine.
-
Add the puffed rice to the bowl. Spray your hands with nonstick cooking spray (or wear gloves and spritz the gloves), then mix everything by hand until the cereal is evenly coated.
-
Lightly spray the container with nonstick cooking spray and press the cereal and marshmallow mixture firmly into it.
-
Garnish with rainbow sprinkles and a dollop of whipped topping, if desired.
-
Let it sit and cool for about 10 minutes, or enjoy right away!
26. Taco Pretzel Bites

Taco Pretzel Bites are seriously my new snack obsession. They’re the perfect salty, spicy, buttery combo that just keeps you reaching for more. I love how easy they are to make: just toss those soft sourdough pretzel bites in melted butter mixed with taco seasoning, bake them low and slow to soak up all that flavor, and boom, you’ve got crunchy, flavorful little bites that taste like a fiesta in your mouth. They’re perfect for game days, parties, or whenever you want a snack that’s way more exciting than your average pretzel. Trust me, once you try these, plain pretzels will feel so basic!
Servings: 4-6
Ingredients:
- 1 16-Ounce Bag Sourdough Pretzel Bites
- 1 Stick Salted Butter (½ cup)
- 1 Packet Taco Seasoning (1 ounce)
Instructions:
-
Preheat your oven to 250°F.
-
Melt the butter by microwaving it in a large mixing bowl for about 1 minute, until fully melted.
-
Stir ¾ of the taco seasoning (about 1 ½ tablespoons) into the melted butter.
-
Add the pretzel bites to the bowl and gently toss them until they are completely coated with the seasoned butter.
-
Spread the coated pretzels evenly on a 9×13-inch baking sheet, then sprinkle the remaining taco seasoning over the top.
-
Bake in the oven for 30 minutes.
-
Take the pretzels out of the oven and let them cool for 10 minutes before serving. Enjoy!
27. Frozen Yogurt Bites

Frozen Yogurt Bites are the perfect little snack when I want something cool, refreshing, and just a bit healthy. Plus, they’re ridiculously easy to whip up! I love mixing creamy Greek yogurt with fresh fruit and a sprinkle of crunchy granola, then freezing them into these perfectly portable little bites that are great for snacking anytime. They’re sweet, tangy, and have that satisfying crunch from the granola that makes each bite feel like a mini dessert. Honestly, having a stash of these in the freezer is my secret weapon for beating the heat or just grabbing a guilt-free treat on the go!
You can read more about this recipe and get a printable recipe card here.
Servings: 18
Ingredients:
- 2 cups plain Greek vanilla yogurt
- 1/2 cup blueberries, fresh or frozen
- 1/2 cup strawberries, sliced
- 1/4 cup granola
Instructions:
-
Line a baking sheet with parchment paper for easy removal.
-
In a mixing bowl, combine the Greek yogurt with the vanilla extract (if using plain yogurt). Mix well until smooth.
-
Using a spoon, drop 2–3 tablespoon dollops of the yogurt mixture onto the prepared baking sheet, spacing them apart.
-
Evenly distribute blueberries, sliced strawberries, and a sprinkle of granola on each yogurt dollop.
-
Place the baking sheet in the freezer and freeze for at least 2–4 hours, or until the yogurt is fully frozen and firm.
-
Once the yogurt bites are completely frozen, remove them from the freezer. Enjoy immediately, or store in an airtight container or freezer bag in the freezer for up to 2 weeks.
28. Teriyaki Cauliflower Wings

Teriyaki Cauliflower Wings are one of those snacks that totally satisfy your craving for something crispy and flavorful but without the guilt of traditional wings. I love how the cauliflower gets coated in a crispy panko crust, then gets drenched in a sticky, sweet, and tangy homemade teriyaki sauce that’s packed with garlic and ginger goodness. Toss in a sprinkle of fresh scallions and sesame seeds, and you’ve got a snack that’s crunchy, saucy, and downright addictive.
Servings: 4
Ingredients:
- 1 cauliflower head
- 5 cups panko breadcrumbs
- 1 cup milk, of your choosing (I used soy milk)
- ½ cup flour
- ½ tsp garlic powder
- ½ tsp onion powder
- ¼ tsp salt, or to taste
- ¼ tsp black pepper, or to taste
- 1 Scallion, for garnish
- 1 tbsp sesame seeds, for garnish
Instructions:
-
Begin by cutting the cauliflower into florets.
-
In a medium bowl, combine the milk, flour, garlic powder, onion powder, salt, and pepper. Whisk until smooth.
-
Add the cauliflower florets to the bowl and coat them well with the milk mixture.
-
Next, transfer the cauliflower into the panko crumbs, ensuring each floret is fully covered.
-
Arrange the coated florets in a single layer in the air fryer basket.
-
Air fry at 350°F for 20 minutes.
-
While the cauliflower is cooking, prepare the teriyaki sauce.
-
In a saucepan, combine the water, soy sauce, brown sugar, honey, minced garlic, and minced ginger. Cook over medium-high heat, stirring occasionally, until the sauce thickens and the liquid reduces (about 10-15 minutes).
-
Once the cauliflower is done, drizzle the teriyaki sauce over the florets and top with sliced scallions and sesame seeds.
29. Pumpkin Feta Phyllo Cups

Pumpkin Feta Phyllo Cups are perfect when you want a snack that’s both elegant and packed with cozy, comforting flavors. The crispy, buttery phyllo cups are like little edible bowls holding a delicious mix of tender pumpkin, salty feta, and fresh spinach. Plus a touch of honey if you’re feeling fancy and want that perfect hint of sweetness. I love how these bite-size treats come together with just a few simple ingredients but taste like something straight out of a fancy café. Whether it’s for a party or a special snack, these little cups always feel like a fancy bite that’s surprisingly easy to make!
Servings: 6
Ingredients:
- 6 sheets of phyllo dough
- 200 g pumpkin, peeled and cut into small cubes
- 100 g feta cheese, crumbled
- 1 cup baby spinach, finely chopped
- 2 tbsp olive oil
- Salt and pepper to taste
- 1 tbsp honey (optional)
- 2-3 tbsp melted butter (for brushing the phyllo dough)
- Pumpkin seeds or sesame seeds for garnish (optional)
Instructions:
- Preheat the oven to 180°C (350°F).
- In a skillet, heat 1 tbsp of olive oil and sauté the pumpkin cubes until tender, about 5-7 minutes. Season with salt, pepper, and honey (if using), and stir.
- Add the baby spinach and cook for another 1-2 minutes, until wilted. Turn off the heat and add the crumbled feta cheese. Gently mix the filling.
- Cut the phyllo dough sheets into squares (about 10×10 cm each). Brush each square with melted butter.
- Stack three squares on top of each other, rotating them slightly to form a star shape. Press the stacked squares into a muffin tin, shaping them into cups.
- Fill each phyllo cup with the pumpkin, spinach, and feta filling.
- For extra texture, sprinkle pumpkin seeds or sesame seeds on top if desired.
30. Caprese Skewers

Caprese Skewers are one of my favorite go-to snacks when I want something fresh, light, and bursting with flavor, all in a cute, bite-size package! I love how easy they are to put together: just stacking creamy mozzarella pearls, fragrant basil leaves, and juicy cherry tomatoes on a skewer, then drizzling everything with a tangy balsamic glaze. It’s like having all the best parts of a classic Caprese salad but in a fun, portable form that’s perfect for parties, quick snacks, or even a pretty appetizer.
You can read more about this recipe and get a printable recipe card here.
Servings: 12 skewers
Ingredients:
-
12 cherry tomatoes
-
½ cup mozzarella pearls
-
24 fresh basil leaves
-
1 tbsp balsamic glaze
-
½ tsp black pepper, or to taste
- 12 skewers
Instructions:
- On a skewer place 2 small pearls of mozzarella.
- Then add a basil leaf. You can fold it double if it’s too big.
- Then add a cherry tomato.
- Then add another basil leaf.
- And add 2 small mozzarella pearls again.
- Repeat until you run out of ingredients.
- Drizzle with balsamic glaze and season with black pepper to taste.
These 30 irresistible bite-size snacks are perfect for keeping you fueled, satisfied, and happily munching all day long. Whether you’re craving something sweet, savory, crunchy, or creamy, this list offers easy, fun, and delicious options for any occasion. The best part? These snacks are small enough to enjoy guilt-free but packed with flavor to keep you coming back for more. Try a few (or all!) and keep your snack game strong and seriously tasty!