I’m so excited to share this recipe for Copycat Starbucks Inspired Pink Vanilla Cake Pops because, honestly, these little treats are pure magic. If you love that sweet, vanilla-y, and just a bit nostalgic flavor from the Starbucks bakery case, you’re going to fall head over heels for these cake pops. They’re exactly the kind of fun, bite-sized dessert that brightens up any day, perfect for parties, afternoon pick-me-ups, or just when you want a cute and delicious snack.
Making cake pops always feels like a mini celebration to me. There’s something so satisfying about crumbling up cake, mixing it with frosting, and rolling it all into perfect little balls before dipping them into that dreamy pink coating. And let’s be real, the best part is how customizable they are, whether you want to add a little sparkle, a drizzle of chocolate, or just keep them classic and simple, these pops bring so much joy in every bite.
Plus, they’re a total crowd-pleaser. Whenever I bring these out, people can’t help but smile and grab a few (or a dozen). If you’ve ever wanted to recreate that Starbucks vibe at home, this recipe is your golden ticket. I hope you love them as much as we do!

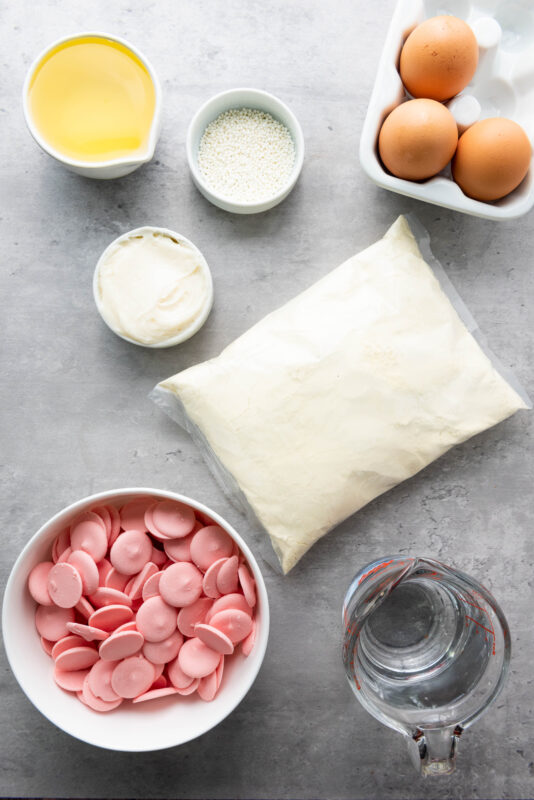
Ingredients
- 1 box classic cake mix (I used Duncan Hines): the base for our fluffy, sweet cake pops.
- 3 eggs: just like the box says, these help bring the cake to life and keep it moist.
- 1/3 cup oil: adds that perfect tender crumb to the cake batter.
- 1 cup water: needed to mix everything together smoothly and get the batter just right.
- 1/4 cup vanilla frosting: adds extra sweetness and helps bind the crumbled cake into perfect balls.
- 12 oz pink candy melts: the star of the show for coating the pops in that pretty, irresistible pink color.
- White sprinkles: a touch of fun and sparkle to finish these cake pops with a festive pop!
Recipe Instructions
You can find a printable recipe card at the bottom of this post.
1. Preheat your oven to the temperature specified on the cake mix box.
2. In a large mixing bowl, combine the cake mix, eggs, oil, and water. Mix until well combined and smooth.


3. Pour the batter into a greased baking pan and bake according to the instructions on the box.

4. Once baked, remove the cake from the oven and allow it to cool completely.

5. Once the cake is completely cooled, crumble it into fine crumbs using your hands or a food processor.


6. Add the vanilla frosting to the cake crumbs and mix until the mixture is well combined and holds together when pressed.


7. Using your hands, scoop out small portions of the cake mixture and roll them into balls. Place them on a baking sheet lined with parchment paper.

8. Freeze the cake balls for about 15-20 minutes, or until they are firm.
9. Melt the pink candy melts according to the package instructions, either in a microwave or using a double boiler.
10. Dip the tip of a cake pop stick into the melted candy, then insert it into a cake ball (about halfway through). This helps secure the stick in the cake ball.


11. Dip the entire cake ball into the melted candy, turning it to coat evenly. Allow any excess coating to drip off.


12. While the coating is still wet, sprinkle the white sprinkles over the top for decoration.

13. Place the cake pop upright in a styrofoam block or cake pop stand to set. Repeat with the remaining cake balls.
14. Allow the cake pops to set completely at room temperature or in the fridge.
15. Once set, the cake pops are ready to be enjoyed! Store any leftovers in an airtight container.

Top Tips
-
Make sure your cake is completely cooled before crumbling it, warm cake can make the mixture too sticky to handle.
-
Don’t skip the frosting! It’s what helps hold the cake crumbs together so your pops stay perfectly round and don’t fall apart.
-
If the cake pop mixture feels too wet, pop it in the fridge for 15-20 minutes before rolling, it firms up nicely.
-
When dipping your pops in the candy melts, dip quickly and gently tap off the excess to avoid thick clumps.
-
If your candy melts get too thick, add a little bit of vegetable oil or shortening to thin it out for a smoother coating.
-
Stick the cake pops in the fridge for a bit after dipping so the coating sets up firm and glossy.
-
Have fun with the sprinkles, add them right after dipping before the coating hardens for the best stick!

My Favorite Ways to Enjoy Vanilla Cake Pops
-
I love grabbing a couple of these cake pops as a quick sweet fix when I’m working at my desk, they’re the perfect little pick-me-up without any mess.
-
They’re such a hit at parties! I always bring a batch and watch them disappear fast, everyone loves how cute and tasty they are.
-
Sometimes I pop one in the fridge for a bit to enjoy it chilled, kind of like a mini ice cream cake on a stick.
-
These cake pops make the sweetest gift, wrapped up in a clear bag with a ribbon, perfect for sharing some love with friends or neighbors.
-
I’m all about pairing them with a cozy cup of tea or coffee; that vanilla and pink coating just makes the whole treat feel extra special.
-
And honestly, they’re just fun to eat, no forks, no plates, just pure, easy, delicious joy in every bite!

Serving & Storing
-
Serve these cake pops at room temperature so the coating stays nice and smooth without getting too hard.
-
They’re perfect for parties, snacks, or even as a fun dessert after dinner, everyone loves how easy they are to grab and enjoy.
-
To store, keep them in an airtight container in the fridge to keep the cake fresh and the coating firm.
-
If you want to enjoy them later, just let them sit at room temperature for 10-15 minutes before eating so they soften up a bit.
-
You can also freeze cake pops for longer storage, just pop them in a freezer-safe container and thaw in the fridge overnight.
-
Avoid stacking them when storing to keep the pretty coating and sprinkles looking perfect!

FAQs
Q: Can I use homemade cake instead of a box mix?
A: Absolutely! Homemade cake works great, just make sure it’s fully cooled and crumbly before mixing with the frosting.
Q: What if my cake pop mixture feels too dry or too wet?
A: If it’s too dry, add a little more frosting, a teaspoon at a time. If it’s too wet, pop the mixture in the fridge for 15-20 minutes to firm up before rolling.
Q: How do I keep the cake pops from falling off the sticks?
A: Dip the tip of each stick into melted candy before inserting it into the cake ball, this helps glue it in place. Also, chilling the pops before dipping helps keep them sturdy.
Q: Can I use regular chocolate instead of candy melts?
A: You can, but candy melts are easier to work with because they melt smoothly and harden with a nice glossy finish.
Q: How long will cake pops stay fresh?
A: Stored in an airtight container in the fridge, they’ll stay fresh for about 5 days.
Q: Can I make these cake pops ahead of time?
A: Definitely! You can make and dip them a day or two ahead, just keep them refrigerated and bring to room temp before serving.

Prep Time
30 minutes
Cook Time
30 minutes
Additional Time
45 minutes
Total Time
1 hour 45 minutes
Ingredients
-
1 box classic cake mix (I used Duncan Hines)
-
3 eggs (as required by the cake mix – this can vary with different brands)
-
1/3 cup oil (as required by the cake mix– this can vary with different brands)
-
1 cup water (as required by the cake mix– this can vary with different brands)
-
1/4 cup vanilla frosting (pre-made)
-
12 oz pink candy melts
-
White sprinkles
Instructions
- Preheat your oven to the temperature specified on the cake mix box.
- In a large mixing bowl, combine the cake mix, eggs, oil, and water. Mix until well combined and smooth.
- Pour the batter into a greased baking pan and bake according to the instructions on the box.
- Once baked, remove the cake from the oven and allow it to cool completely.
- Once the cake is completely cooled, crumble it into fine crumbs using your hands or a food processor.
- Add the vanilla frosting to the cake crumbs and mix until the mixture is well combined and holds together when pressed.
- Using your hands, scoop out small portions of the cake mixture and roll them into balls. Place them on a baking sheet lined with parchment paper.
- Freeze the cake balls for about 15-20 minutes, or until they are firm.
- Melt the pink candy melts according to the package instructions, either in a microwave or using a double boiler.
- Dip the tip of a cake pop stick into the melted candy, then insert it into a cake ball (about halfway through). This helps secure the stick in the cake ball.
- Dip the entire cake ball into the melted candy, turning it to coat evenly. Allow any excess coating to drip off.
- While the coating is still wet, sprinkle the white sprinkles over the top for decoration.
- Place the cake pop upright in a styrofoam block or cake pop stand to set. Repeat with the remaining cake balls.
- Allow the cake pops to set completely at room temperature or in the fridge.
- Once set, the cake pops are ready to be enjoyed! Store any leftovers in an airtight container.
Nutrition Information:
Yield:
24
Serving Size:
per serving
Amount Per Serving:
Calories: 375Total Fat: 20gSaturated Fat: 10gCholesterol: 35mgSodium: 200mgCarbohydrates: 45gFiber: 1gSugar: 35gProtein: 3g