Quick & Adorable Christmas Tree Pops You Can Make in Minutes
I just love finding holiday treats that look festive but don’t take hours to make, and these Christmas Tree Pops are exactly that. They’re colorful, cheerful, and so simple that even the kids can get in on the fun. Every year, I try to add at least one new treat to our Christmas snack lineup, and these candy trees were an instant hit from the very first try.
The best part is that you only need a few basic ingredients to make them. Once the candy melts are ready, it’s just a matter of piping little Christmas tree shapes, adding a star on top, and sprinkling some holiday magic. It’s one of those recipes that feels more like a craft project than cooking, which makes it perfect for cozy afternoons in the kitchen.
These little pops are perfect for classroom parties, bake sales, or just adding a festive touch to your dessert table. I like to wrap them in cellophane bags with a bit of ribbon for easy gifting. They’re so quick and adorable that you’ll probably find yourself making a second batch just to keep at home.
Ingredients
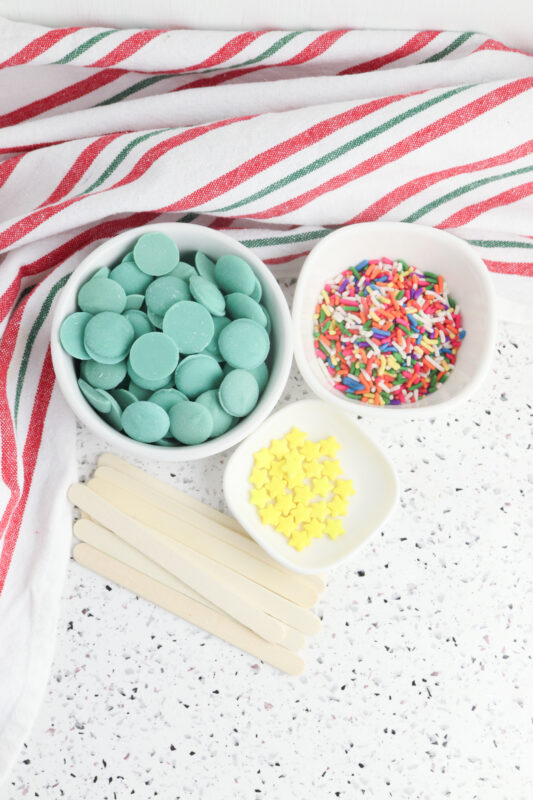
- 12 ounces green melting candy – This creates the perfect base for your sweet, colorful trees.
- Star sprinkles – Pop one on top to give each tree its shining holiday star.
- Rainbow sprinkles – Add these for a burst of festive color and sparkle.
- Popsicle sticks – Use these as the “trunks” to turn your trees into easy-to-hold pops.
Recipe Instructions
You can find a printable recipe card at the bottom of this post.
1. Melt the candy melts according to the package directions, then spoon the mixture into a piping bag.
2. Arrange the popsicle sticks about an inch apart on a sheet of parchment paper.
3. Snip the tip off the piping bag and pipe the melted candy over the top of each stick in a triangle shape.

4. Quickly place a star sprinkle at the top of the triangle and add rainbow sprinkles for decoration.

5. Let the candy cool and harden completely before serving.

Serving & Storing
-
I love displaying these pops on a festive platter or standing them upright in a block of styrofoam covered with wrapping paper. It makes them look extra special on the dessert table.
-
These are perfect for gifting. I like to wrap each one in a small cellophane bag tied with a ribbon and a little tag.
-
If you’re serving them at a party, keep them in a cool spot so the candy doesn’t soften.
-
Store any leftovers in an airtight container at room temperature for up to a week.
-
If your kitchen is warm, you can pop them in the fridge for a few minutes to help them stay firm and shiny.

Variations
-
Use white candy melts and tint them with food coloring for pastel Christmas trees.
-
Swap the rainbow sprinkles for crushed peppermint or gold sugar pearls for a more elegant look.
-
Make “snowy” trees by drizzling white chocolate over the green candy once it sets.
-
Add a small pretzel stick instead of a popsicle stick for a fully edible version.
-
Try different colors like red or gold to match your holiday party theme.
-
Sprinkle crushed cookies or edible glitter for a fun, textured finish.
-
Use mini M&M’s or tiny gumdrops as ornaments to decorate your trees.

Substitutions
-
If you can’t find green candy melts, melt white chocolate and stir in a few drops of green gel food coloring.
-
Swap the star sprinkles for small candy stars, gold sugar decorations, or even cut-out fondant shapes.
-
Use any sprinkles you already have on hand. Red and green jimmies or metallic dragees look just as festive.
-
Instead of popsicle sticks, you can use paper straws, lollipop sticks, or pretzel rods for a fun edible twist.
-
For a dairy-free version, look for vegan candy melts or use dark chocolate instead.
-
Try flavoring the melted candy with a drop of peppermint or vanilla extract to add a little extra holiday flavor.

FAQs
Can I make these ahead of time?
Yes! You can make them a few days in advance and store them in an airtight container at room temperature. They stay fresh and look just as pretty.
How do I keep the candy from hardening too quickly while piping?
If it starts to thicken, just pop the piping bag in the microwave for a few seconds to soften the candy again. Give it a quick knead before continuing.
Can I use white chocolate instead of candy melts?
Absolutely. White chocolate works great, but add a little vegetable oil or coconut oil if it feels too thick to pipe smoothly.
What’s the best way to package these for gifting?
Once they’re completely set, place each pop in a small cellophane bag and tie it with a festive ribbon. They make adorable stocking stuffers or party favors.
Do these need to be refrigerated?
Not usually. Just keep them in a cool, dry spot away from direct sunlight. If your house is warm, a few minutes in the fridge before serving helps them stay firm.

Christmas Tree Pops

These adorable Christmas Tree Pops are a quick and festive treat that’s perfect for the holidays. Made with green candy melts, colorful sprinkles, and a touch of creativity, they’re fun to make, easy to decorate, and guaranteed to brighten up any dessert table. Perfect for parties, gifting, or a cozy afternoon craft in the kitchen!
Ingredients
- 12 ounces green melting candy
- Star sprinkles
- Rainbow sprinkles
- Popsicle sticks
Instructions
- Melt the candy melts according to the package directions, then spoon the mixture into a piping bag.
- Arrange the popsicle sticks about an inch apart on a sheet of parchment paper.
- Snip the tip off the piping bag and pipe the melted candy over the top of each stick in a triangle shape.
- Quickly place a star sprinkle at the top of the triangle and add rainbow sprinkles for decoration.
- Let the candy cool and harden completely before serving.