Spooky Halloween Oreos (A Fun & Easy No-Bake Treat!)
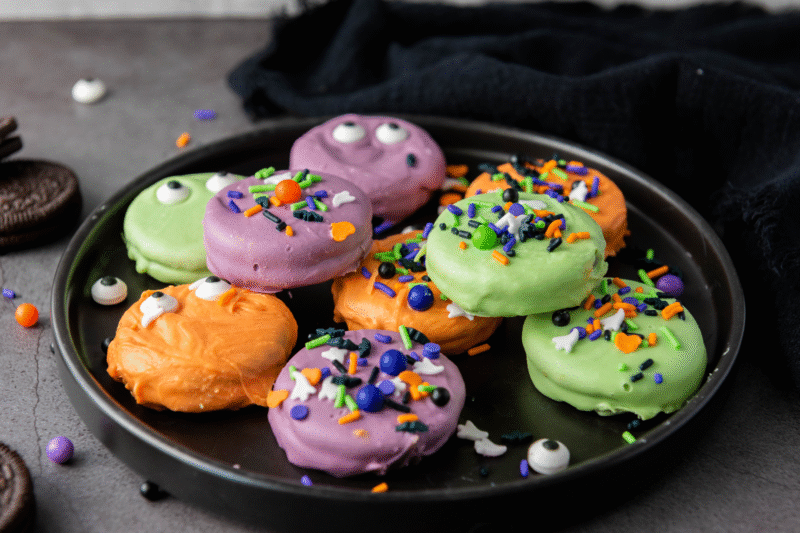
Every year when Halloween rolls around, I can’t resist making a batch of festive treats that are just as fun to look at as they are to eat. These Spooky Halloween Oreos are one of my absolute favorites because they’re so simple but always get a big reaction. Brightly colored candy melts, fun sprinkles, and everyone’s favorite cookie, it doesn’t get much better than that! They’re the kind of treat that instantly makes a Halloween table feel more festive.
What I love most about these Oreos is how quick they are to put together. Since they’re no-bake, you don’t need to worry about preheating the oven or dirtying a bunch of bowls. Just melt, dip, decorate, and you’re done! They’re perfect for a last-minute party idea, and the kids love getting involved in the decorating part. Honestly, I think half the fun is mixing and matching the spooky sprinkles to make each cookie look different.
These Halloween Oreos are also super versatile. You can stick to the classic purple, green, and orange candy melts for that traditional spooky vibe, or swap in whatever colors you like best. They look amazing on a Halloween party platter and make a sweet little gift when wrapped in clear bags with a ribbon. I always make extra because they disappear faster than you’d think, there’s just something irresistible about a chocolatey Oreo dressed up for Halloween!

Ingredients
-
12 Oreo cookies – the classic chocolate cookie that’s about to get a spooky makeover.
-
¼ cup Purple candy melts – perfect for adding a bold and witchy pop of color.
-
¼ cup Green candy melts – this ghoulish green makes the cookies look extra festive.
-
¼ cup Orange candy melts – the ultimate Halloween shade that ties the whole look together.
-
Halloween sprinkles (e.g., bats, pumpkins, ghosts, and other spooky shapes) – the finishing touch that makes each cookie a little work of edible art.

Recipe Instructions
You can find a printable recipe card at the bottom of this post.
1. Line a baking sheet with parchment paper or a silicone baking mat, and separate the Halloween sprinkles into small bowls.
2. Place purple, green, and orange candy melts in three separate microwave-safe bowls. Microwave one bowl at a time in 30-second intervals, stirring after each, until smooth.

3. Using a fork or dipping tool, dip each Oreo into the melted candy until fully coated, letting the excess drip off before placing it on the prepared baking sheet.
4. Coat 4 Oreos in purple, 4 in green, and 4 in orange for a colorful assortment.

5. While the coating is still wet, generously top each Oreo with Halloween sprinkles, mixing and matching for variety.

6. Let the Oreos sit at room temperature for 30–60 minutes, or refrigerate for about 15 minutes, until the coating is fully set.
7. Once hardened, arrange on a festive plate or store in an airtight container until ready to serve.

My Favorite Ways to Enjoy Halloween Oreos
-
I love serving them on a big platter at Halloween parties, they disappear so fast!
-
Sometimes I wrap a few in clear treat bags with ribbon and hand them out as party favors or teacher gifts.
-
They’re the perfect sweet snack for a family Halloween movie night (Hocus Pocus and cookies? Yes, please!).
-
I’ve even used them to decorate spooky dessert boards alongside candy corn, caramel popcorn, and other themed treats.
-
The kids like dunking them in a glass of milk, and honestly, I think they taste even better that way.

Serving & Storing
-
These Oreos look best when served on a festive tray or platter, especially if you mix up the colors and sprinkle designs.
-
If you’re making them ahead of time, store them in an airtight container at room temperature for up to 5 days.
-
For an extra chill (and to help the candy coating set quickly), you can pop them in the fridge for about 15 minutes.
-
I don’t recommend freezing them since the candy coating can crack once thawed.
-
If you’re packing them up as party favors, just layer them between sheets of parchment paper so they don’t stick together.

Variations
-
Switch up the candy melt colors. Black and white make a great ghostly combo, or go neon for a fun twist.
-
Use double-stuffed Oreos if you want a thicker cookie with even more filling.
-
Try flavored Oreos (like pumpkin spice or mint) to add a little surprise under the colorful coating.
-
Instead of sprinkles, you can decorate with candy eyeballs, crushed candy corn, or mini M&Ms.
-
Dip just half the Oreo in candy melts for a different look that shows off the cookie underneath.

Substitutions
-
If you don’t have Oreos, you can use any sandwich cookie – chocolate, vanilla, or even gluten-free versions work.
-
Candy melts can be swapped for white chocolate chips with a few drops of food coloring stirred in.
-
If you can’t find Halloween sprinkles, use colored sugar, crushed candy, or mini chocolate chips instead.
-
For a dairy-free version, choose vegan sandwich cookies and dairy-free candy melts.
-
If you prefer a less sweet option, try dipping in dark chocolate instead of candy melts.

FAQs
Can I make Halloween Oreos ahead of time?
Yes! You can make them up to 5 days in advance. Just store them in an airtight container at room temperature so they stay fresh.
Do I need to refrigerate Halloween Oreos?
Not unless you want the candy coating to set quickly. Otherwise, they’re perfectly fine at room temperature.
What if I don’t have candy melts?
You can melt white chocolate or almond bark and stir in food coloring to get those spooky shades.
Can kids help with this recipe?
Absolutely! This is a super kid-friendly recipe. They’ll love dipping the Oreos and going wild with the sprinkles.
Can I freeze Halloween Oreos?
I wouldn’t recommend freezing them, since the candy coating can crack when thawed. They’re best enjoyed fresh.

Spooky Halloween Oreos

These Spooky Halloween Oreos are the easiest no-bake treat for Halloween! Made with colorful candy melts and fun sprinkles, they’re perfect for parties, movie nights, or festive gifts. Quick to make and even quicker to disappear!
Ingredients
- 12 Oreo cookies
- ¼ cup Purple candy melts
- ¼ cup Green candy melts
- ¼ cup Orange candy melts
- Halloween sprinkles (e.g., bats, pumpkins, ghosts, and other spooky shapes)
Instructions
- Line a baking sheet with parchment paper or a silicone baking mat, and separate the Halloween sprinkles into small bowls.
- Place purple, green, and orange candy melts in three separate microwave-safe bowls. Microwave one bowl at a time in 30-second intervals, stirring after each, until smooth.
- Using a fork or dipping tool, dip each Oreo into the melted candy until fully coated, letting the excess drip off before placing it on the prepared baking sheet.
- Coat 4 Oreos in purple, 4 in green, and 4 in orange for a colorful assortment.
- While the coating is still wet, generously top each Oreo with Halloween sprinkles, mixing and matching for variety.
- Let the Oreos sit at room temperature for 30–60 minutes, or refrigerate for about 15 minutes, until the coating is fully set.
- Once hardened, arrange on a festive plate or store in an airtight container until ready to serve.
Nutrition Information:
Yield:
12Serving Size:
1 OreoAmount Per Serving: Calories: 160Total Fat: 7gSaturated Fat: 4gSodium: 90mgCarbohydrates: 22gFiber: 1gSugar: 17gProtein: 1g