17 Sandwich Recipes You’ll Crave Again and Again
There’s just something about a good sandwich that always hits the spot. Whether it’s stacked high with deli meats or piled with fresh veggies, I love how simple yet satisfying a sandwich can be. Around here, sandwiches aren’t just a last-minute lunch option – they’re a way to get creative in the kitchen without needing to spend hours cooking. Some days I’m all about a hearty grilled panini, and other times I’m happy with a light, fresh wrap.
Over the years, I’ve collected a bunch of sandwich recipes that have become real favorites in our house. My kids have their own picks, of course (PB&J forever!), but I like to switch things up so nobody gets bored. Some of these are classics with a twist, while others are a little unexpected but totally worth trying. And if you’re anything like me, you’re always on the hunt for quick meals that don’t skimp on flavor.
So today I’m sharing 17 sandwich recipes you’ll crave again and again. Whether you need lunch ideas for the week or something easy for dinner, there’s definitely something here for you. Go ahead and scroll through – I’m pretty sure you’ll find a few to add to your regular rotation!
1. Chicken Club Sandwich
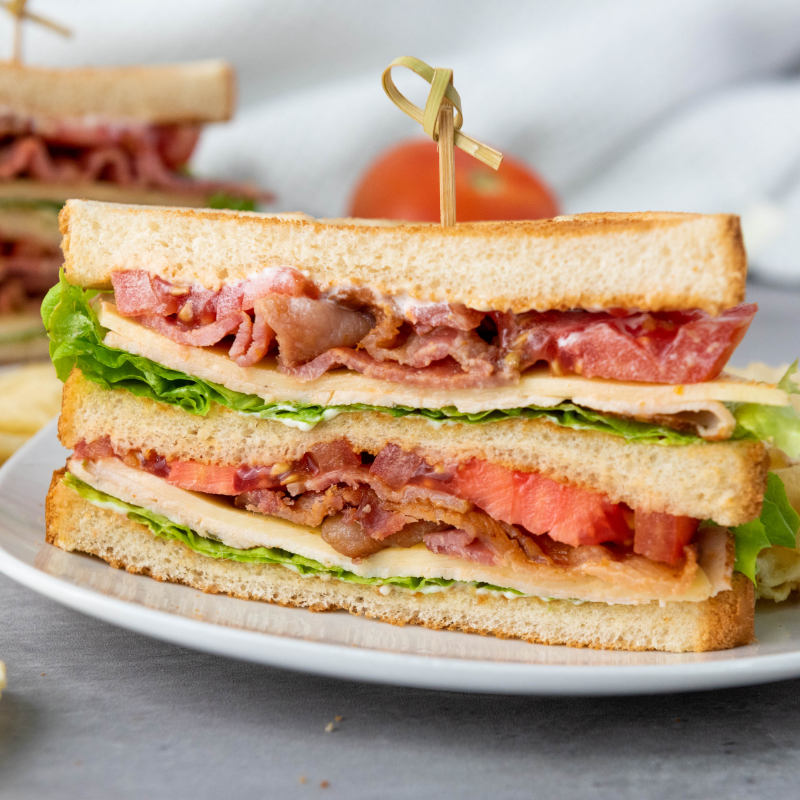
The Chicken Club Sandwich is one of those classics that never lets me down. Crispy bacon, juicy chicken, fresh lettuce and tomato – what’s not to love? I usually toast the bread just enough to give it that golden crunch, and if I’m feeling fancy, I’ll add a little avocado too. It’s a solid choice for busy weekdays or even a laid-back weekend lunch when you want something filling but easy.
You can read more about this recipe and get a printable recipe card here.
Servings: 2
Ingredients:
- 3 slices of white bread
- 2 tbsp mayonnaise
- 2 lettuce leaves
- 2 slices of deli chicken breast
- 2 slices of American cheese
- 4 slices of cooked bacon
- 1 tomato, sliced
Instructions:
- Toast all 3 slices of white bread until golden brown and crispy.
- Spread mayonnaise on one side of each toasted slice.
- Place one slice of bread mayo-side up on a cutting board or plate—this will be your bottom layer.
- Add 1 lettuce leaf, 1 slice of deli chicken, 1 slice of cheese, and 2 slices of bacon.
- Top with the second slice of bread, mayo-side down on the first layer, then spread a little mayo on the top side of that same slice.
- Add the second layer of toppings: 1 lettuce leaf, 1 slice of deli chicken, 1 slice of cheese, 2 slices of bacon, and a few tomato slices.
- Finish with the third slice of bread, mayo-side down.
- Gently press the sandwich together and use a sharp knife to cut it diagonally or into quarters if you’d like.
- Serve right away and enjoy that double-decker deliciousness!
2. Smoked Salmon Bagel

The Smoked Salmon Bagel is my go-to when I want something that feels a little special but takes barely any time to put together. Cream cheese, salty smoked salmon, red onion, and capers all piled on a toasty bagel – it’s simple, but the flavors just work. I love serving this one for brunch or even a light dinner when I don’t feel like cooking a full meal.
You can read more about this recipe and get a printable recipe card here.
Servings: 2
Ingredients:
- 4 oz smoked salmon
- 2 bagels (your choice of flavor)
- 1/2 red onion, thinly sliced
- 1 tomato, thinly sliced
- 1/2 cucumber, thinly sliced
- 4 oz cream cheese
- 1 tablespoon fresh dill, chopped
- 1 tablespoon capers
- Black pepper, freshly ground (to taste)
Instructions:
-
Slice the bagels in half horizontally.
-
Spread 2 oz of cream cheese on each bagel half.
-
Divide the smoked salmon evenly and place it on the bottom halves of the bagels.
-
Add the red onion, tomato slices, and cucumber slices evenly between both bagels.
-
Sprinkle 1 tablespoon of freshly chopped dill over the vegetables on each bagel.
-
Scatter 1 tablespoon of capers over the vegetables and salmon on each bagel.
-
Finish with a few grinds of black pepper to taste.
3. Truffle Mayo Roast Beef Sandwich

This Truffle Mayo Roast Beef Sandwich is where things get a little fancy – but still totally doable. The richness of the roast beef paired with that earthy truffle mayo? It’s next-level good. I like to add arugula for a bit of peppery bite and maybe some caramelized onions if I’ve got extra time. It’s one of those sandwiches that feels like something you’d order at a nice café, but you’re making it right at home.
You can read more about this recipe and get a printable recipe card here.
Servings: 2
Ingredients:
- 1 baguette
- 4-6 slices of medium-rare roast beef
- 2 oz arugula
- 2 tbsp mayonnaise
- 1 tbsp white truffle oil
- 1 oz shaved parmesan
- 1 oz pine nuts
- Salt, to taste
- Black crushed pepper, to taste
Instructions:
-
In a small bowl, mix the mayonnaise and truffle oil until smooth and well combined.
-
Toast the pine nuts in a dry pan over medium-high heat for 3–4 minutes, stirring occasionally, until golden and fragrant.
-
Slice the baguette open and spread a generous layer of truffle mayo on the bottom layer (or both sides if desired).
-
Layer arugula over the bottom half of the baguette.
-
Add slices of roast beef on top of the arugula.
-
Sprinkle shaved parmesan over the beef.
-
Season with a pinch of salt and freshly ground black pepper.
-
Finish with a handful of the toasted pine nuts.
-
Close the sandwich, cut in half, and enjoy!
4. Vegan Avocado Toast

This Vegan Avocado Toast is one of my favorite quick meals when I want something fresh and satisfying. I use Dave’s Killer Bread for a little extra texture and flavor, then top it with ripe avocado slices and juicy diced tomato. A sprinkle of everything bagel seasoning adds just the right savory crunch, and a little salt and pepper ties it all together. It’s super simple, but honestly, it hits every time – especially when the bread is perfectly toasted. Great for breakfast, lunch, or one of those snacky dinners!
You can read more about this recipe and print off a recipe card here.
Servings: 2
Ingredients:
- 2 slices of bread (I used Dave’s Killer bread)
- 1 ripe avocado, sliced
- ½ tomato, diced
- 1 tsp everything bagel seasoning
- Salt, to taste
- Pepper, to taste
Instructions:
-
Cut the avocado in half, remove the pit and skin, then slice it thinly.
-
Wash and dice the tomato.
-
Toast the bread to your preferred level of crispiness.
-
Layer the sliced avocado on the toast, then top with diced tomatoes and a sprinkle of everything bagel seasoning.
-
Season with salt and pepper to taste.
-
Serve immediately and enjoy!
5. Honey Carrots Toast

This Honey Carrots Toast is one of those recipes that feels extra special but still comes together pretty easily. The carrots get sautéed with herbs and spices until they’re perfectly tender, then finished with a touch of honey for that sweet-savory balance I love. I layer them over creamy cottage cheese on golden toasted whole grain bread, then top it all with crunchy pumpkin seeds and a sprinkle of fresh parsley. It’s hearty, wholesome, and has just the right mix of comfort and freshness. Definitely a new favorite around here!
You can read more about this recipe and get a printable recipe card here.
Servings: 2
Ingredients:
- 2 medium size carrots (about 1 ½ cup)
- 2 whole grain slices of bread
- 1 cup cottage cheese
- 1tbsp olive oil
- ½tbsp honey
- ½ tsp oregano
- ½ tsp paprika
- ¼ tsp salt
- 1 sprig of fresh rosemary
- 1 sprig of fresh thyme
- 1 tbsp Pumpkin seeds
- Fresh parsley
Instructions:
-
Heat a frying pan over medium heat, then add olive oil and reduce the heat to low.
-
Cut the carrots into 2–3 inch pieces and add them to the pan along with the dry spices and fresh herbs.
-
Cook the carrots until tender, adding a tablespoon of water and covering with a lid if needed.
-
Once the carrots are tender, stir in the honey, then remove them from the pan and set aside.
-
In the same pan, add the pumpkin seeds and cook until they start to pop and turn brown. Remove and set aside.
-
Add the bread slices to the pan and toast on both sides until golden.
-
Top each slice of toast with a generous layer of cottage cheese.
-
Add the honey-glazed carrots, then sprinkle with toasted pumpkin seeds and finely chopped parsley.
-
Drizzle with extra honey before serving.
6. Crispy Buttermilk Fried Chicken Sandwich

Okay, this Crispy Buttermilk Fried Chicken Sandwich is a serious treat. The chicken gets soaked in a spiced buttermilk marinade that makes it super tender and flavorful, then it’s double-dredged for that extra crunchy coating that just crackles when you bite in. I pile it onto a toasted brioche bun with homemade garlic aioli, a few bread and butter pickles, and some butter lettuce if I have it on hand. It’s definitely not an everyday sandwich – but when I make it, everyone around here is very excited.
You can read more about this recipe and get a printable recipe card here.
Servings: 2
Ingredients:
For the Buttermilk Fried Chicken:
- 2 boneless, skinless chicken thighs
- 1 cup (240 ml) buttermilk
- 1 teaspoon hot sauce
- 1 teaspoon salt
- ½ teaspoon black pepper
- ½ teaspoon smoked paprika
- ½ teaspoon garlic powder
- ½ teaspoon onion powder
For the Dredge:
- 1 cup (125 g) all-purpose flour
- ¼ cup (30 g) cornstarch
- 1 teaspoon salt
- ½ teaspoon black pepper
- ½ teaspoon smoked paprika
- ½ teaspoon cayenne pepper (optional for spice)
- ½ teaspoon garlic powder
- ½ teaspoon onion powder
- 1 egg
- 1 tablespoon buttermilk
For Frying:
- 2 cups (480 ml) vegetable oil (for frying)
For the Garlic Aioli:
- ¼ cup (60 g) mayonnaise
- 1 clove garlic, minced
- 1 teaspoon lemon juice
- ¼ teaspoon salt
- ¼ teaspoon black pepper
For Assembling:
- 2 brioche buns, toasted
- 4 bread and butter pickles
- 2 butter lettuce leaves (optional, for a fresh crunch)
Instructions:
-
In a bowl, whisk together buttermilk, hot sauce, salt, black pepper, smoked paprika, garlic powder, and onion powder.
-
Submerge the chicken thighs in the marinade, cover, and refrigerate for at least 2 hours (or overnight for best results).
-
In a shallow dish, mix flour, cornstarch, salt, black pepper, smoked paprika, cayenne (if using), garlic powder, and onion powder.
-
In a separate bowl, whisk together the egg and 1 tablespoon of buttermilk.
-
Remove the chicken from the marinade and let the excess drip off.
-
Dredge each thigh in the flour mixture, then dip into the egg mixture, and return to the flour mixture, pressing to create a craggy coating.
-
Heat vegetable oil in a deep skillet or Dutch oven to 350°F (175°C).
-
Fry the chicken for 5–7 minutes per side, or until golden brown and cooked through (internal temp should reach 165°F / 74°C).
-
Drain the fried chicken on a wire rack over a baking sheet to keep it crispy.
-
In a small bowl, mix together mayonnaise, minced garlic, lemon juice, salt, and black pepper to make the garlic aioli.
-
Spread the garlic aioli on both halves of a toasted brioche bun.
-
Place one crispy fried chicken thigh on the bottom bun.
-
Add two pickles on top of the chicken.
-
Add butter lettuce, if desired.
-
Top with the other half of the bun and press gently before serving.
7. Cuban Sandwich

This Cuban Sandwich is all about bold flavor and melty, toasty perfection. It’s layered with juicy pork, thin-sliced ham, melty cheese, and tangy pickles – all tucked between crispy, golden bread that’s been grilled just right. I like using a mix of mustard and mayo for that creamy kick, and pressing it down while it grills really helps everything meld together. It’s one of those sandwiches that feels like a whole meal, and every bite is a little smoky, savory, and just plain satisfying.
You can read more about this recipe and get a printable recipe card here.
Servings: 2
Ingredients:
- 4 pieces Cuban bread or baguette slices
- 7 oz cooked pork or beef, thinly sliced
- 3 oz ham, thinly sliced
- 3 oz Edam or Gruyère cheese (or another melting cheese), sliced
- 4-6 pickle slices, thinly sliced
- 2 tbsp mustard (yellow or Dijon)
- 2 tbsp mayonnaise
- 1 tbsp olive oil
- Salt and pepper to taste
Instructions:
-
Spread mayonnaise on one side of each bread slice and mustard on the other.
-
On one slice, layer the cooked pork, then ham, cheese, and pickles.
-
Close the sandwich with the second slice of bread, keeping the mayo and mustard sides facing out.
-
Brush the outer sides of the sandwich with olive oil to help prevent burning while grilling.
-
Preheat the grill to medium heat.
-
Place the sandwich on the grill and close the lid.
-
Grill for 3–4 minutes on each side, or until the bread is golden brown and crispy and the cheese is melted.
-
Press the sandwich with a grill press or a heavy object if needed to help it cook evenly.
-
Serve hot, sliced diagonally for a nicer presentation.
8. BLT Sandwich
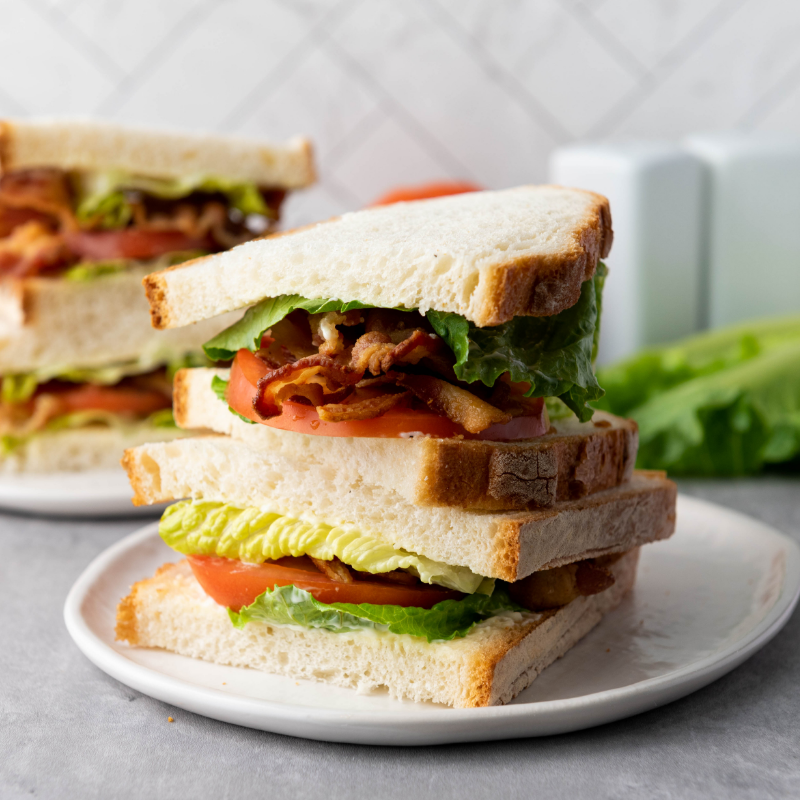
Sometimes, you just can’t beat a classic – and this BLT Sandwich is proof. Crisp bacon, juicy ripe tomatoes, and fresh lettuce all stacked between toasted bread with a slather of mayo… it’s simple, but honestly, it hits every time. I like to season the tomatoes just a bit to bring out their flavor, and I never skimp on the bacon (because really, that’s the best part). It’s quick to make, super satisfying, and always a crowd-pleaser around here.
You can read more about this recipe and get a printable recipe card here.
Servings: 2
Ingredients:
- 8-12 slices of cooked bacon
- 4 slices (toasted if you prefer) of your favorite bread (white, whole wheat, sourdough, etc.)
- 4 leaves of lettuce (romaine, iceberg, or your choice)
- 4 slices of ripe tomato
- 4 tablespoons mayonnaise
- Salt and freshly ground black pepper, to taste
Instructions:
-
Wash and dry the lettuce leaves, then slice the tomatoes into thick slices.
-
Spread 1 tablespoon of mayonnaise on one side of each bread slice.
-
On two slices of the bread, layer the lettuce leaves.
-
Add the tomato slices on top of the lettuce on one slice of bread and season with a little salt and pepper.
-
Place 4–6 slices of cooked bacon on top of the tomatoes, depending on your preference.
-
Top each sandwich with the remaining slices of bread, mayonnaise side down.
-
Press gently to hold everything together.
-
Slice each sandwich in half, if desired, and serve immediately.
9. Classic Italian Sub Sandwich
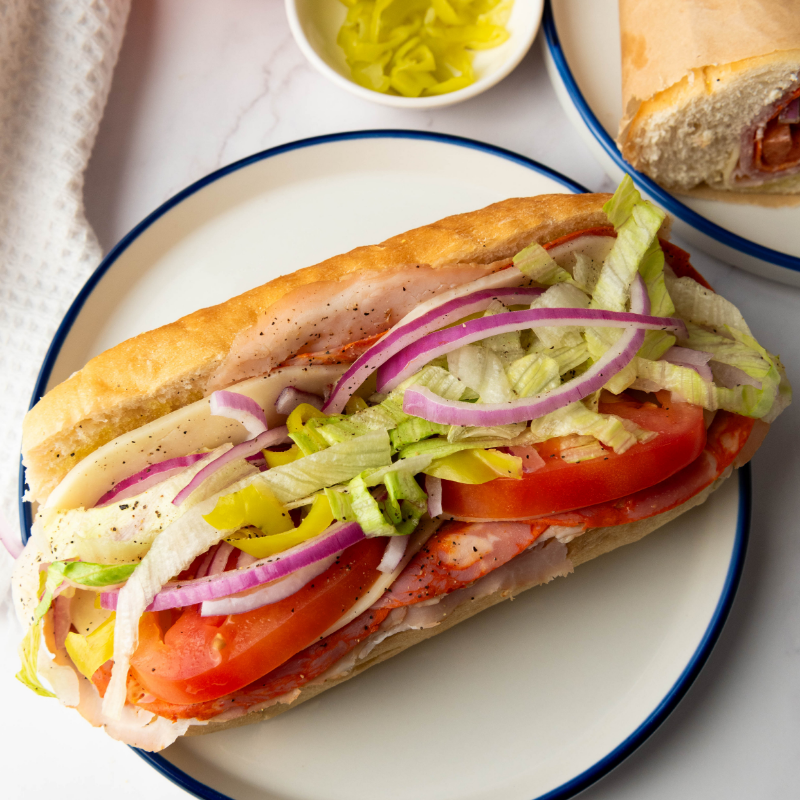
This Classic Italian Sub Sandwich takes me right back to deli lunches growing up – layer after layer of savory meats, melty provolone, and crisp veggies, all tucked into a soft, seasoned hoagie roll. I love the mix of ham, salami, and capicola, especially with that little tang from the red wine vinegar and pepperoncini. A quick drizzle of olive oil and Italian seasoning gives it that extra flavor boost, and the shredded lettuce on top makes it feel fresh and crunchy. It’s hearty, satisfying, and perfect when you’re craving something bold and filling.
You can read more about this recipe and get a printable recipe card here.
Servings: 2
Ingredients:
- 2 hoagie rolls, sliced lengthwise
- 4-6 slices of ham
- 4-6 slices of Genoa salami
- 4-6 slices of capicola
- 4 slices of provolone cheese
- 1 cup shredded iceberg lettuce
- 1 large tomato, thinly sliced
- 1/2 cup thinly sliced red onion
- 4-6 slices of pepperoncini (optional)
- 2 tablespoons olive oil
- 1 tablespoon red wine vinegar
- 1/2 teaspoon dried Italian seasoning
- Salt and freshly ground black pepper
Instructions:
-
Open the hoagie rolls and drizzle each side with 1 tablespoon of olive oil.
-
Sprinkle a little dried Italian seasoning on each roll for added flavor.
-
Divide the ham slices evenly between the two rolls, followed by the salami slices, then the capicola slices.
-
Place 2 slices of provolone cheese on each roll.
-
Layer the tomato slices on top of the cheese, then add the sliced red onion.
-
Add 4–6 slices of pepperoncini to each sandwich, then evenly distribute the shredded lettuce over the top.
-
Drizzle about ½ tablespoon of red wine vinegar over the vegetables on each roll.
-
Season with a pinch of salt and freshly ground black pepper to taste.
-
Place the top half of each roll over the fillings, gently pressing down to compact the sandwiches slightly.
-
Cut each hoagie roll in half if desired, and serve immediately – or wrap in parchment paper and refrigerate for a couple of hours to let the flavors meld.
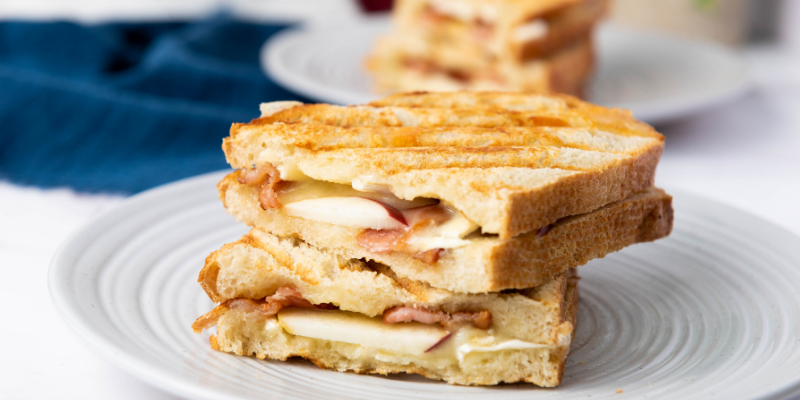
10. Brie, Bacon, Apple & Honey Panini

This Brie, Bacon, Apple & Honey Panini is the kind of sandwich I make when I want something a little fancy but still super comforting. The creamy Brie melts beautifully over the salty bacon, and the thin apple slices add just the right touch of crisp sweetness. A little drizzle of honey ties everything together and gives it that irresistible sweet-and-savory vibe. Pressed until golden and melty, this one is best enjoyed warm – preferably with a cozy drink on the side.
You can read more about this recipe and get a printable recipe card here.
Servings: 2
Ingredients:
- 4 slices of your favorite bread
- 1/2 wheel of Brie cheese, sliced
- 4 slices of bacon, cooked until desired crispiness has been reached
- 1/2 apple, cored and thinly sliced
- 1 tbsp honey
Instructions:
-
Take 2 slices of bread and divide the Brie cheese evenly between them.
-
Add a layer of thinly sliced apples on top of the cheese.
-
Place two slices of cooked bacon on top of the apple on each slice.
-
Drizzle honey over the bacon.
-
Top each sandwich with another slice of bread to close them.
-
Spread butter on the outside of each sandwich.
-
Heat a panini grill or skillet over medium heat.
-
Grill the sandwiches until the bread is golden brown and the Brie is melted, about 3–5 minutes.
-
Slice in half and enjoy while warm.
11. Freezer Breakfast Sandwiches

These Freezer Breakfast Sandwiches have been a total lifesaver on busy mornings. I like to prep a batch over the weekend – some with crispy bacon, some with sausage – so we’ve got a quick and hearty breakfast ready to go all week long. Each sandwich is layered with a cooked egg, melted cheese, and a buttery English muffin that holds up great in the freezer. Just pop one in the microwave or oven and you’ve got a warm, filling breakfast without the morning scramble. Honestly, they’ve made mornings way less chaotic around here!
You can read more about this recipe and get a printable recipe card here.
Servings: 6
Ingredients:
- 6 English muffins, cut in half
- 6 large eggs
- 3 slices of bacon, cut in half
- 3 sausage patties
- 6 slices of cheese (I used Gouda)
- Salt and pepper, to taste
- Butter or cooking spray (for greasing the pan)
Instructions:
-
In a skillet over medium heat, cook the bacon until crispy. Remove and drain on paper towels, then set aside.
-
In the same skillet, cook the sausage patties until fully cooked. Remove and drain on paper towels, then set aside.
-
Heat a small non-stick pan or a pan with 4 egg rings over medium heat and lightly grease with butter or cooking spray.
-
Crack an egg into each ring and season with salt and pepper.
-
Cook until the whites are set and the yolks are cooked to your liking, about 3–4 minutes. For firmer yolks, flip and cook for an additional 1–2 minutes.
-
Remove the eggs from the pan and let cool slightly.
-
Place the bottom half of each English muffin on a clean surface.
-
Place a slice of cheese on each muffin bottom.
-
For 3 sandwiches, add a cooked egg and two halves of bacon.
-
For the remaining 3 sandwiches, add a cooked egg and a sausage patty.
-
Cover each with the top half of the English muffin.
-
Wrap each assembled sandwich in parchment paper.
-
Place the wrapped sandwiches in a large Ziploc bag or airtight container.
-
Store in the freezer for up to 3 months.
-
To reheat, unwrap the sandwich from the parchment and wrap it in a paper towel.
-
Microwave on high for 1–2 minutes, or until heated through.
-
Alternatively, reheat in a preheated 350°F (175°C) oven for about 20 minutes, or until warmed through.
12. Ham & Cheese Sliders

These Ham & Cheese Sliders are my go-to when I need something easy, cheesy, and guaranteed to disappear fast. Soft slider buns get layered with melty Swiss and savory ham, then brushed with a buttery mustard glaze that bakes up golden and flavorful. I love making a batch for game day, potlucks, or even just a cozy family dinner when no one wants to wait long to eat. They’re simple, comforting, and always a hit – especially fresh out of the oven.
You can read more about this recipe and get a printable recipe card here.
Servings: 12
Ingredients:
- 12 slider buns (like Hawaiian rolls)
- ½ lbs thinly sliced cooked ham
- 12 slices Swiss cheese
- ¼ cup mayonnaise
- 1 tbsp Dijon mustard
- 4 tbsp butter, melted
- 1 tbsp minced onion
- 1 tbsp poppy seeds
Instructions:
-
Preheat your oven to 350°F (175°C).
-
Cut the slider buns in half and place the bottom halves in a baking dish.
-
Spread mayonnaise on the buns, then layer Swiss cheese, ham, and another layer of Swiss cheese on top.
-
Place the top halves of the buns over the fillings to close the sliders.
-
In a bowl, mix together melted butter, Dijon mustard, minced onion, and poppy seeds to make the glaze.
-
Brush the glaze generously over the tops of the sliders, ensuring even coverage.
-
Cover the baking dish with aluminum foil and bake for 15 minutes.
-
Remove the foil and bake for an additional 5–10 minutes, or until the tops are lightly browned and crispy.
-
Let the sliders cool for a few minutes before serving.
13. Philly Cheesesteak Sliders

These Philly Cheesesteak Sliders are everything I love about the classic sandwich – just in mini, melty, totally snackable form. They’re packed with thin-sliced beef, sautéed peppers and onions, and plenty of gooey cheese, all tucked into soft slider buns. I usually make them for game nights or casual get-togethers, but honestly, they’re just as great for a fun dinner at home. They’re messy in the best way, and once they hit the table, they’re gone fast!
You can read more about this recipe and get a printable recipe card here.
Servings: 12
Ingredients:
- 1 green bell pepper, sliced and halved
- 1 yellow onion, quartered and sliced
- 14 oz package shaved steak
- 1 tsp steak seasoning
- 6 slices provolone cheese
- 12 slider rolls
- 1 tbsp butter
Instructions:
- Preheat the oven to 350 degrees.
- Chop the onion and pepper.
- In a large skillet over medium heat, cook the onion and pepper for 5-7 minutes to slightly soften. Remove to a plate.
- Add the shaved steak and steak seasoning to the skillet, and cook until brown, stirring the meat as it cooks.
- Add the peppers and onions back into the skillet and cook for an additional 3-5 minutes.
- Slice the slider rolls in half, leaving the bottom and top intact.
- Set the bottom of the rolls into the casserole dish. Cover the rolls with a little over half of the steak, pepper, and onion mixture, then top with 4 slices of provolone.
- Cover the cheese with the rest of the meat mixture, then top with broken pieces of cheese, fitting them in under meat etc.
- Cover with the top half of the slider rolls.
- Melt the butter and brush over the top of the rolls.
- Transfer the pan to the oven and bake for 10-15 minutes, until cheese is melty.
14. Shrimp Po Boy

This Shrimp Po’ Boy brings serious flavor and just the right amount of crunch. The shrimp get soaked in buttermilk and spices, then fried until golden and crispy – so good you’ll want to sneak a few before they even make it into the sandwich (I always do). Piled into a soft roll with crisp lettuce, juicy tomato, and a tangy homemade remoulade sauce, it’s a messy, drippy, totally satisfying kind of sandwich. Serve it hot, and trust me – it tastes like a trip to New Orleans without leaving your kitchen.
You can read more about this recipe and get a printable recipe card here.
Servings: 4
Ingredients:
For the remoulade sauce:
- ¼ cup (60 ml) mayonnaise
- ½ tbsp mustard
- ½ tbsp capers, finely chopped
- ½ tbsp finely chopped dill pickle
- ½ tsp lemon juice
- ½ tsp hot sauce
- ½ tsp paprika
- Salt and pepper to taste
For the shrimp:
- 8.8 oz (about ½ lb) medium shrimp, peeled and deveined
- ½ cup (120 ml) buttermilk
- ½ large egg (beat the egg and use half)
- ½ tbsp hot sauce (e.g., Tabasco)
- ½ tsp black pepper
- ½ tsp salt
- ½ cup (60 g) corn flour
- ½ cup (60 g) all-purpose flour
- ½ tsp paprika
- ½ tsp garlic powder
- Oil for frying
For the sandwich:
- 4 long rolls
- ½ cup shredded iceberg lettuce
- ½ large tomato, thinly sliced, or a few cherry tomatoes, halved
- ½ small red onion, thinly sliced
- ½ small cucumber, thinly sliced
Instructions:
-
In a bowl, mix mayonnaise, mustard, capers, dill pickle, lemon juice, hot sauce, and paprika.
-
Add salt and pepper to taste, then stir until smooth and refrigerate until ready to use.
-
In a large bowl, whisk together buttermilk, egg, hot sauce, black pepper, and salt.
-
In another bowl, combine corn flour, all-purpose flour, paprika, and garlic powder.
-
Dip the shrimp into the buttermilk mixture, then coat them in the flour mixture.
-
Heat oil in a large skillet or deep fryer to 350°F (175°C).
-
Fry the shrimp in batches for 2–3 minutes, until golden brown.
-
Transfer the cooked shrimp to a paper towel-lined plate to drain excess oil.
-
Slice the baguettes or rolls lengthwise, keeping them attached at the bottom to form a pocket.
-
Spread remoulade sauce on one side of each roll (or both if you like a lot of sauce).
-
Layer shredded lettuce, sliced tomato, red onion, and cucumber on the bottom half of each roll.
-
Add the fried shrimp on top of the vegetables.
-
Close the sandwiches with the top half of the rolls.
-
Serve hot, with French fries or other sides if desired.
15. Bagel with Egg, Prosciutto & Garlic Butter

This Bagel with Egg, Prosciutto & Garlic Butter is one of those breakfasts that feels a little extra – but it’s totally worth the (minimal) effort. The garlic herb butter melts right into the toasty bagel, and when you add layers of salty prosciutto, savory salami, and melty cheddar, it’s already good. But crack an egg in the middle and bake it until it’s just set? Game-changer. I love how the edges get crispy and golden while the center stays soft and rich. It’s kind of like a full brunch packed into one perfect bagel.
You can read more about this recipe and get a printable recipe card here.
Servings: 4
Ingredients:
- 4 bagels
- 4 eggs
- 4 slices of cheddar cheese
- 4 slices of prosciutto
- 4 slices of your favorite Italian salami
- 1 ½ tbsp salted butter
- 1 garlic clove
- ½ tsp dried oregano
- ½ tsp chili paprika
- A few sprigs of fresh parsley
- Salt, to taste
Instructions:
-
Preheat your oven to 375°F. You can also use a fan oven or an air fryer if preferred.
-
In a blender, combine the garlic, parsley, butter, oregano, chili paprika, and a pinch of salt. Blend until smooth and creamy.
-
Spread the garlic butter evenly over the top of each (no need to slice).
-
Layer each bagel with a slice of cheddar cheese, a slice of Italian salami, and a slice of prosciutto.
-
Carefully make a small hole in the center of the prosciutto on each bagel to hold the egg.
-
Crack an egg into each hole, allowing the egg white to spread slightly – it’s okay if some spills over.
-
Sprinkle each bagel with a bit of chili paprika and a pinch of salt.
-
Place the bagels on a baking sheet and bake for 13–16 minutes, or until the eggs are set and the prosciutto is crispy and golden.
-
Remove the bagels from the oven and let them cool for 2–4 minutes.
-
Garnish with freshly chopped parsley before serving.
16. Copycat Filet-O-Fish

This Copycat Fish-O-Filet totally hits the spot when I’m craving that fast food classic but want to make it at home. Crispy golden fish, tangy homemade tartar sauce, melty cheese, and a soft bun – what’s not to love? It’s surprisingly easy to throw together, and honestly, I think it tastes even better fresh from your own kitchen. I like to toast the buns just a little and keep the lettuce crisp for that extra crunch. It’s simple, comforting, and always a family favorite around here.
You can read more about this recipe and get a printable recipe card here.
Servings: 3
Ingredients:
For the Fish Fillet:
- 400g white fish fillets (like cod, haddock, or pangasius)
- 1 cup breadcrumbs
- 1/2 cup flour
- 1 egg
- Salt and black pepper to taste
- Vegetable oil for frying
For the Tartar Sauce:
- 1/2 cup mayonnaise
- 1-2 tbsp pickles, finely chopped
- 1 tbsp lemon juice
- 1 tsp mustard
- Salt and pepper to taste
Other Ingredients:
- 3 burger buns, halved
- 3 slices of cheese
- Lettuce leaves
Instructions:
-
Cut the fish fillets into portions and season with salt and pepper.
-
Dredge each piece in flour, dip in beaten egg, and then coat in breadcrumbs.
-
Heat vegetable oil in a large skillet over medium heat.
-
Fry each fillet for 3–4 minutes per side, until golden and crisp.
-
Drain the cooked fillets on paper towels to remove excess oil.
-
In a small bowl, mix together the mayonnaise, pickles, lemon juice, and mustard to make the tartar sauce.
-
Season the tartar sauce with salt and pepper to taste.
-
Lightly toast the buns.
-
On the bottom half of each bun, place a fish fillet.
-
Spoon tartar sauce over the fish, then add a slice of cheddar cheese (optional) and a lettuce leaf.
-
Top with the other half of the bun.
-
Serve and enjoy while the fish is still warm and crispy.
17. Tuna Melt Sandwich

This Tuna Melt Sandwich is one of my go-to comfort meals – warm, melty, and packed with flavor. The tuna salad is creamy and crisp thanks to the celery, red onion, and those little bites of dill pickle, and when you broil it with a slice of cheddar on top? So good. It’s simple, but totally satisfying, especially on days when I want something easy but still homemade. I usually pair it with a handful of chips and call it lunch done right.
You can read more about this recipe and get a printable recipe card here.
Servings: 2
Ingredients:
- 1 can of tuna, drained (5 oz)
- 3 tbsp mayonnaise
- 1 tsp Dijon mustard
- 2 tablespoons chopped celery
- 2 tablespoons red onion, finely chopped
- 3 small kosher dill pickles
- 4 slices of bread
- 2 slices of cheddar cheese
- Salt and pepper to taste
Instructions:
-
In a bowl, mix the drained tuna, mayonnaise, Dijon mustard, chopped celery, red onion, chopped dill pickles, and season with salt and pepper to taste.
-
Spread the tuna mixture evenly over 2 slices of bread.
-
Top each slice with a slice of cheddar cheese.
-
Place the bread slices on a baking sheet and broil on low for 2–3 minutes, or until the cheese is melted and bubbly.
-
Remove from the oven and slice the sandwiches in half.
-
Optionally, serve with chips.
There you have it – 17 sandwich recipes that prove lunch (or dinner… or even breakfast!) doesn’t have to be boring. Whether you’re in the mood for something classic and comforting or bold and packed with flavor, there’s a sandwich here for every craving. I hope a few of these find their way into your regular rotation like they have in mine. And hey, if your family’s anything like mine, don’t be surprised if they start requesting their favorites again and again!