Churro Cheesecake Bars with Cajeta
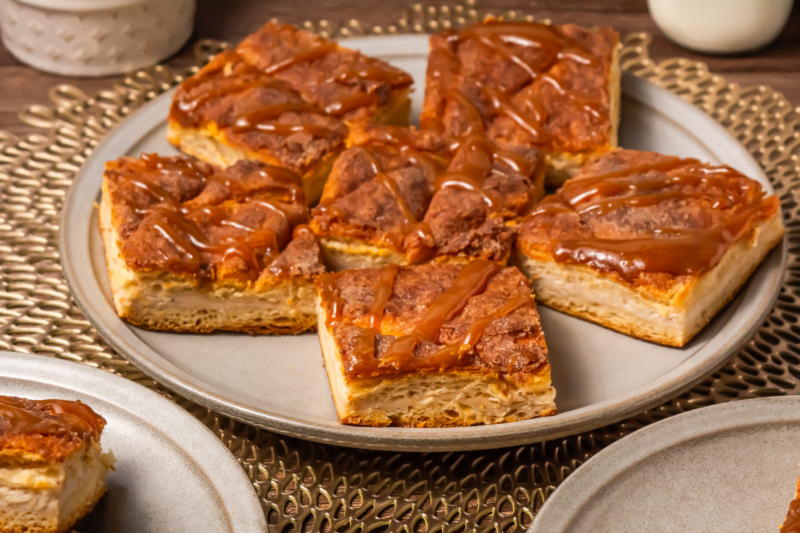
If you’ve never tried churro cheesecake bars before, you’re in for a treat. They have all those warm cinnamon sugar flavors you’d expect from a churro, but instead of frying dough, everything gets layered into an easy-to-make dessert with a creamy cheesecake filling.
I love making these when I want something that feels a little bit special without spending ages in the kitchen. Using crescent roll dough keeps things nice and simple, and once they’re baked until golden, your kitchen smells amazing.
The homemade cajeta really finishes these bars off perfectly. It’s rich, silky, and adds even more caramel flavor over the top. They’re perfect for everything from family desserts to holiday gatherings, and they’re guaranteed to satisfy a sweet craving.
Why We Love This Recipe
- If you love churros, I promise you’re going to love these. They have all those warm cinnamon sugar flavors but with a creamy cheesecake filling in the middle.
- They’re much easier than making actual churros, thanks to the shortcut of using crescent roll dough.
- The homemade cajeta really takes them over the top. It’s rich, caramel-y, and so good drizzled over each slice.
- They’re one of those desserts that always disappear quickly whenever I put them out.
- You can make them ahead of time, which is always a bonus if you’re baking for a party or holiday.
- They’re sweet, creamy, buttery, and have just the right amount of cinnamon in every bite.

Equipment
- 13×9-inch baking dish
- Large heavy-bottomed stockpot
- Stand mixer or hand mixer
- Mixing bowls
- Measuring cups and spoons
- Silicone spatula or wooden spoon
- Pastry brush (for the butter)
- Parchment paper
Ingredients
For the Cajeta
-
Whole milk (or goat’s milk) – Goat’s milk is the traditional choice, but whole milk makes a delicious cajeta too.
-
Sugar – Sweetens the cajeta and helps it turn into a rich caramel sauce.
-
Baking soda – This helps create the smooth texture and deep caramel color as the cajeta cooks.
-
Cinnamon stick – Adds that lovely warm cinnamon flavor while the cajeta simmers.
-
Vanilla extract – Gives the cajeta an extra layer of sweetness and warmth.
-
Unsalted butter – Stirred in at the end to make the cajeta rich and silky.

For the Churro Cheesecake Bars
- Premade crescent rolls – The easy shortcut that gives these bars their flaky layers.
- Sugar – Mixed with the cinnamon to create that classic churro topping.
- Ground cinnamon – The key ingredient for that unmistakable churro flavor.
- Cream cheese – Make sure it’s softened first so the filling mixes up nice and smooth.
- Egg – Helps the cheesecake filling set as it bakes.
- Vanilla extract – Adds a little extra flavor to the cheesecake filling.
- Unsalted butter – Brushed over the top so the cinnamon sugar sticks and the pastry turns beautifully golden.
- Cajeta – Drizzle it over the bars before serving for the perfect finishing touch.

Recipe Instructions
Full measurements and cooking times can be found in the recipe card at the bottom of this post.
Step 1: Prepare the cajeta in advance. Traditional cajeta is made with goat’s milk, but you can use whole milk if you prefer a milder caramel flavor.
Step 2: In a large stockpot, combine the milk, sugar, and cinnamon stick. Heat over medium-low until the mixture begins to steam and small bubbles form around the edges.

Step 3: Carefully stir in the baking soda. The mixture may foam and rise, so use caution and be sure the pot is large enough. This reaction is normal.
Step 4: Continue simmering over medium-low heat for 50–60 minutes, stirring frequently and more often as the mixture thickens. The cajeta is ready when it turns a deep golden color and coats the back of a spoon.

Step 5: Remove the pot from the heat and take out the cinnamon stick.
Step 6: Stir in the vanilla and butter until fully incorporated.


Step 7: Let the cajeta cool. It will continue to thicken as it sits. Transfer to jars or an airtight container and store in the refrigerator for up to 7 days.
Step 8: To make the cheesecake bars, line a 13×9-inch baking dish with parchment paper and preheat the oven to 350°F.
Step 9: In a small bowl, mix the cinnamon and sugar together. Sprinkle about one-third of the mixture across the bottom of the prepared baking dish and set the remaining mixture aside.

Step 10: Unwrap the crescent dough sheets and separate them into rectangles. Arrange them in the bottom of the baking dish, gently pressing the seams together and tearing pieces if needed to create an even layer. Set the remaining dough aside for the top.

Step 11: In the bowl of a stand mixer, beat the softened cream cheese with about one-third of the cinnamon-sugar mixture until smooth.
Step 12: Add the egg and vanilla, mixing well and scraping down the sides of the bowl as needed.

Step 13: Spread the cheesecake filling evenly over the crescent dough layer in the baking dish.

Step 14: Place the remaining crescent dough sheets over the filling, arranging and pressing them together so the top is fully covered.

Step 15: Melt the butter in a small bowl and brush or spread it evenly over the top layer of dough.

Step 16: Sprinkle the remaining cinnamon-sugar mixture evenly across the top.

Step 17: Bake for about 30 minutes, or until the crescent dough is golden and lightly toasted.

Step 18: Remove from the oven and allow the bars to cool.
Step 19: Drizzle with cajeta sauce before serving, or serve the sauce on the side.

What to Serve with Churro Cheesecake Bars
Churro cheesecake bars are pretty rich on their own, so they don’t really need much alongside them. I love serving them slightly chilled with plenty of cajeta drizzled over the top, but there are lots of other ways to make them feel even more like a special dessert.
-
A scoop of vanilla ice cream.
-
Fresh strawberries or raspberries.
-
A dollop of whipped cream.
-
An extra drizzle of warm cajeta or dulce de leche.
-
A sprinkle of chopped pecans or walnuts for a little crunch.
-
A cup of coffee or a cinnamon latte.
-
Mexican hot chocolate if you’re really leaning into those cozy flavors.
Storing
These churro cheesecake bars need to be kept in the fridge because of the cream cheese filling. Once they’ve cooled completely, cover the baking dish or transfer the bars to an airtight container and they’ll keep well for up to 4 days. I actually think they’re even nicer after they’ve had a few hours to chill.
If you’ve made homemade cajeta, keep that in a separate airtight jar or container in the refrigerator for up to a week. It will thicken as it chills, so if you want it nice and pourable again, just warm it gently in the microwave or on the stovetop before serving. You can also freeze the cheesecake bars for up to 2 months, just leave the cajeta off until you’re ready to serve them.

Variations & Substitutions
One of the best things about this recipe is how easy it is to switch things up depending on what you have on hand. You can stick with the traditional version or make a few simple swaps to put your own spin on these churro cheesecake bars.
-
Use store-bought cajeta or dulce de leche if you don’t want to make your own.
-
Swap the whole milk for goat’s milk to make a more traditional cajeta.
-
Add a handful of mini chocolate chips to the cheesecake filling.
-
Mix a pinch of nutmeg or pumpkin pie spice into the cinnamon sugar for extra warmth.
-
Sprinkle chopped pecans or walnuts over the top before serving.
-
Drizzle with melted chocolate as well as the cajeta for an extra indulgent dessert.
-
Add a little orange zest to the cheesecake filling for a fresh citrus twist.

FAQs
Can I make churro cheesecake bars ahead of time?
Yes! In fact, they're even better after they've had a chance to chill in the refrigerator for a few hours. That makes them a great make-ahead dessert for parties and holidays.
Do churro cheesecake bars need to be refrigerated?
Yes. Since the filling is made with cream cheese, the bars should be stored in the refrigerator until you're ready to serve them.
Can I freeze churro cheesecake bars?
Absolutely. Once they've cooled completely, wrap the bars well or store them in a freezer-safe container for up to 2 months. Thaw overnight in the refrigerator before serving, then drizzle with cajeta.
What's the difference between cajeta and dulce de leche?
They're very similar, but traditional cajeta is made with goat's milk, while dulce de leche is usually made with cow's milk. Cajeta has a slightly richer, more complex flavor.
Can I use store-bought cajeta?
Yes! Homemade cajeta is delicious, but a good-quality store-bought cajeta or dulce de leche works perfectly if you're short on time.
Can I use puff pastry instead of crescent roll dough?
You can, but the texture will be different. Crescent roll dough gives these bars their soft, flaky layers, while puff pastry creates a much crispier, lighter finish.
Why is my cheesecake filling lumpy?
This usually happens if the cream cheese is still too cold. Let it come to room temperature before mixing and you'll get a much smoother filling.
How do I know when the churro cheesecake bars are done?
The top should be golden brown and the cheesecake filling should be mostly set with just a very slight wobble in the center. It will continue to firm up as it cools.

Churro Cheesecake Bars with Cajeta

These easy Churro Cheesecake Bars are made with flaky crescent roll dough, a rich and creamy cheesecake filling, plenty of cinnamon sugar, and a drizzle of homemade cajeta. They're the perfect make-ahead dessert for parties, holidays, or whenever you're craving something sweet.
Ingredients
For the Cajeta:
- 4 cups whole milk (or goat milk)
- 1 ½ cups sugar
- ½ tsp baking soda
- 1 cinnamon stick
- 1 tsp vanilla
- 2 tbsp unsalted butter
For the Churro Cheesecake Bars:
- 2-3 packages premade crescent rolls
- ½ cup sugar
- 1 tbsp cinnamon
- 16 oz cream cheese, softened
- 1 egg
- 2 tsp vanilla
- 4 tbsp unsalted butter, melted
- Cajeta, to serve
Instructions
- Prepare the cajeta in advance. Traditional cajeta is made with goat’s milk, but you can use whole milk if you prefer a milder caramel flavor.
- In a large stockpot, combine the milk, sugar, and cinnamon stick. Heat over medium-low until the mixture begins to steam and small bubbles form around the edges.
- Carefully stir in the baking soda. The mixture may foam and rise, so use caution and be sure the pot is large enough. This reaction is normal.
- Continue simmering over medium-low heat for 50–60 minutes, stirring frequently and more often as the mixture thickens. The cajeta is ready when it turns a deep golden color and coats the back of a spoon.
- Remove the pot from the heat and take out the cinnamon stick.
- Stir in the vanilla and butter until fully incorporated.
- Let the cajeta cool. It will continue to thicken as it sits. Transfer to jars or an airtight container and store in the refrigerator for up to 7 days.
- To make the cheesecake bars, line a 13×9-inch baking dish with parchment paper and preheat the oven to 350°F.
- In a small bowl, mix the cinnamon and sugar together. Sprinkle about one-third of the mixture across the bottom of the prepared baking dish and set the remaining mixture aside.
- Unwrap the crescent dough sheets and separate them into rectangles. Arrange them in the bottom of the baking dish, gently pressing the seams together and tearing pieces if needed to create an even layer. Set the remaining dough aside for the top.
- In the bowl of a stand mixer, beat the softened cream cheese with about one-third of the cinnamon-sugar mixture until smooth.
- Add the egg and vanilla, mixing well and scraping down the sides of the bowl as needed.
- Spread the cheesecake filling evenly over the crescent dough layer in the baking dish.
- Place the remaining crescent dough sheets over the filling, arranging and pressing them together so the top is fully covered.
- Melt the butter in a small bowl and brush or spread it evenly over the top layer of dough.
- Sprinkle the remaining cinnamon-sugar mixture evenly across the top.
- Bake for about 30 minutes, or until the crescent dough is golden and lightly toasted.
- Remove from the oven and allow the bars to cool.
- Drizzle with cajeta sauce before serving, or serve the sauce on the side.
Notes
- You can make the cajeta a day ahead to save time.
- Let the cream cheese come to room temperature before mixing for the smoothest filling.
- Chill the bars before slicing for cleaner, neater pieces.
- Warm the cajeta slightly before serving if it's too thick to drizzle.
- Store any leftovers in the refrigerator for up to 4 days.
Nutrition Information:
Yield:
16Serving Size:
1Amount Per Serving: Calories: 216Total Fat: 16gSaturated Fat: 10gUnsaturated Fat: 7gCholesterol: 57mgSodium: 168mgCarbohydrates: 14gFiber: 1gSugar: 12gProtein: 4g