Easy Frankenstein Wafer Cookies (Fun Halloween Recipe!)
Every Halloween I love putting together fun little treats that are equal parts spooky and adorable, and these Frankenstein Wafer Cookies check all the boxes. They’re the kind of recipe that makes the kids giggle the moment they see them, and I can’t help but smile too. The best part is that they look so impressive, but they’re secretly super easy to make with just a handful of ingredients.
I used simple vanilla wafers as the base, then gave them a monster makeover with green candy melts, candy eyes, and a few black jimmies for that classic Frankenstein hair. A quick drizzle of black candy melts for stitches, and suddenly you’ve got a tray of the cutest little monsters ready to party. They’re a great project to do with kids since there’s no baking involved, just dipping, sprinkling, and decorating.
These Frankenstein Wafer Cookies are perfect for Halloween parties, school treats, or just a cozy afternoon at home when you want to get into the spooky spirit. They add so much character to any dessert table and are always one of the first things to disappear. I love that they’re festive without being fussy, and they’re guaranteed to bring big smiles to your little monsters.

Ingredients
-
12 oz green candy melts – These give Frankenstein his signature green monster look.
-
6 oz black candy melts – Perfect for piping on those spooky stitches.
-
2 tablespoons black jimmies – Just right for creating Frankenstein’s wild, messy hair.
-
20 candy eyes – Because every monster needs a pair of big googly eyes to come alive.
-
10 vanilla wafers – The simple base that gets a frightfully fun makeover.

Recipe Instructions
You can find a printable recipe card at the bottom of this post.
1. Melt green candy melts in the microwave at 50% power for 2 minutes, then stir. Continue melting in 1-minute intervals, stirring each time, until smooth.
2. Dip vanilla wafers into the melted green candy and place them on a parchment-lined baking sheet.

3. While the coating is still wet, sprinkle with black jimmies and add candy eyes.


4. Melt black candy melts at 50% power for 2 minutes, stir, then continue in 1-minute intervals until smooth.
5. Transfer the melted black candy to a piping bag, snip the tip, and pipe stitches onto each wafer.
6. Let the decorations set completely before serving.

Serving & Storing
-
These little monsters look amazing on a Halloween dessert table or tucked into party favor bags.
-
Pair them with other spooky treats like monster donuts or candy bark for a fun themed spread.
-
Store the cookies in an airtight container at room temperature for up to 4–5 days.
-
If stacking them, place a piece of parchment or wax paper between layers to keep the decorations from smudging.
-
Avoid refrigerating, as the candy coating can get sticky or dull.
Variations
-
Swap the vanilla wafers for graham crackers or shortbread cookies for a different crunch.
-
Use purple or orange candy melts instead of green for a whole monster crew.
-
Add candy corn, licorice, or pretzel sticks to make “ears” or “bolts” for extra spooky details.
-
Try different sprinkle shapes or colors for Frankenstein’s hair to give each cookie its own personality.
-
Turn them into mummies or vampires by switching up the candy melt colors and decorations.
-
Make sure you also check out my Purple Monster Wafers and Mummy Wafers.

Substitutions
-
Use white chocolate chips with a drop of green food coloring if you don’t have green candy melts.
-
Swap the black candy melts for melted chocolate or even black icing for the stitches.
-
If you can’t find black jimmies, crushed chocolate cookies make a great “hair” substitute.
-
Candy eyes can be replaced with mini chocolate chips, M&Ms, or small dots of white/black icing.
-
Any plain cookie, like digestive biscuits or rectangular tea biscuits, can stand in for vanilla wafers.
FAQs
Can I make these ahead of time?
Yes! You can make them 2–3 days in advance and store them in an airtight container at room temperature.
Do I need to temper the candy melts?
Nope! Candy melts are designed to be easy to use, just melt and dip. No tempering required.
Can I use chocolate instead of candy melts?
Absolutely. Just know that chocolate can be a little trickier to work with and may need a touch of coconut oil to stay smooth.
What if I don’t have a piping bag?
You can use a zip-top bag, snip off a tiny corner, and it works just as well for adding the stitches.
Are these kid-friendly to make?
Yes! Kids love dipping, sprinkling, and sticking on the eyes, it’s a fun family project.

Frankenstein Wafer Cookies
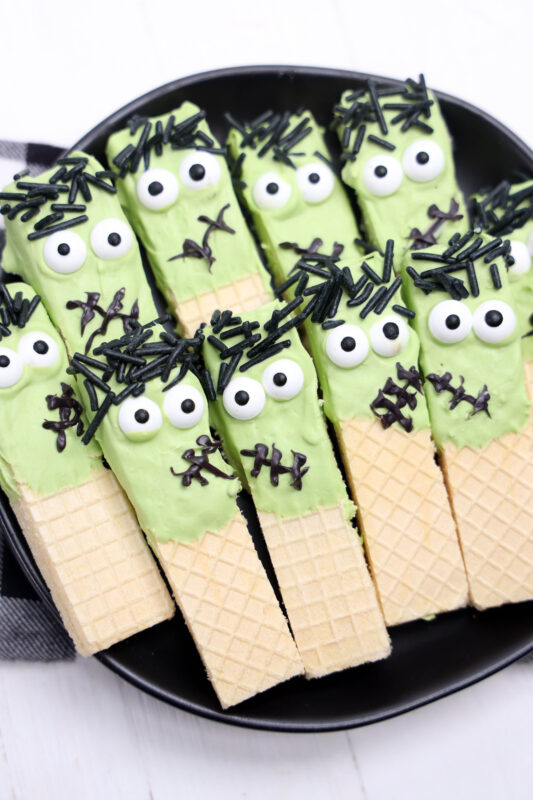
These Easy Frankenstein Wafer Cookies are the perfect mix of spooky and cute! Made with vanilla wafers, candy melts, and candy eyes, they’re a no-bake Halloween treat that comes together in minutes and is always a hit at parties.
Ingredients
- 12 oz green candy melts
- 6 oz black candy melts
- 2 tablespoons black jimmies
- 20 candy eyes
- 10 vanilla wafers
Instructions
- Melt green candy melts in the microwave at 50% power for 2 minutes, then stir. Continue melting in 1-minute intervals, stirring each time, until smooth.
- Dip vanilla wafers into the melted green candy and place them on a parchment-lined baking sheet.
- While the coating is still wet, sprinkle with black jimmies and add candy eyes.
- Melt black candy melts at 50% power for 2 minutes, stir, then continue in 1-minute intervals until smooth.
- Transfer the melted black candy to a piping bag, snip the tip, and pipe stitches onto each wafer.
- Let the decorations set completely before serving.