Get in the Halloween Spirit with These Blackout Cobweb Cookies
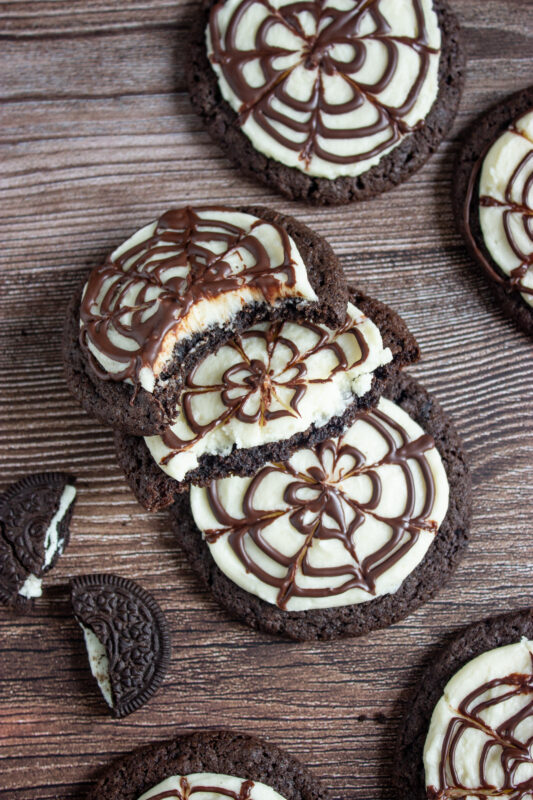
Halloween is one of my absolute favorite times of year, and one of the things I look forward to most is baking fun and spooky treats. These Blackout Cobweb Cookies are the perfect way to get into the Halloween spirit. They’re packed with rich chocolate flavor, and the black-and-white cobweb design adds a creepy (but totally cute) touch to each cookie. Trust me, these cookies are as fun to make as they are to eat, and they’ll definitely wow anyone who sees them.
The cookie dough is a delicious combination of dark brown sugar, cocoa powder, and crushed Oreos, which gives them that perfect balance of sweetness and chocolatey richness. I love how simple the recipe is, but the end result is so impressive. The white vanilla frosting and the dark chocolate cobweb design really bring these cookies to life and make them stand out at any Halloween gathering. Plus, they’re the ideal treat for anyone who’s obsessed with spooky sweets.
Whether you’re hosting a Halloween party or just looking for a fun activity to do with the kids, these Blackout Cobweb Cookies will make sure you’re fully immersed in the holiday spirit. They’re the kind of treat that’s sure to spark a few ooohs and ahhhhs when you pull them out of the oven, and they’ll disappear just as fast as you can make them!
Ingredients
Cookie Dough Ingredients (makes 8 large cookies):
-
1 cup unsalted butter, softened: Start with softened butter for the perfect cookie texture that’s smooth and easy to work with.
-
1 cup dark brown sugar, packed: This gives the cookies a rich, molasses-like sweetness that balances the chocolate flavor perfectly.
-
½ cup granulated sugar: A touch of granulated sugar for a light sweetness that complements the dark brown sugar.
-
2 large eggs: Eggs help bind the dough together and make the cookies soft and chewy.
-
2 tsp vanilla extract: Vanilla adds depth and enhances the sweetness of the dough.
-
1 ¾ cups all-purpose flour: Flour gives the cookies structure and helps them hold their shape while baking.
-
½ cup cocoa powder: This adds the deep, rich chocolate flavor that makes these cookies a true chocolate lover’s dream.
-
½ tsp baking soda: Baking soda helps the cookies spread slightly while baking, creating a soft texture.
-
½ tsp baking powder: A little bit of baking powder ensures the cookies rise just right.
-
¼ tsp salt: Salt enhances all the flavors and balances the sweetness.
-
1 cup crushed Oreo cookies (about 10 cookies, without filling): Crushed Oreos bring in that signature cookie crunch and a delightful chocolaty texture.
-
Optional: use black food coloring for an extra black cookie dough: Add a drop of black food coloring for a dramatic, Halloween-inspired black dough.

White Vanilla Frosting Ingredients:
-
½ cup unsalted butter, softened: Butter is key for creamy, smooth frosting that spreads easily.
-
2 cups powdered sugar: Powdered sugar gives the frosting a light, fluffy consistency that’s perfectly sweet.
-
2–3 tbsp milk or heavy cream: Milk or heavy cream helps thin the frosting to the perfect spreadable consistency.
-
1 ½ tsp vanilla extract: Vanilla gives the frosting a warm, comforting flavor that pairs well with the chocolate cookie.
-
Pinch of salt: A pinch of salt helps balance the sweetness and brings out all the flavors.
Cobweb Chocolate Design Ingredients:
-
¼ cup dark chocolate chips or chopped dark chocolate: Dark chocolate adds the rich, slightly bitter flavor that contrasts beautifully with the sweet frosting.
-
1 tsp coconut oil or butter (optional, for smoothness): A little coconut oil or butter helps the chocolate melt smoothly, making it easier to pipe the cobweb design.

Step-by-Step Instructions
You can find a printable recipe card at the bottom of this post.
For the Cookies:
1. Preheat oven to 350°F (175°C). Line two baking sheets with parchment paper.
2. Beat the butter, brown sugar, and granulated sugar until light and fluffy.


3. Mix in the eggs one at a time, then add vanilla.

4. In a separate bowl, whisk flour, cocoa, baking soda, baking powder, and salt. Add to wet mixture gradually.


5. Stir in crushed Oreos.


6. Scoop ¼ cup of dough per cookie. Roll into balls and flatten slightly.

7. Bake for 9–12 minutes until set around the edges but soft in the middle. Let cool completely.

For the White Vanilla Frosting:
1. Beat butter until creamy. Add powdered sugar gradually.


2. Add vanilla and a tablespoon of milk at a time until thick but spreadable.


3. Spread or pipe a generous layer on each cooled cookie.

For the Cobweb Chocolate Design:
1. Melt chocolate (and coconut oil, if using) in a microwave-safe bowl in 15–20 second intervals until smooth.


2. Transfer to piping bag or small zip bag and snip a tiny corner.
3. Pipe tight spirals over the white frosting.

4. Create a cobweb effect: Take a toothpick and drag from the center to create a cobweb effect. Wipe the toothpick clean between drags.


Tips for the Perfect Blackout Cobweb Cookies
-
Softened butter is key: Make sure your butter is softened before you start. This helps create a smooth dough and prevents any clumps in your cookies. You want that creamy texture to shine through!
-
Don’t skip the chilling: If you’ve got a little time to spare, chilling the dough for 15-20 minutes before scooping can help the cookies hold their shape and prevent them from spreading too much while baking.
-
Use a generous amount of Oreos: Don’t be shy with the crushed Oreos! The more, the better. They add a lovely crunch and extra chocolatey goodness that makes these cookies so special.
-
Watch the bake time: Keep an eye on the cookies as they bake. You want them set around the edges but still soft in the center. The cookies will firm up as they cool, so don’t overbake them!
-
Let them cool completely: Be patient and let the cookies cool completely before you frost them. This gives the frosting a chance to set without melting into the cookie, giving you that beautiful white finish.
-
Go easy with the food coloring: If you’re using black food coloring, just a drop or two is enough to give your dough that spooky vibe without overpowering the flavor.
-
Perfect the cobweb design: When piping the cobweb, keep the spirals tight, but don’t stress if it’s not perfect! It’s all about the spooky vibe. You can always adjust with the toothpick for a fun, messy effect.

Get Creative!
-
Mix up the frosting: While white vanilla frosting is a classic, try using different colored frostings for a unique twist! You could go for orange or purple to match a Halloween theme or even add a hint of food coloring to the frosting for a surprise inside.
-
Add sprinkles or toppings: After piping the cobweb design, top the cookies with Halloween sprinkles, edible glitter, or mini candy eyeballs for a little extra spooky flair.
-
Use different cookie shapes: Feel free to experiment with cookie cutters! You could shape these into bats, pumpkins, or ghosts to match the Halloween theme and still use the same delicious dough.
-
Go wild with the cobwebs: Try creating a different cobweb pattern by adding more layers or experimenting with different swirling techniques. You could even make a multi-colored cobweb design by using different chocolate colors!
-
Add a little crunch: Mix in other fun cookie bits like mini chocolate chips, crushed pretzels, or candy pieces to the dough for a crunchier cookie with a surprise inside.
-
Turn them into cookie sandwiches: Frost two cookies with a generous layer of frosting in the middle and make a spooky cookie sandwich. This adds an extra indulgent layer to the treat!
-
Make them gluten-free or vegan: If you need to cater to dietary preferences, try swapping the flour for a gluten-free blend or using vegan butter and eggs to make a version that everyone can enjoy.

Serving & Storing
-
Perfect for a Halloween party: These cookies are the ideal treat to serve at any Halloween gathering. They’re fun, spooky, and sure to be a hit with both kids and adults. Arrange them on a platter for a sweet centerpiece or wrap them individually as party favors!
-
Store at room temperature: Once baked and decorated, these cookies can be stored at room temperature for up to 3 days. Just place them in an airtight container to keep them fresh and soft.
-
Freeze for later: If you want to make them ahead of time, freeze the cookies (before frosting) for up to 2 months. Just let them cool completely, wrap them tightly in plastic wrap, and pop them into a freezer-safe bag. When you’re ready to enjoy, thaw them at room temperature and add the frosting and cobweb design.
-
Keep frosting fresh: If you’re making the frosting in advance, store it in an airtight container in the fridge for up to a week. Before using, let it come to room temperature and give it a quick stir to bring it back to that creamy consistency.
-
No need to refrigerate: There’s no need to refrigerate these cookies, especially if they’re already frosted. Refrigeration can sometimes make the cookies dry out or the frosting too stiff.
-
Serve with a spooky drink: Pair these cookies with a Halloween-themed drink, like a creamy pumpkin spice latte, a spooky punch, or even a simple glass of milk for the perfect treat!

Blackout Cobweb Cookies

These Blackout Cobweb Cookies are the perfect spooky treat for Halloween! With rich, chocolatey cookie dough, a creamy vanilla frosting, and a fun cobweb design, they’re sure to impress at any Halloween gathering. Easy to make and even more fun to decorate, these cookies are as delicious as they are festive!
Ingredients
For the Cookie Dough
- 1 cup unsalted butter, softened
- 1 cup dark brown sugar, packed
- ½ cup granulated sugar
- 2 large eggs
- 2 tsp vanilla extract
- 1 ¾ cups all-purpose flour
- ½ cup cocoa powder
- ½ tsp baking soda
- ½ tsp baking powder
- ¼ tsp salt
- 1 cup crushed Oreo cookies (about 10 cookies, without filling)
- Optional: use black food coloring for an extra black cookie dough.
White Vanilla Frosting
- ½ cup unsalted butter, softened
- 2 cups powdered sugar
- 2–3 tbsp milk or heavy cream
- 1 ½ tsp vanilla extract
- Pinch of salt
For the Cobweb Chocolate Design:
- ¼ cup dark chocolate chips or chopped dark chocolate
- 1 tsp coconut oil or butter (optional, for smoothness)
Instructions
For the Cookies:
- Prep: Preheat oven to 350°F (175°C). Line two baking sheets with parchment paper.
- Cream butter & sugar: Beat butter, brown sugar, and granulated sugar until light and fluffy.
- Add eggs & vanilla: Mix in eggs one at a time, then add vanilla.
- Dry ingredients: In a separate bowl, whisk flour, cocoa, baking soda, baking powder, and salt. Add to wet mixture gradually.
- Oreo time: Stir in crushed Oreos.
- Shape cookies: Scoop ¼ cup of dough per cookie. Roll into balls and flatten slightly.
- Bake: Bake for 9–12 minutes until set around the edges but soft in the middle. Let cool completely.
For the White Vanilla Frosting:
- Beat butter until creamy. Add powdered sugar gradually.
- Add vanilla and a tablespoon of milk at a time until thick but spreadable.
- Spread or pipe a generous layer on each cooled cookie.
For the Cobweb Chocolate Design:
- Melt chocolate (and coconut oil, if using) in a microwave-safe bowl in 15–20 second intervals until smooth.
- Transfer to piping bag or small zip bag and snip a tiny corner.
- Pipe tight spirals over the white frosting.
- Create a cobweb effect: Take a toothpick and drag from the center to create a cobweb effect. Wipe the toothpick clean between drags.
Nutrition Information:
Yield:
8 large cookiesServing Size:
1 cookieAmount Per Serving: Calories: 520Total Fat: 27gCarbohydrates: 65gFiber: 2gSugar: 45gProtein: 5g