Soft & Chewy Easter Cookies with Colorful Candy Centers
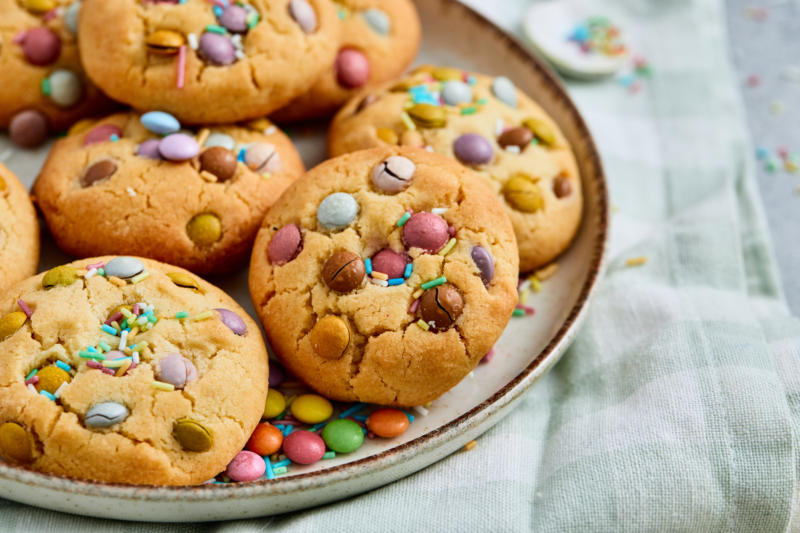
These cookies are pure happy-baking energy. Soft, chewy, and just a little bit nostalgic, they’re the kind that make the kitchen feel extra cozy while they bake. The candy on top gives them that cheerful Easter look, but at heart they’re just really good cookies you’ll keep sneaking past the cooling rack.
One of my favorite things about this recipe is how easy it is to fit into real life. The dough comes together quickly, there’s nothing complicated going on, and freezing the dough does all the heavy lifting for you. That one step keeps the cookies thick, soft, and perfectly chewy instead of spreading all over the pan. It’s low effort with very satisfying results.
They’re also great for baking with kids or squeezing in during a busy afternoon. Rolling the dough and pressing in the candy is fun and forgiving, and you can swap colors or sprinkles to match the season or whatever you have on hand. These are the kind of cookies that work just as well for a holiday table as they do for a casual snack that somehow disappears faster than expected.
Why We Love This Recipe
- They stay soft and chewy: Even the next day (if they last that long), these cookies keep that tender, soft-baked center everyone hopes for when they reach for one.
- The dough is simple and forgiving: No fancy steps, no chilling overnight stress. Mix it up, roll, freeze, and bake. Easy in the best way.
- That pop of candy makes them extra fun: Pressing the candy right on top means every cookie looks festive and colorful without any extra decorating effort.
- Perfect for baking with kids: Rolling dough balls and adding candy is exactly the kind of job little helpers love, and there’s no pressure for perfection.
- They bake up beautifully every time: Freezing the dough keeps the cookies thick, soft, and just the right amount of chewy instead of spreading too thin.
- They fit so many occasions: Easter trays, spring parties, bake sales, or just a random Tuesday when you want something sweet and cheerful.
- They’re easy to customize: Swap the candy colors, skip the sprinkles, or mix in what you have on hand. These cookies are happy to go with the flow.

Equipment
-
Mixing bowl: Big enough to give you room to mix without flour puffing everywhere when things get going.
-
Hand mixer or stand mixer: Makes creaming the butter and sugar quick and easy, so the dough starts off light and fluffy.
-
Measuring cups and spoons: Nothing fancy here, just your everyday set to keep everything nicely balanced.
-
Rubber spatula: Perfect for scraping down the sides of the bowl so none of that dough goes to waste.
-
Cookie scoop or tablespoon: Helps keep the cookies the same size so they bake evenly and look nice and uniform.
-
Baking sheets: A sturdy pan makes all the difference for even baking and soft centers.
-
Parchment paper: Keeps the cookies from sticking and makes cleanup way less annoying.
-
Freezer space: Not technically equipment, but freezing the dough is the little trick that helps these cookies stay thick and chewy.
-
Wire cooling rack: Lets the cookies cool properly after baking so the bottoms don’t get soggy.
Ingredients
-
2 ½ cups all-purpose flour (300 g): This is the backbone of the cookies, giving them just enough structure while keeping the texture soft and tender.
-
½ teaspoon baking powder: A small amount goes a long way here, helping the cookies puff slightly without losing that chewy middle.
-
1 cup unsalted butter, softened (225 g): Softened butter creams beautifully with the sugar and is the secret behind that rich, melt-in-your-mouth texture.
-
½ cup granulated sugar (100 g): Keeps the cookies sweet and helps create those lightly crisp edges with soft centers.
-
1 large egg yolk: Using just the yolk adds extra richness and chewiness without making the cookies feel cakey.
-
Candy-coated chocolates (such as M&M’s), to taste: These add little pops of chocolate and color in every bite, plus they make the cookies look extra festive.
-
Colorful sprinkles (optional): Completely optional, but they add a fun finishing touch and a bit of Easter cheer if you’re feeling extra.

Recipe Instructions
You can find a printable recipe card at the bottom of this post.
Step 1: In a large mixing bowl, beat the softened butter and granulated sugar until light and fluffy, then add the egg yolk and mix until fully incorporated.


Step 2: Add the flour and baking powder directly to the bowl and mix just until a soft dough forms, being careful not to overmix.


Step 3: Scoop tablespoon-sized portions of dough and roll them into balls. Place on a parchment-lined tray and gently press several candy-coated chocolates into the top of each dough ball.


Step 4: Transfer the tray to the freezer and freeze for at least 1 hour, or until the dough balls are firm.
Step 5: Preheat the oven to 350°F (175°C). Arrange the frozen dough balls on a parchment-lined baking sheet, spacing them slightly apart, and bake for 10–12 minutes, until the edges are set and the centers remain soft.

Step 6: Remove from the oven and let the cookies cool on the baking sheet for about 5 minutes. If using, sprinkle with colorful sprinkles while the cookies are still slightly warm, then transfer to a wire rack to cool completely.

Serving & Storing
-
Serve them once they’ve set: Let the cookies cool for a bit so they hold together, but they’re especially good while the centers are still slightly soft.
-
Perfect for sharing: Stack them on a plate, tuck them into a basket, or add them to an Easter tray. They always look cheerful and inviting.
-
Great for lunchboxes and snack plates: These travel well and stay soft, which makes them easy to pack up without worrying about crumbs everywhere.
-
Store at room temperature: Keep the cookies in an airtight container on the counter, and they’ll stay soft and chewy for several days.
-
Layer with parchment if stacking: If you’re piling them up, a sheet of parchment between layers helps keep the candy tops looking pretty.
-
They freeze well too: Once cooled, pop them into a freezer-safe container and freeze for up to a couple of months. Let them thaw at room temperature and they’re just as good.
-
Revive if needed: If they feel a little firm after a few days, a quick zap in the microwave brings that soft, chewy texture right back.

Variations & Substitutions
-
Swap the candy colors: Use pastel candies for Easter, red and pink for Valentine’s Day, or classic chocolate ones if you want something a little less themed.
-
Try different mix-ins: Mini chocolate chips, chopped chocolate, or even a handful of white chocolate chips work really well if candy-coated chocolates aren’t your thing.
-
Add a hint of flavor: A splash of vanilla or almond extract gives the dough a little extra warmth without changing the texture.
-
Skip the sprinkles: Totally fine to leave them out. The cookies still look cute and taste just as good with just the candy on top.
-
Make them extra soft: If you like an even chewier cookie, slightly underbake them and let them finish setting on the baking sheet.
-
Go smaller or bigger: Scoop smaller dough balls for bite-sized cookies or make them a bit larger for bakery-style treats. Just adjust the bake time slightly.
-
Change the look: Roll the dough balls in sprinkles before baking instead of topping them after for a more colorful, all-over finish.

Little Tricks That Make a Big Difference
-
Freeze the dough balls: This one step keeps the cookies thick, soft, and chewy instead of spreading too much in the oven.
-
Don’t overmix the dough: Once the flour goes in, mix just until everything comes together so the cookies stay tender.
-
Press the candy in gently: You want it to stick, not sink. Light pressure keeps the tops looking pretty after baking.
-
Bake until just set: Pull them out when the edges are set but the centers still look soft. They’ll finish baking as they cool.
-
Use parchment paper: It helps the cookies bake evenly and makes cleanup easy, which is always a win.
-
Let them rest on the pan: Giving them a few minutes on the baking sheet helps them set without drying out.
-
Add sprinkles while warm: If you’re using sprinkles, sprinkle them on while the cookies are still warm so they actually stick.

FAQs
Can I skip freezing the dough?
You can, but freezing really helps these cookies stay thick and soft instead of spreading too much. If you’re short on time, even 30 minutes in the freezer makes a difference.
Why do you only use the egg yolk?
The yolk adds richness and chewiness without making the cookies cakey. Using the whole egg would change the texture and make them a bit more bread-like.
How do I know when they’re done baking?
Look for set edges and soft-looking centers. They might seem slightly underbaked when you pull them out, but they’ll firm up just right as they cool.
Can I make the dough ahead of time?
Yes! You can freeze the dough balls and keep them in the freezer for up to two months. Bake straight from frozen whenever you’re ready.
Do I have to use candy-coated chocolates?
Not at all. Mini chocolate chips, chopped chocolate, or even white chocolate chips work great if that’s what you have on hand.
Why did my cookies spread too much?
This usually happens if the butter was too warm or the dough wasn’t chilled enough. Freezing the dough and making sure the butter is just softened, not melty, helps a lot.
How should I store leftover cookies?
Keep them in an airtight container at room temperature. They’ll stay soft and chewy for several days, and a quick microwave warm-up brings them right back to life.

Soft & Chewy Easter Cookies

Soft, chewy, and full of cheerful color, these Easter cookies are an easy, feel-good bake that fits right into a busy day. The dough comes together quickly, freezes beautifully, and bakes into thick, tender cookies with perfectly soft centers. Finished with candy-coated chocolates and optional sprinkles, they’re perfect for Easter trays, spring gatherings, or a sweet treat that disappears fast.
Ingredients
- 2 ½ cups all-purpose flour (300 g)
- ½ teaspoon baking powder
- 1 cup unsalted butter, softened (225 g)
- ½ cup granulated sugar (100 g)
- 1 large egg yolk
- Candy-coated chocolates (such as M&M’s), to taste
- Colorful sprinkles (optional)
Instructions
- In a large mixing bowl, beat the softened butter and granulated sugar until light and fluffy, then add the egg yolk and mix until fully incorporated.
- Add the flour and baking powder directly to the bowl and mix just until a soft dough forms, being careful not to overmix.
- Scoop tablespoon-sized portions of dough and roll them into balls. Place on a parchment-lined tray and gently press several candy-coated chocolates into the top of each dough ball.
- Transfer the tray to the freezer and freeze for at least 1 hour, or until the dough balls are firm.
- Preheat the oven to 350°F (175°C). Arrange the frozen dough balls on a parchment-lined baking sheet, spacing them slightly apart, and bake for 10–12 minutes, until the edges are set and the centers remain soft.
- Remove from the oven and let the cookies cool on the baking sheet for about 5 minutes. If using, sprinkle with colorful sprinkles while the cookies are still slightly warm, then transfer to a wire rack to cool completely.
Notes
- Freezing the dough is key for thick, soft cookies, so don’t skip this step if you can help it.
- The butter should be softened but not melty. If it’s too warm, the cookies may spread more than you want.
- For the best texture, pull the cookies from the oven when the centers still look slightly soft. They’ll finish setting as they cool.
- Candy-coated chocolates can be swapped for mini chocolate chips or chopped chocolate if needed.
- Sprinkles stick best when added while the cookies are still warm.
- Store baked cookies in an airtight container at room temperature to keep them soft and chewy.
- Dough balls can be frozen ahead and baked straight from the freezer with no thawing needed.
Nutrition Information:
Yield:
18Serving Size:
1Amount Per Serving: Calories: 183Total Fat: 12gSaturated Fat: 7gUnsaturated Fat: 5gCholesterol: 40mgSodium: 23mgCarbohydrates: 18gFiber: 0gSugar: 7gProtein: 2g