Spooktacular Halloween Candy Bark (Easy No-Bake Treat!)
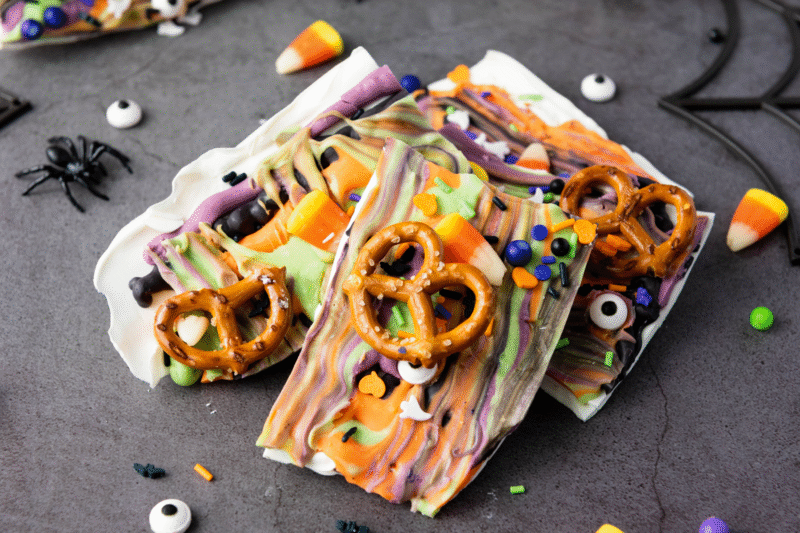
Every Halloween, I love making something that’s as fun to look at as it is to eat, and this Spooktacular Halloween Candy Bark checks all the boxes. It’s colorful, festive, and full of that sweet-and-salty crunch that keeps everyone coming back for more. Plus, it’s one of those treats that looks like it took a lot of effort, but in reality, it comes together in no time at all. Perfect for when you’re juggling costumes, parties, and pumpkin carving!
What I really love about this bark is how customizable it is. I like swirling in those bright Halloween colors – orange, purple, green, and black – because they give it that spooky vibe, but you can switch things up depending on what candy melts or sprinkles you have on hand. And the toppings? Anything goes. I usually throw on candy corn, broken pretzels, and festive sprinkles, but feel free to dig into your leftover candy stash and get creative.
It’s also such a great recipe to make with kids. Mine love dropping the colors on the white base and swirling them together, it’s basically edible art! Then we scatter the toppings and wait for it to set, which is honestly the hardest part because they can’t wait to break it apart and dig in. Whether you’re making it for a party, trick-or-treat night, or just as a fun afternoon activity, this Halloween Candy Bark is always a hit.

Ingredients
-
12 oz white candy melts – this makes the perfect creamy base for all the spooky colors to swirl into.
-
1/4 cup orange candy melts – a pop of classic Halloween color that brightens up the bark.
-
1/4 cup purple candy melts – adds that eerie, festive flair you can’t skip.
-
1/4 cup green candy melts – for a fun splash of ghoulish green.
-
1/4 cup black candy melts – the bold touch that makes all the other colors stand out.
-
1/2 cup candy corns – sweet little bites of Halloween tradition sprinkled on top.
-
1/2 cup mini pretzels, broken into pieces – for that salty crunch that balances all the sweetness.
-
Halloween-themed sprinkles – the final festive touch that makes the bark extra fun and spooky.

Recipe Instructions
You can find a printable recipe card at the bottom of this post.
1. Line a baking sheet with parchment paper or a silicone baking mat.
2. In a microwave-safe bowl, melt the white candy melts in 30-second intervals, stirring after each, until smooth.

3. Spread the melted white candy evenly on the prepared baking sheet, about 1/4 inch thick.

4. In separate microwave-safe bowls, melt the orange, purple, green, and black candy melts in 30-second intervals, stirring after each, until smooth.

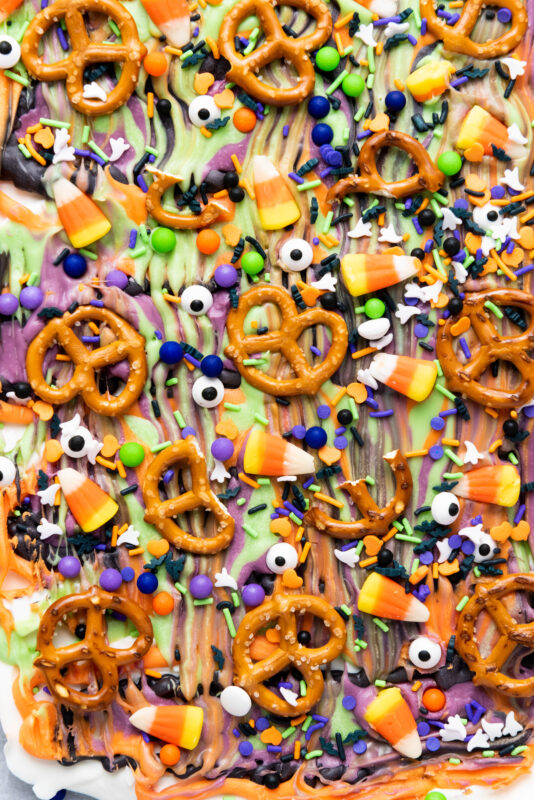
5. Drop spoonfuls of each colored candy (or use a piping bag) onto the white layer, then swirl together with a toothpick or skewer to create a marbled effect.


6. Immediately sprinkle candy corns, broken pretzels, and Halloween sprinkles over the top, pressing them in gently.


7. Let the bark set at room temperature for 1–2 hours, or refrigerate for about 30 minutes to speed up the process.
8. Once hardened, break into pieces by hand or with a knife.

9. Store in an airtight container at room temperature until ready to serve.

My Favorite Ways to Enjoy Halloween Candy Bark
-
I love breaking the bark into big rustic pieces and piling them onto a festive platter for Halloween parties, it always disappears fast!
-
Sometimes I tuck a few pieces into little treat bags for my kids’ friends or neighbors; it makes the cutest homemade gift.
-
A little piece with a cup of hot cocoa or coffee feels like such a cozy Halloween night snack for me.
-
I’ve even crumbled it over a bowl of vanilla ice cream. Seriously, the extra crunch is so good.
-
And of course, sneaking a piece or two while watching a spooky movie after the kids are in bed is my personal favorite way to enjoy it.

Serving & Storing
Serving
-
Break it into big or small pieces depending on how you like to serve it. I usually do a mix so there’s something for everyone.
-
It looks extra festive when you pile it high on a tray lined with Halloween parchment paper.
-
You can also portion it into little bags or jars as party favors or trick-or-treat goodies.
Storing
-
Keep your candy bark in an airtight container at room temperature. It stays fresh and crunchy for up to a week.
-
If your kitchen runs warm, pop the container in the fridge so the candy doesn’t get too soft.
-
I don’t recommend freezing it since the candy melts can lose their pretty swirl when thawed.

Variations
-
Swap out the candy corn for Reese’s Pieces, M&M’s, or any leftover trick-or-treat candy you have lying around.
-
Try different colored candy melts – neon green, bright pink, or even red can make it look extra spooky.
-
If you’re a chocolate lover, use milk or dark chocolate as the base instead of white candy melts.
-
Add gummy worms or gummy spiders on top for a creepy-crawly twist that kids will love.
-
For a nutty crunch, sprinkle on some chopped peanuts, almonds, or pecans before the bark sets.
-
Make it festive for other holidays too, just swap the colors and sprinkles to match the season.

Substitutions
-
If you don’t have candy melts, you can use white chocolate chips or almond bark instead, they melt just as smoothly.
-
No orange, purple, or green melts on hand? Mix a few drops of food coloring into melted white chocolate to create your own festive colors.
-
Swap out candy corn for any seasonal candy you like. Think gummy pumpkins, Reese’s Pieces, or even Skittles for a fruity twist.
-
If pretzels aren’t your thing, try popcorn, crushed Oreos, or graham cracker pieces for that crunchy element.
-
Can’t find Halloween sprinkles? Regular rainbow sprinkles or even a drizzle of extra melted chocolate will still make it fun and colorful.

FAQs
Can I make Halloween Candy Bark ahead of time?
Absolutely! I usually make it a day or two before a party and keep it in an airtight container, it stays fresh and crunchy.
Can kids help with this recipe?
Yes, and they love it! Kids can swirl the colors together, sprinkle on the toppings, and help break it into pieces once it’s set. Just be sure an adult handles the melting.
Do I have to use candy melts?
Nope! White chocolate chips or almond bark work just as well. I like candy melts because they come in so many fun colors, but chocolate tastes amazing too.
How long does Halloween Candy Bark last?
It keeps well at room temperature for about a week, or you can store it in the fridge if your kitchen is warm.
Can I freeze candy bark?
I don’t recommend it, the colors and texture can get a little funky once it thaws. It’s best enjoyed fresh!
Halloween Candy Bark

Spooktacular Halloween Candy Bark is a fun and festive no-bake treat that’s perfect for parties, trick-or-treat night, or just a spooky afternoon snack. With swirls of bright candy colors, crunchy pretzels, sweet candy corn, and festive sprinkles, every bite is a mix of sweet and salty deliciousness. It’s easy enough for kids to help make and always a hit at any Halloween gathering!
Ingredients
- 12 oz white candy melts
- 1/4 cup orange candy melts
- 1/4 cup purple candy melts
- 1/4 cup green candy melts
- 1/4 cup black candy melts
- 1/2 cup candy corns
- 1/2 cup mini pretzels, broken into pieces
- Halloween-themed sprinkles
Instructions
- Line a baking sheet with parchment paper or a silicone baking mat.
- In a microwave-safe bowl, melt the white candy melts in 30-second intervals, stirring after each, until smooth.
- Spread the melted white candy evenly on the prepared baking sheet, about 1/4 inch thick.
- In separate microwave-safe bowls, melt the orange, purple, green, and black candy melts in 30-second intervals, stirring after each, until smooth.
- Drop spoonfuls of each colored candy onto the white layer, then swirl together with a toothpick or skewer to create a marbled effect.
- Immediately sprinkle candy corns, broken pretzels, and Halloween sprinkles over the top, pressing them in gently.
- Let the bark set at room temperature for 1–2 hours, or refrigerate for about 30 minutes to speed up the process.
- Once hardened, break into pieces by hand or with a knife.
- Store in an airtight container at room temperature until ready to serve.