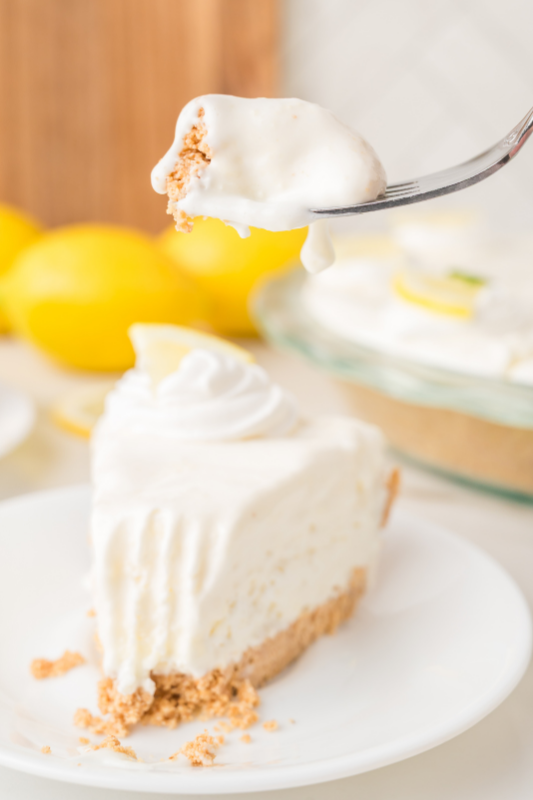
The Easiest No-Bake Lemonade Pie for Busy Summer Days
There are some days when I just don’t feel like turning the oven on, especially when the kitchen’s already warm and everyone’s in and out grabbing snacks. That’s when simple desserts like this really come in handy. It’s quick to pull together, uses ingredients I usually have on hand, and still feels like a proper homemade treat.
I love having a dessert like this tucked away in the freezer, ready for those moments when the kids ask for something sweet or we’ve got family popping by. It’s creamy, a little tangy, and just light enough that it doesn’t feel too heavy after dinner. It also stretches nicely, which helps when you’re feeding a full house and trying to keep grocery costs in check.
This is one of those recipes that fits right into everyday life. It doesn’t take much effort, you can make it ahead, and it always goes down well. Just slice it up, add a little whipped cream on top, and it’s ready to serve without any fuss.
If you like this recipe then you’ll LOVE these:
Why We Love This Recipe
- No oven needed: On busy days or when it’s too warm to cook, this comes together without turning the oven on, which always feels like a win.
- Simple, budget-friendly ingredients: Everything here is easy to find and not expensive, so you can make a lovely dessert without stretching the grocery budget.
- Make-ahead friendly: You can pop it in the freezer the night before, and it’s ready to go when you need it, which takes a lot of pressure off.
- Light and refreshing: It’s sweet but not too heavy, so it’s perfect after a big family meal or on a warm day.
- Kid-approved and fuss-free: The creamy, tangy flavor is one the whole family enjoys, and there’s nothing complicated about putting it together.

Equipment
- Pie dish: This is where everything comes together, so a standard pie dish works perfectly for shaping and serving.
- Food processor: Makes quick work of turning the graham crackers into fine crumbs without any hassle.
- Mixing bowl: You’ll need a good-sized bowl to mix up the filling until it’s smooth and creamy.
- Hand mixer or stand mixer: Helps blend the filling ingredients together easily so you don’t end up with any lumps.
- Spatula: Handy for folding in the Cool Whip and scraping every last bit of filling into the crust.
- Measuring cups and spoons: Keeps everything accurate so the texture and flavor turn out just right.

Ingredients
Crust
- 16 graham crackers: These give you that classic, slightly sweet base that holds everything together nicely.
- ½ cup unsalted butter, softened: This helps bind the crumbs and gives the crust a rich, buttery flavor.
Filling
- 8 ounces cream cheese, softened to room temperature: Softened cream cheese blends smoothly and gives the filling that creamy, tangy base.
- 14 ounces sweetened condensed milk: This adds sweetness and helps create that silky, set texture without any baking.
- 12 ounce can frozen lemonade concentrate, thawed: This brings all the bright, zesty lemon flavor that makes the pie so refreshing.
- 8 ounces Cool Whip, thawed: Folding this in keeps the filling light and fluffy, which makes it easy to slice and serve.
Topping
- Whipped cream: A simple topping that adds a little extra creaminess and makes each slice feel special.
- Sliced lemons: These add a fresh, pretty finish and hint at the citrus flavor inside.
- Mint: A few leaves on top give a pop of color and a light, fresh touch.

Recipe Instructions
You can find a printable recipe card at the bottom of this post.
Step 1: Start by greasing your pie dish to prevent the crust from sticking.
Step 2: Then add the graham crackers to your food processor and process into crumbs.

Step 3: Add the butter to the cracker crumbs and process again until the mixture starts to clump, then pour into your pie dish, press into the dish with the bottom of a measuring cup to flatten the crust on the bottom and sides. Set aside, in the freezer, while making the filling.


Step 4: Make the filling by beating together the cream cheese, sweetened condensed milk, and thawed lemonade concentrate, until smooth.

Step 5: Fold in the cool whip until well mixed, then pour into the pie crust.


Step 6: Set in the freezer for 8+ hours, or overnight, before topping with whipped cream, sliced lemons, and mint.

Step 7: Then slice, serve, and enjoy!

Serving & Storing
- Serve it straight from the freezer: This slices up much more easily when it’s nice and firm, so I like to take it out just a few minutes before serving.
- Let it sit briefly before cutting: Giving it 5 to 10 minutes at room temperature helps soften it just enough for cleaner slices.
- Add toppings just before serving: I like to wait until the last minute to add whipped cream and garnishes so everything looks fresh.
- Store leftovers in the freezer: Cover the pie well or transfer slices to an airtight container to keep it from picking up any freezer smells.
- Keeps well for several days: It’ll stay fresh and tasty for up to 4 to 5 days, which makes it handy for stretching desserts across the week.
- Wrap slices individually if needed: If you’ve got a busy household, wrapping pieces separately makes it easy for everyone to grab one when they fancy something sweet.

Variations & Substitutions
- Swap the crust if needed: If you don’t have graham crackers, digestive biscuits or vanilla wafers work just as well and still give you that nice crunchy base.
- Use fresh whipped cream instead of Cool Whip: If you prefer to make things from scratch, whipped cream works nicely, just whip it until soft peaks form before folding it in.
- Try a different citrus flavor: Lime or even orange concentrate can be used for a slightly different twist that still keeps that fresh, zingy taste.
- Make it a little lighter: You can use reduced-fat cream cheese and light whipped topping if you’re trying to cut back a bit without losing the creamy texture.
- Add a bit of crunch: A handful of crushed cookies or even chopped nuts stirred into the filling can give it a little extra texture.
- Turn it into mini desserts: Instead of one pie, you can spoon the mixture into small cups or jars, which is great for portion control and easy serving.
Little Tricks That Make a Big Difference
- Soften the cream cheese properly: Let it sit out until it’s nice and soft so you don’t end up with little lumps in the filling.
- Press the crust firmly: Using the bottom of a measuring cup helps pack it down evenly so it holds together when you slice it.
- Freeze the crust before filling: Giving it a quick chill helps it set up and keeps it from crumbling when you add the filling.
- Mix the filling until smooth first: Take a minute to fully blend the cream cheese, condensed milk, and lemonade before adding the whipped topping.
- Fold gently at the end: When you add the Cool Whip, fold it in slowly so the filling stays light and fluffy.
- Cover it well in the freezer: A bit of plastic wrap or a lid keeps it from picking up any freezer smells and helps it stay fresh.

What to Serve with Lemonade Pie
- Fresh berries on the side: Strawberries, raspberries, or blueberries add a nice pop of color and go really well with the lemon flavor.
- A scoop of vanilla ice cream: If you’ve got a crowd to feed, this makes each slice feel a little more filling and extra special.
- Iced tea or lemonade: Something cold and simple to drink pairs nicely and keeps everything feeling light and refreshing.
- A simple fruit salad: This is great if you’re serving it after a heavier meal and want to keep things balanced.
- Light summer meals: It fits in perfectly after things like grilled chicken, pasta salads, or anything you’d serve at a casual family dinner.
- Coffee for the grown-ups: A hot cup alongside a cold slice is always a nice little treat at the end of the day.

FAQs
Can I make no-bake lemonade pie ahead of time?
Yes, and it actually works really well that way. I like to make it the night before and leave it in the freezer so it’s fully set and ready to serve the next day.
How long does no-bake lemonade pie need to freeze?
It needs at least 8 hours to firm up properly, but overnight is even better if you’ve got the time.
Can I use fresh lemon juice instead of lemonade concentrate?
You can, but the flavor won’t be quite the same. The concentrate gives it that sweet and tangy balance that makes this pie so easy and reliable.
How do I store leftover lemonade pie?
Just cover it well or place slices in an airtight container and keep it in the freezer. It’ll stay fresh for up to 4 to 5 days.
Can I make this lemonade pie without Cool Whip?
Yes, you can swap it for homemade whipped cream. Just whip it until soft peaks form and fold it in gently so the filling stays light.
Why is my no-bake lemonade pie not setting properly?
It usually just needs more time in the freezer. Also make sure the filling was mixed until smooth before freezing, as that helps it set evenly.
Can I use a store-bought crust instead?
You can, and it’s a great time-saver. A ready-made graham cracker crust works just fine if you want to keep things even simpler.

No-Bake Lemonade Pie

A cool and creamy no-bake lemonade pie that’s perfect for warm days and busy family life. Made with simple, budget-friendly ingredients and a buttery graham cracker crust, it’s an easy make-ahead dessert with a light, tangy flavor everyone enjoys. Just slice, serve, and enjoy straight from the freezer.
Ingredients
Crust:
- 16 Graham Crackers
- ½ cup Unsalted Butter, softened
Filling:
- 8 ounces Cream Cheese, softened to room temperature
- 14 ounces Sweetened Condensed Milk
- 12 ounce can Frozen Lemonade Concentrate, thawed
- 8 ounces Cool Whip, thawed
Topping:
- Whipped Cream
- Sliced Lemons
- Mint
Instructions
- Start by greasing your pie dish to prevent the crust from sticking.
- Then add the graham crackers to your food processor and process into crumbs.
- Add the butter to the cracker crumbs and process again until the mixture starts to clump, then pour into your pie dish, press into the dish with the bottom of a measuring cup to flatten the crust on the bottom and sides. Set aside, in the freezer, while making the filling.
- Make the filling by beating together the cream cheese, sweetened condensed milk, and thawed lemonade concentrate, until smooth.
- Fold in the cool whip until well mixed, then pour into the pie crust.
- Set in the freezer for 8+ hours, or overnight, before topping with whipped cream, sliced lemons, and mint.
- Then slice, serve, and enjoy!
Notes
- Make sure the cream cheese is fully softened before mixing so the filling turns out smooth and creamy.
- Freeze the crust for at least 15 to 20 minutes before adding the filling to help it hold together better when slicing.
- Give the pie plenty of time to set, at least 8 hours, but overnight works best for clean slices.
- If you prefer a softer texture, let the pie sit at room temperature for 5 to 10 minutes before serving.
- You can use a store-bought graham cracker crust to save time if needed.
- For a slightly stronger lemon flavor, add a little fresh lemon zest to the filling.
- Cover the pie well in the freezer to keep it fresh and prevent any freezer odors.
Nutrition Information:
Yield:
8Serving Size:
1Amount Per Serving: Calories: 564Total Fat: 30gSaturated Fat: 17gUnsaturated Fat: 13gCholesterol: 79mgSodium: 293mgCarbohydrates: 69gFiber: 1gSugar: 48gProtein: 8g
Based on 8 servings.