Some days you just want a dessert that feels a little special without turning your kitchen upside down. That’s exactly where this one comes in. It starts with a simple cake mix, then gets soaked with a creamy, fruity filling that makes every bite soft and full of flavor.
I love recipes like this because they use ingredients I usually already have on hand, and they stretch nicely when you’re feeding a family. The kids get excited about the bright fruit and fluffy topping, and I get to enjoy something homemade that didn’t cost much or take all afternoon to make.
It’s also one of those desserts you can make ahead and tuck into the fridge until you need it. I’ve brought it out for family get-togethers, birthdays, and even just a regular weekend when we wanted a little treat. It’s easy, cheerful, and always disappears faster than I expect.
If you like this recipe then you’ll LOVE these:
Why We Love This Recipe
- Budget-friendly ingredients: It uses simple pantry staples and canned fruit, so you can make something that feels special without spending a lot.
- Easy to put together: The cake mix keeps things quick and fuss-free, which is exactly what you need on a busy day.
- Perfect make-ahead dessert: You can pop it in the fridge and forget about it until you’re ready to serve, and it tastes even better once it’s chilled.
- Great for feeding a crowd: It makes a big tray, so it’s ideal for family gatherings, potlucks, or when the kids have friends over.
- Light, fresh flavors: The fruit and creamy topping keep it from feeling too heavy, which is lovely after a big meal.
- Fun and colorful: With all the bright fruit on top, it looks cheerful on the table and always gets people excited to dig in.

Equipment
- 9×13 baking dish: This is the perfect size for baking the cake evenly and gives you plenty to slice up for the whole family.
- Large mixing bowl: You’ll need this to mix up the cake batter without making a mess all over the counter.
- Medium mixing bowl: Handy for stirring together the pineapple filling so everything blends smoothly.
- Wooden spoon or spatula: Great for mixing and folding the batter without overworking it.
- Hand mixer or whisk: Makes it easier to get a smooth batter and pudding mixture without lumps.
- Wooden spoon handle: This is what you’ll use to poke holes in the cake so all that creamy filling soaks right in.
- Measuring cups: Helps you keep everything accurate, especially when mixing the pudding and milk.
- Small skillet: Perfect for toasting the coconut until it’s golden and adds that little extra flavor on top.

Ingredients
- 1 box yellow cake mix: This keeps things nice and simple while still giving you a soft, fluffy base everyone will love.
- Ingredients listed on cake mix box (eggs, oil, water): Just your usual basics to bring the cake together without any extra fuss.
- 1 (11-ounce) can mandarin oranges, drained: These add a lovely sweetness and keep the cake extra moist.
- 1 (20-ounce) can crushed pineapple, drained: Brings that juicy tropical flavor and soaks right into the cake beautifully.
- 1 (14-ounce) can sweetened condensed milk: This is what makes the filling rich, creamy, and just a little indulgent.
- 1 (3.4 ounce) box instant vanilla pudding mix: Helps thicken everything up while adding a soft vanilla flavor.
- 1 cup of milk: Blends with the pudding to create that smooth, pourable mixture.
- 1 (8-ounce) container whipped topping: Gives you that light, fluffy layer on top without any extra work.
- ½ cup shredded coconut: Adds a bit of texture and that classic tropical touch once it’s toasted.
- Maraschino cherries: These bring a pop of color and a little sweetness that the kids always get excited about.
- Mandarin oranges and pineapple chunks for garnish: Perfect for topping it off and making it look bright, fresh, and ready to serve.

Recipe Instructions
You can find a printable recipe card at the bottom of this post.
Step 1: Preheat your oven to 350°F and prepare a 9×13 baking dish following the directions on the cake mix box.
Step 2: In a large bowl, mix together the yellow cake mix, eggs, oil, and water listed on the package, then fold in one can of drained mandarin oranges.

Step 3: Stir until the batter is smooth, then pour it into your prepared baking dish.

Step 4: Bake according to the package instructions. Once done, remove from the oven and let it cool for about 10 minutes.
Step 5: While the cake is still warm, use the handle of a wooden spoon to poke holes evenly across the surface.
Step 6: In a separate bowl, combine the crushed pineapple, sweetened condensed milk, vanilla pudding mix, and milk, stirring until smooth and fully blended.

Step 7: Pour this mixture evenly over the cake, making sure it seeps into all the holes.

Step 8: Let the cake cool completely.
Step 9: Spread the whipped topping evenly over the top.

Step 10: Toast the shredded coconut in a dry skillet over medium-low heat until golden brown.
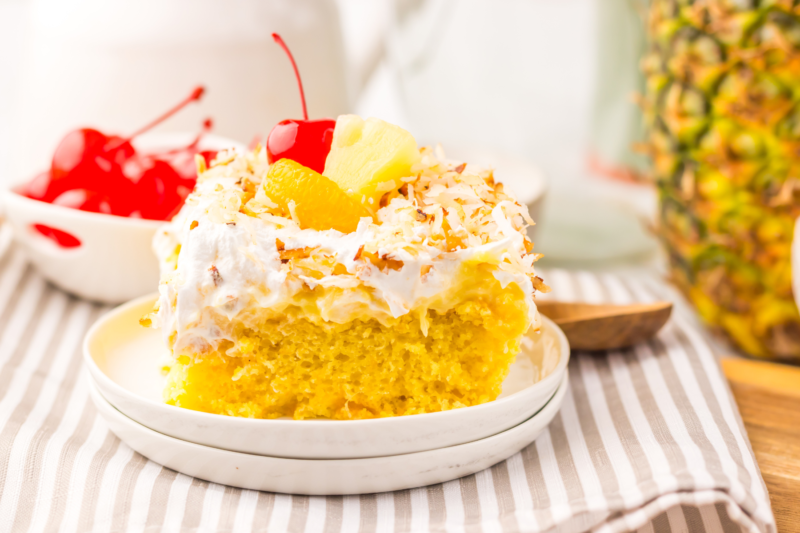
Step 11: Sprinkle the toasted coconut over the cake, then decorate with maraschino cherries, mandarin oranges, and pineapple for a colorful finish.


Step 12: Refrigerate for at least 2 hours before slicing and serving.

Serving & Storing
- Chill before serving: It really does need that time in the fridge so everything can set properly and the flavors come together nicely.
- Serve cold: This one is at its best straight from the fridge, especially on warmer days when you want something light and refreshing.
- Easy to slice and share: Once it’s chilled, it cuts cleanly into squares, which makes serving a crowd nice and simple.
- Store covered in the fridge: Just cover the dish with plastic wrap or a lid and it’ll keep well for a few days.
- Great for leftovers: The flavors actually settle in even more overnight, so it’s just as good, if not better, the next day.
- Skip freezing: Because of the creamy topping and fruit, it doesn’t freeze well, so it’s best enjoyed fresh from the fridge.

Variations & Substitutions
- Switch up the cake mix: If you don’t have yellow cake, a white or pineapple-flavored mix works just as well and still tastes lovely.
- Use fresh fruit if you have it: Fresh pineapple or orange segments can be used in place of canned, just keep in mind it may not be quite as sweet.
- Try a different pudding flavor: Coconut cream or even cheesecake pudding gives it a fun twist while still keeping that creamy texture.
- Make it a little lighter: You can use light whipped topping and reduced-fat milk if that’s what you have on hand.
- Skip the coconut if needed: If someone in the family isn’t a fan, you can leave it off and still have a delicious dessert.
- Add a little crunch: A handful of chopped nuts sprinkled on top gives it a nice bit of texture without much extra effort.

Little Tricks That Make a Big Difference
- Poke plenty of holes: Don’t be shy here, the more holes you make, the better that creamy filling soaks into every bite.
- Pour the filling while the cake is still warm: This helps it sink in properly instead of just sitting on top.
- Drain the fruit really well: Extra liquid can make the cake too soggy, so I like to let it sit in a sieve for a few minutes.
- Spread the topping once it’s fully cooled: If the cake is still warm, the topping can melt and get a bit messy.
- Toast the coconut gently: Keep the heat low and stir often so it turns golden without burning.
- Give it enough chill time: It’s tempting to dig in early, but a couple of hours in the fridge makes a big difference in texture and flavor.

What to Serve with Hawaiian Poke Cake
- Fresh fruit on the side: A simple bowl of extra pineapple, oranges, or berries keeps things light and pairs nicely with the creamy cake.
- Hot drinks for balance: A cup of coffee or tea works really well to cut through the sweetness, especially after dinner.
- Light summer meals: It fits in perfectly after grilled chicken, burgers, or anything you’ve cooked up for a backyard dinner.
- A scoop of vanilla ice cream: If you want to make it feel a bit more indulgent, this adds an extra creamy touch the kids will love.
- Lemonade or iced tea: Something cold and refreshing alongside it keeps everything feeling bright and easy.
- Keep it simple for gatherings: When you’re serving this at a party, I usually stick to lighter sides so the dessert can really shine.

FAQs
Can you make Hawaiian poke cake ahead of time?
Yes, this cake is actually better when made ahead. It needs a few hours in the fridge to set, and the flavors come together even more by the next day.
How long does Hawaiian poke cake last in the fridge?
It will keep well for about 3 to 4 days when covered and stored in the refrigerator. Just make sure it stays chilled since it has a creamy topping.
Can you freeze Hawaiian poke cake?
Freezing isn’t recommended for this one. The whipped topping and fruit can change texture once thawed, so it’s best enjoyed fresh from the fridge.
What is a poke cake?
A poke cake is a baked cake that has holes poked all over it, then filled with a liquid or creamy mixture that soaks in and adds extra flavor and moisture.
Can I use fresh fruit instead of canned?
You can, but canned fruit tends to work better here since it’s softer and a bit sweeter. If you use fresh fruit, make sure it’s ripe and juicy.
Why is my poke cake soggy?
This usually happens if the fruit isn’t drained well or too much liquid is added. Letting the fruit drain properly and measuring carefully helps keep the texture just right.
Do you have to refrigerate Hawaiian poke cake?
Yes, it needs to be kept in the fridge because of the whipped topping and creamy filling. It’s also much nicer served cold.
What size pan is best for Hawaiian poke cake?
A 9×13 baking dish works perfectly. It gives you an even bake and plenty of servings for family or guests.

Prep Time
20 minutes
Cook Time
30 minutes
Additional Time
2 hours 30 minutes
Total Time
3 hours 20 minutes
Ingredients
-
1 box yellow cake mix
-
Ingredients listed on cake mix box (eggs, oil, water)
-
1 (11-ounce) can mandarin oranges, drained
-
1 (20-ounce) can crushed pineapple, drained
-
1 (14-ounce) can sweetened condensed milk
-
1 (3.4 ounce) box instant vanilla pudding mix
-
1 cup of milk
-
1 (8-ounce) container whipped topping
-
½ cup shredded coconut
-
Maraschino cherries
-
Mandarin oranges and pineapple chunks for garnish
Instructions
- Preheat your oven to 350°F and prepare a 9×13 baking dish following the directions on the cake mix box.
- In a large bowl, mix together the yellow cake mix, eggs, oil, and water listed on the package, then fold in one can of drained mandarin oranges.
- Stir until the batter is smooth, then pour it into your prepared baking dish.
- Bake according to the package instructions. Once done, remove from the oven and let it cool for about 10 minutes.
- While the cake is still warm, use the handle of a wooden spoon to poke holes evenly across the surface.
- In a separate bowl, combine the crushed pineapple, sweetened condensed milk, vanilla pudding mix, and milk, stirring until smooth and fully blended.
- Pour this mixture evenly over the cake, making sure it seeps into all the holes.
- Let the cake cool completely.
- Spread the whipped topping evenly over the top.
- Toast the shredded coconut in a dry skillet over medium-low heat until golden brown.
- Sprinkle the toasted coconut over the cake, then decorate with maraschino cherries, mandarin oranges, and pineapple for a colorful finish.
- Refrigerate for at least 2 hours before slicing and serving.
Notes
- Make sure to drain the mandarin oranges and pineapple really well so the cake doesn’t end up too wet.
- Pour the filling over the cake while it’s still slightly warm so it soaks in properly.
- Let the cake cool completely before adding the whipped topping to keep it light and fluffy.
- Toast the coconut gently over low heat and keep an eye on it, as it can brown quickly.
- For cleaner slices, chill the cake for at least a couple of hours before cutting.
- You can make this a day ahead, which makes it really handy for parties and busy weekends.
Nutrition Information:
Yield:
12
Serving Size:
1
Amount Per Serving:
Calories: 263Total Fat: 6gSaturated Fat: 4gUnsaturated Fat: 2gCholesterol: 3mgSodium: 381mgCarbohydrates: 51gFiber: 2gSugar: 30gProtein: 3g