34 Easy Winter Sandwich Recipes for Lunch or Dinner
When the weather turns chilly, I start craving all things warm and comforting. A cozy blanket, a steaming mug of tea, and a good sandwich fresh off the pan just hit the spot on a cold day. I love how a great sandwich can be simple yet satisfying, with melty cheese, toasty bread, and flavors that make you forget how gloomy it looks outside.
During winter, I trade the light summer sandwiches for heartier ones that really fill you up. Think hot grilled paninis, meaty sliders, and saucy chicken sandwiches you can enjoy by the fire or at your kitchen table. These recipes are the kind that make the whole house smell amazing and bring everyone running to the kitchen before you’ve even finished plating them.
In this roundup, I’ve gathered 34 of my favorite winter sandwich recipes that are easy to make and perfect for lunch or dinner. From cozy classics to creative new ideas, there’s something here for every craving.
1. Crockpot Cranberry BBQ Turkey Sliders

These sliders are one of my favorite ways to use up leftover turkey or make something special without much effort. The combination of tangy BBQ sauce and sweet cranberry gives the turkey such a rich, cozy flavor that feels perfect for cold days. I love that the slow cooker does most of the work, filling the kitchen with that irresistible smell while I get on with my day. When the turkey’s tender and ready, everything comes together in a warm batch of cheesy, buttery sliders that disappear fast at dinnertime or any winter get-together.
You can read more about this recipe and get a printable recipe card here.
Servings: 12 sliders
Ingredients:
- 2-3 pound boneless turkey breast
- 1 cup bbq sauce
- 1 cup cranberry sauce
- 1 tablespoon dijon mustard
- 2 tablespoons brown sugar
- 1 teaspoon onion powder
- 1 teaspoon garlic salt
- 1 teaspoon smoked paprika
- ½ teaspoon black pepper
- 12 count slider rolls
- 6 slices cheddar cheese
Topping:
- ½ cup unsalted butter, melted
- 1 teaspoons smoked paprika
- 1 teaspoons packed brown sugar
- ½ teaspoon garlic salt
- ½ teaspoon onion powder
- ¼ teaspoon ground black pepper
- 1 teaspoon dried parsley
Instructions:
-
Place the turkey breast in your slow cooker.
-
In a medium bowl, whisk together the BBQ sauce, cranberry sauce, mustard, 2 tablespoons brown sugar, onion powder, garlic salt, smoked paprika, and black pepper.
-
Set aside ½ cup of this sauce mixture for later.
-
Pour the remaining sauce over the turkey in the slow cooker.
-
Cover and cook on low for 6 hours or on high for 4 hours, until the turkey shreds easily.
-
Shred the turkey using two forks.
-
Preheat the oven to 350°F.
-
Slice the Hawaiian rolls in half horizontally.
-
Arrange the cheese slices over the bottom half of the rolls.
-
Pile the shredded turkey on top of the cheese.
-
Spoon the reserved sauce evenly over the turkey.
-
Place the top half of the rolls back on.
-
In a small bowl, combine the melted butter, smoked paprika, brown sugar, garlic salt, onion powder, black pepper, and dried parsley.
-
Pour the butter mixture evenly over the tops of the rolls.
-
Bake for 15–20 minutes, until the cheese is melted and the tops are golden brown.
-
Serve warm and enjoy.
2. Monte Cristo Sliders

These little sandwiches are the ultimate mix of sweet and savory, and they always feel extra special in the winter. The layers of ham, turkey, and melty cheese paired with a hint of raspberry jam give that cozy, café-style flavor I crave when it’s cold outside. They bake up beautifully with golden buttery tops and a touch of sweetness that makes them perfect for brunch or an easy dinner. I love serving them warm with a sprinkle of powdered sugar and watching everyone go back for seconds.
You can read more about this recipe and get a printable recipe card here.
Servings: 12 sliders
Ingredients:
- 12 Sweet Dinner Rolls
- 1/2 Cup Seedless Raspberry Preserves
- 1/2 Pound Honey Roasted Turkey, thin sliced
- 1/2 Pound Black Forest Ham, thin sliced
- 6 slices Havarti Cheese
- 1/2 Cup Melted Butter, divided into 1/4 cup portions
- 1/2 Teaspoon Worcestershire Sauce
- 1 Tablespoon Yellow Mustard
- 1 Tablespoon Honey
- 1 Tablespoon Mayonnaise
- 1/2 Tablespoon Powdered Sugar (optional garnish)
Instructions:
- Preheat oven to 350°F.
- Spray a 9 x 13 inch baking dish with nonstick cooking spray.
- Slice rolls horizontally keeping the rolls together in one piece and place the bottom half in the bottom of prepared baking dish, set top half aside.
- Spread raspberry preserves on top of the bottom half of the rolls.
- Layer turkey, ham and cheese on top of jellied rolls.
- Make a sauce in a small bowl by whisking together 1/4 cup melted butter, Worcestershire sauce, mustard, honey and mayonnaise.
- Spread sauce on the inside of the top half of the rolls and place on top of the sliders in the pan.
- Brush top of rolls with remaining melted butter.
- Bake for 12-15 minutes, or until the tops of the rolls are golden brown and cheese is melted.
- Dust slider tops with powdered sugar, cut into individual sliders and serve.
3. Copycat McDonald’s Big Mac

There’s something about making this fast-food favorite at home that feels extra cozy when it’s cold outside. The sizzling patties, toasted buns, and that famous sauce come together in a way that tastes even better than takeout. I love how the whole kitchen smells as everything cooks, and how each bite has that perfect mix of tangy, creamy, and savory. It’s the kind of meal that instantly lifts your mood on a gray winter day and makes dinner feel fun again.
You can read more about this recipe and get a printable recipe card here.
Servings: 4
Ingredients:
Big Mac Sauce:
- 3/4 cup mayonnaise
- 1/4 cup sweet pickle relish
- 2 teaspoons yellow mustard
- 1 teaspoon paprika
- 1 teaspoon granulated sugar
- 1 teaspoon onion powder
- 1/2 teaspoon Worcestershire sauce
- 1/4 teaspoon garlic powder
- 1/4 teaspoon salt
- 1/4 teaspoon pepper
Burgers:
- 2 tablespoons minced dried onion
- 1/4 cup water
- 1 1/2 pounds 80/20 ground beef
- Salt
- Black pepper
- 4 sesame seed hamburger buns, plus 4 bottom buns
- 1 tablespoon softened butter
- 4 slices American cheese
- 1 1/2 cups shredded iceberg lettuce
- Thin dill pickle slices
Instructions:
- In a medium bowl, whisk together the mayonnaise, relish, mustard, paprika, sugar, onion powder, Worcestershire sauce, garlic powder, salt, and pepper until smooth.
- Cover and refrigerate the sauce until ready to use.
- Mix the minced dried onion with the water and set aside to rehydrate.
- Divide the ground beef into 8 equal portions and shape into thin patties.
- Season the patties with salt and pepper.
- Heat a large skillet over medium-high heat and cook 4 patties at a time, flipping once, about 2 minutes per side until cooked through.
- Transfer the cooked patties to a paper towel-lined tray and repeat with the remaining 4 patties.
- Drain the rehydrated onions on a paper towel-lined plate.
- Melt the butter in another skillet over medium-high heat and lightly toast all the buns.
- To assemble, spread some sauce on a bottom bun, add a slice of cheese, lettuce, pickles, a patty, onions, then place another bottom bun on top.
- Spread with more sauce, add lettuce, pickles, another patty, onions, and finish with a top bun.
- Repeat with the remaining ingredients to make the rest of the burgers and serve immediately.
4. Chicken Walnut Pesto Sandwich

This one’s a fresh, flavorful pick for chilly days when I still want something bright and satisfying. The creamy pesto brings a taste of summer to a cold afternoon, while the warm chicken and melted mozzarella make it feel perfectly cozy. I love how the toasted sourdough gives a bit of crunch against the soft cheese and juicy tomato. It’s simple to make but feels like something you’d order at a little café on a quiet winter weekend.
You can read more about this recipe and get a printable recipe card here.
Servings: 2
Ingredients:
For the Walnut Pesto:
- 1/2 cup toasted walnuts
- 1 cup fresh basil leaves
- 2 cloves garlic
- 1/4 cup grated Parmesan cheese
- 1/4 cup extra virgin olive oil
- 1 tbsp lemon juice
- Salt and pepper, to taste
For the Sandwich:
- 2 chicken breasts (grilled or pan-seared and shredded, about 6 oz each)
- 1 medium sized sourdough baguette
- 2 tbsp butter or olive oil
- 1 cup fresh mozzarella cheese, sliced
- 1 tomato, sliced
- Handful of fresh arugula
- Salt and pepper, to taste
Instructions:
-
Toast the walnuts in a dry pan over medium heat for 2-3 minutes, stirring occasionally, until fragrant. Let them cool slightly.
-
In a food processor or blender, combine the toasted walnuts, basil leaves, garlic, Parmesan cheese, lemon juice, salt, and pepper. Pulse until finely chopped.
-
With the processor running, slowly drizzle in the olive oil until the pesto reaches a smooth but slightly chunky consistency. Taste and adjust seasoning with more salt, pepper, or lemon juice as needed.
-
Season the chicken breasts with salt and pepper. Grill or pan-sear them over medium-high heat for 5-6 minutes per side, or until the internal temperature reaches 165°F (74°C). Let the chicken rest for a couple of minutes before shredding.
-
Mix the shredded chicken with the pesto.
-
Heat a skillet over medium heat and melt 1 tablespoon of butter (or use olive oil) in the pan. Slice the baguette in half and toast until golden and crispy, about 2-3 minutes per side.
-
Fill the toasted baguette slices with the chicken-pesto mixture, then add fresh mozzarella, tomatoes, and arugula.
-
Cut the sandwich in half and serve immediately.
5. French Onion Beef Dip Sliders

These little sandwiches are the kind of comfort food I crave when it’s cold out. The layers of tender roast beef, melted cheese, and crispy onions make every bite rich and satisfying. I love how they bake up golden and bubbly, and that warm au jus on the side takes them over the top. They’re perfect for a cozy dinner or a game day spread, and they never last long once they hit the table.
You can read more about this recipe and get a printable recipe card here.
Servings: 12 sliders
Ingredients:
- 1 pack (12-count) of Hawaiian rolls or slider rolls of choice
- 1lb deli sliced roast beef (or more!)
- 10-12 slices swiss or provolone cheese (or half/half of both), divided
- 1 cup French fried onions
- 4tbl butter
- 1 packet (1oz) au jus gravy mix
- ½ tsp garlic powder
- ½ tsp onion powder
- ½ tsp sesame seeds for garnish (optional)
- Fresh parsley or fresh thyme for garnish (optional)
Instructions:
-
Preheat the oven to 350℉.
-
Lightly grease a 13×9 baking dish with cooking spray, or line it with parchment paper or nonstick foil.
-
Remove the Hawaiian rolls from the package, keeping them attached as one block. Carefully slice the rolls in half horizontally to separate the top layer from the bottom.
-
Place the bottom layer of rolls into the prepared pan.
-
Lay half of the cheese slices evenly over the bottom layer, covering the surface.
-
Evenly spread the deli-sliced roast beef on top of the cheese.
-
Sprinkle French fried onions across the beef layer.
-
Add the remaining cheese slices over the onions, covering the entire surface.
-
Place the top half of the rolls on top to complete the sliders.
-
In a microwave-safe bowl, melt the butter.
-
Measure out 1 tablespoon from the au jus gravy mix packet.
-
Stir the 1 tablespoon au jus mix, garlic powder, and onion powder into the melted butter until well combined.
-
Brush the butter mixture evenly over the tops of the rolls.
-
If desired, sprinkle sesame seeds on top.
-
Bake uncovered for 15–20 minutes, until the tops are golden brown and crisp, and the cheese is melted.
-
While the sliders bake, prepare the remaining au jus according to the packet directions for dipping. Removing 1 tablespoon won’t affect the flavor.
-
Once the sliders are done, garnish with fresh parsley or thyme if you like.
-
Serve warm with au jus on the side for dipping.
6. Sloppy Joe Sliders

These sliders are pure comfort on a chilly evening. They’re saucy, cheesy, and just the right mix of sweet and savory with those soft, buttery rolls holding everything together. I love how easy they are to make and how the kitchen smells while they’re baking. They’re the kind of meal that brings everyone to the table fast, and they always disappear before I can grab a second one.
You can read more about this recipe and get a printable recipe card here.
Servings: 12 sliders
Ingredients:
- 12 Hawaiian sweet rolls
- 1lb ground beef
- 15-ounce can of Manwich
- 8 slices of cheddar cheese
- 4 tablespoons butter, melted
- 1 Tablespoon brown sugar
- 1 teaspoon Dijon mustard
- 1 teaspoon Worcestershire sauce
- 1 teaspoon sesame seeds
- Chopped parsley, optional for garnish
Instructions:
- Preheat the oven to 350°F and line a baking sheet with parchment paper or a silicone mat.
- In a large skillet over medium-high heat, cook the ground beef until fully browned. Drain any excess grease.
- Reduce the heat to low, stir in the can of Manwich, and let the mixture simmer for about 5 minutes to heat through and blend the flavors.
- While the meat simmers, slice the Hawaiian rolls in half horizontally with a serrated knife, keeping the top and bottom halves intact.
- Place the bottom half of the rolls onto the prepared baking sheet.
- Spread the sloppy joe mixture evenly over the rolls, making sure to cover the entire surface.
- Lay the cheddar cheese slices over the meat.
- Add the top half of the rolls to close the sliders.
- In a small microwave-safe bowl, melt the butter. Stir in the brown sugar, Dijon mustard, and Worcestershire sauce until fully combined.
- Brush the butter mixture evenly over the tops of the rolls.
- Sprinkle sesame seeds over the top.
- Bake uncovered for 20 to 25 minutes, until the tops are golden brown and the cheese is melted.
- Let the sliders cool slightly, then transfer them to a cutting board. Garnish with chopped parsley if desired.
- Slice along the seams to separate into individual sliders and serve warm.
7. Copycat Filet-O-Fish

There’s something about a crispy fish sandwich on a cold day that feels extra comforting. The crunchy coating, soft bun, and creamy tartar sauce make such a cozy combo when you want an easy homemade meal that still feels special. I love how quick it comes together and how golden the fish turns out right in the skillet. It’s a simple, satisfying way to bring a little seaside flavor to winter without leaving the house.
You can read more about this recipe and get a printable recipe card here.
Servings: 3
Ingredients:
For the Fish Fillet:
- 400g white fish fillets (like cod, haddock, or pangasius)
- 1 cup breadcrumbs
- 1/2 cup flour
- 1 egg
- Salt and black pepper to taste
- Vegetable oil for frying
For the Tartar Sauce:
- 1/2 cup mayonnaise
- 1-2 tbsp pickles, finely chopped
- 1 tbsp lemon juice
- 1 tsp mustard
- Salt and pepper to taste
Other Ingredients:
- 3 burger buns, halved
- 3 slices of cheese
- Lettuce leaves
Instructions:
-
Cut the fish fillets into portions and season with salt and pepper.
-
Dredge each piece in flour, dip in beaten egg, and then coat in breadcrumbs.
-
Heat vegetable oil in a large skillet over medium heat.
-
Fry each fillet for 3–4 minutes per side, until golden and crisp.
-
Drain the cooked fillets on paper towels to remove excess oil.
-
In a small bowl, mix together the mayonnaise, pickles, lemon juice, and mustard to make the tartar sauce.
-
Season the tartar sauce with salt and pepper to taste.
-
Lightly toast the buns.
-
On the bottom half of each bun, place a fish fillet.
-
Spoon tartar sauce over the fish, then add a slice of cheddar cheese (optional) and a lettuce leaf.
-
Top with the other half of the bun.
-
Serve and enjoy while the fish is still warm and crispy.
8. Big Mac Sliders

These mini burgers are the perfect cozy treat when I’m craving fast food but want to stay in. The warm buns, melted cheese, and tangy sauce make every bite taste like pure comfort. I love how easy they are to pull together and how fun they are to serve fresh out of the oven. They’re great for game nights or lazy winter dinners when something hearty and familiar just sounds right.
You can read more about this recipe and get a printable recipe card here.
Servings: 12 sliders
Ingredients:
- 1 lb of ground beef
- 1 tsp pepper
- 1 tsp salt
- 12 Hawaiian rolls
- 6 slices of American cheese
- 1/2 cup of white onion (diced)
- 1 tbsp butter (melted)
- 1 tbsp sesame seeds
- 1/2 cup of mayonnaise
- 2 tsp mustard
- 1 tsp vinegar
- 3 tbsp pickled relish
- 1/2 tsp onion powder
- 1/2 tsp garlic powder
- 1/2 tsp paprika
- 5 oz of shredded iceberg lettuce
- 1/2 cup of sliced dill pickles
Instructions:
-
Add the ground beef to a large skillet and season with salt and pepper. Cook over medium-high heat for about 10 minutes, breaking it up as it cooks, until the meat is browned and fully cooked. Preheat the oven to 350°F and line a large baking sheet with parchment paper.
-
Without separating the rolls, slice them in half horizontally. Set the top half aside and place the bottom half on the prepared baking sheet. Lay the cheese slices evenly over the bottom buns, then spread the cooked beef on top. Sprinkle the onions evenly over the meat.
-
Replace the top buns, brush them with melted butter, and sprinkle sesame seeds over the tops. Bake for about 12 minutes, or until the buns are golden brown.
-
In a small bowl, mix together the mayonnaise, mustard, vinegar, pickle relish, onion powder, garlic powder, and paprika until smooth. When the sliders come out of the oven, carefully lift off the top buns and set them aside.
-
Sprinkle the lettuce evenly over the onions, then drizzle the prepared sauce across the top. Add two pickle slices to each slider, replace the top buns, and carefully slice to separate. Serve warm and enjoy!
9. Chicken Cordon Bleu Sliders

These sliders are my idea of cozy comfort food on a cold evening. The crispy chicken, layers of melty Swiss cheese, and savory ham come together in the most satisfying way. I love the creamy sauce that ties everything together and how the buttery tops turn perfectly golden in the oven. They’re easy to make, always a hit with the family, and just the thing for a warm winter meal.
10. Nashville Hot Honey Butter Chicken Sliders
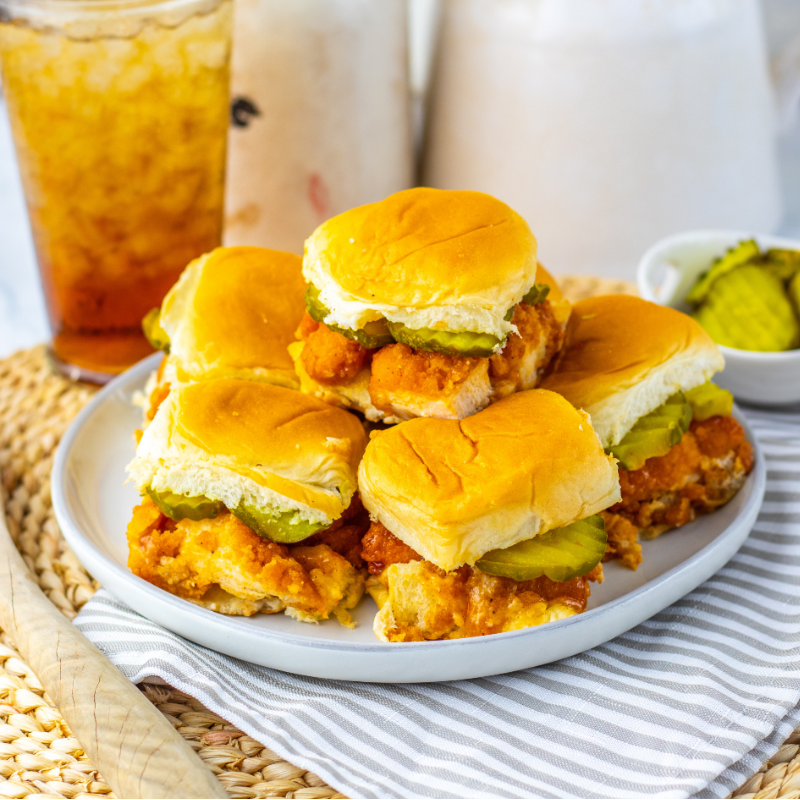
These spicy little sandwiches are the perfect way to warm up on a cold day. The crispy chicken coated in sweet and spicy honey butter hits that perfect balance of heat and comfort. I love how the pickles add a little crunch and tang to each bite, and the soft Hawaiian rolls soak up all that delicious sauce. They’re quick to make, full of flavor, and guaranteed to bring a little extra heat to any winter meal.
You can read more about this recipe and get a printable recipe card here.
Servings: 12 sliders
Ingredients:
- 24 oz bag of crispy boneless chicken bites (or your favorite frozen chicken nuggets/bites)
- 12 count Hawaiian rolls
- 1/4 cup of mayo
- 1 tsp of garlic powder
- 3 tbsp of unsalted butter (melted)
- 1/4 cup of honey
- 2 tbsp of franks red hot hot sauce
- 1 tsp of paprika
- 1 tsp of cayenne powder
- 16 oz jar of pickle chips
Instructions:
-
Cook the chicken bites in the air fryer or oven according to the package directions. While they cook, slice the entire set of slider buns in half horizontally (like you’re making one big sandwich). Set the top half aside. In a small bowl, mix the mayo and garlic powder, then spread it over the bottom half of the buns.
-
In a large bowl, stir together the melted butter, honey, hot sauce, paprika, and cayenne. Add the cooked chicken bites and toss until they’re fully coated in the sauce.
-
Spread the sauced chicken evenly over the bottom buns. Layer pickle slices over the chicken, then place the top buns back on.
-
Using a sharp knife, carefully slice into individual sliders. (It’s okay if you cut through some pickles or chicken along the way!) Serve and enjoy!
11. Smoked Salmon Bagel

This is my go-to when I want something fresh but still cozy on a chilly morning. The creamy cheese, smoky salmon, and crisp veggies make such a great mix of textures and flavors. I love how simple it is to put together yet it feels a little special, like something you’d order at a nice café. It’s light, flavorful, and the perfect way to brighten up a winter day.
You can read more about this recipe and get a printable recipe card here.
Servings: 2
Ingredients:
- 4 oz smoked salmon
- 2 bagels (your choice of flavor)
- 1/2 red onion, thinly sliced
- 1 tomato, thinly sliced
- 1/2 cucumber, thinly sliced
- 4 oz cream cheese
- 1 tablespoon fresh dill, chopped
- 1 tablespoon capers
- Black pepper, freshly ground (to taste)
Instructions:
-
Slice the bagels in half horizontally.
-
Spread 2 oz of cream cheese on each bagel half.
-
Divide the smoked salmon evenly and place it on the bottom halves of the bagels.
-
Add the red onion, tomato slices, and cucumber slices evenly between both bagels.
-
Sprinkle 1 tablespoon of freshly chopped dill over the vegetables on each bagel.
-
Scatter 1 tablespoon of capers over the vegetables and salmon on each bagel.
-
Finish with a few grinds of black pepper to taste.
12. Chicken Parmesan Sliders

These cheesy little sandwiches are one of my favorite cozy dinners when it’s cold outside. The crispy chicken, gooey mozzarella, and rich marinara sauce come together in the most comforting way. I love how the tops bake up golden and buttery with a hint of garlic and Parmesan. They’re easy to make, smell amazing in the oven, and always feel like a warm hug on a winter night.
You can read more about this recipe and get a printable recipe card here.
Servings: 12 sliders
Ingredients:
- 12 Hawaiian sweet rolls
- 20 oz bag chicken tenders
- 1-½ cup marinara sauce
- 8 oz Mozzarella cheese slices
- 4 tablespoons butter, melted
- 2 tablespoons grated Parmesan cheese
- ½ tablespoon Italian seasoning
- 1 teaspoon garlic salt
- Chopped parsley, optional for garnish
Instructions:
- Cook the chicken tenders according to the package instructions, then set them aside.
- Preheat the oven to 350°F.
- Using a serrated knife, slice the Hawaiian rolls in half horizontally, keeping them connected. Place the bottom half in a parchment-lined baking sheet or a lightly greased baking dish.
- Spread a thin layer of marinara sauce over the bottom rolls.
- Arrange the cooked chicken tenders evenly over the marinara, covering the rolls completely.
- Spoon the remaining marinara sauce over the chicken.
- Layer mozzarella cheese slices over the top, then place the top halves of the rolls on.
- Melt the butter in the microwave, then stir in garlic salt, Italian seasoning, and grated Parmesan cheese. Brush the butter mixture evenly over the tops of the rolls.
- Bake for 20 to 25 minutes, or until the tops are golden brown and the cheese is hot and melted.
- Serve sliders warm with extra marinara on the side for dipping.
13. BLT Sandwich
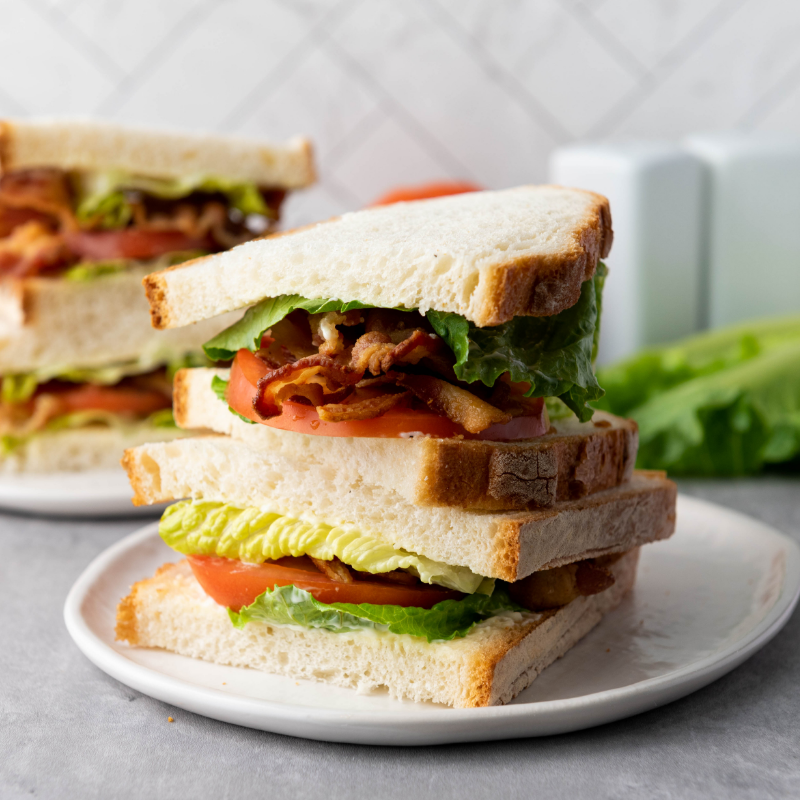
This classic sandwich always hits the spot, especially when I want something quick but still full of flavor. The crispy bacon, juicy tomatoes, and fresh lettuce make such a satisfying combo, and a little mayo ties it all together perfectly. I love making it on toasted bread for that extra crunch, especially on a chilly afternoon when I’m craving something simple and comforting. It’s a little taste of summer that still feels right at home in winter.
You can read more about this recipe and get a printable recipe card here.
Servings: 2
Ingredients:
- 8-12 slices of cooked bacon
- 4 slices (toasted if you prefer) of your favorite bread (white, whole wheat, sourdough, etc.)
- 4 leaves of lettuce (romaine, iceberg, or your choice)
- 4 slices of ripe tomato
- 4 tablespoons mayonnaise
- Salt and freshly ground black pepper, to taste
Instructions:
-
Wash and dry the lettuce leaves, then slice the tomatoes into thick slices.
-
Spread 1 tablespoon of mayonnaise on one side of each bread slice.
-
On two slices of the bread, layer the lettuce leaves.
-
Add the tomato slices on top of the lettuce on one slice of bread and season with a little salt and pepper.
-
Place 4–6 slices of cooked bacon on top of the tomatoes, depending on your preference.
-
Top each sandwich with the remaining slices of bread, mayonnaise side down.
-
Press gently to hold everything together.
-
Slice each sandwich in half, if desired, and serve immediately.
14. Halloumi Burger

This hearty veggie burger is one of my favorite ways to brighten up a cold day. The halloumi turns golden and crisp on the outside while staying perfectly soft inside, and it pairs so well with the creamy sauce and fresh toppings. I love the mix of salty cheese, zesty yogurt dressing, and toasty brioche buns. It’s a cozy, satisfying meal that feels a little indulgent but still fresh enough to enjoy all winter long.
You can read more about this recipe and get a printable recipe card here.
Servings: 4
Ingredients:
For the halloumi burgers:
- 250g (about 9 oz) halloumi cheese, sliced into ½-inch thick pieces
- 1 tablespoon olive oil
- 1 teaspoon dried oregano
- 1 teaspoon paprika
- Salt and black pepper to taste
For the burger assembly:
- 4 burger buns (preferably brioche burger buns)
- 1 tablespoon olive oil (for toasting buns)
- Lettuce leaves
- Sliced tomatoes
- Sliced red onions
- Optional: sliced avocado, pickles, or other preferred toppings
For the sauce:
- ½ cup Greek yogurt or mayonnaise
- 1 tablespoon lemon juice
- 1 teaspoon Dijon mustard
- 1 teaspoon honey or maple syrup
- 1 clove garlic, minced
- Salt and black pepper to taste
Instructions:
-
In a small bowl, combine Greek yogurt (or mayonnaise), lemon juice, Dijon mustard, honey (or maple syrup), and minced garlic.
-
Season with salt and pepper to taste. Adjust seasoning or sweetness as needed.
-
Chill the sauce in the refrigerator while preparing the burgers.
-
In a shallow dish, mix together olive oil, dried oregano, paprika, salt, and black pepper.
-
Coat the halloumi slices with the oil mixture.
-
Heat a grill pan or non-stick skillet over medium heat.
-
Cook the halloumi slices for 2-3 minutes per side, or until golden brown and crispy on the outside. Be careful not to overcook, as halloumi can become too firm.
-
Brush the cut sides of the burger buns with olive oil.
-
In the same pan used for the halloumi, toast the buns, cut side down, until golden and crispy.
-
Spread a layer of the prepared sauce on the bottom half of each toasted bun.
-
Place a few lettuce leaves on top of the sauce.
-
Add the cooked halloumi slices on top of the lettuce.
-
Layer on sliced tomatoes, red onions, and any additional toppings like avocado or pickles.
-
Spread more sauce on the top bun and place it on top of the assembled burger.
-
Serve the halloumi burgers warm with your favorite side dishes, such as sweet potato fries or a fresh salad.
15. Freezer-Friendly Bacon & Sausage Breakfast Sandwiches

These make busy winter mornings so much easier. I love having a batch of these ready to go in the freezer for those chilly days when I just want something warm and hearty without cooking from scratch. The mix of bacon, sausage, egg, and melty cheese tucked into a toasty English muffin feels like such a treat. They’re filling, easy to reheat, and perfect for grabbing on the way out the door or enjoying with a hot cup of coffee at home.
You can read more about this recipe and get a printable recipe card here.
Servings: 6
Ingredients:
- 6 English muffins, cut in half
- 6 large eggs
- 3 slices of bacon, cut in half
- 3 sausage patties
- 6 slices of cheese (I used Gouda)
- Salt and pepper, to taste
- Butter or cooking spray (for greasing the pan)
Instructions:
-
In a skillet over medium heat, cook the bacon until crispy. Remove and drain on paper towels, then set aside.
-
In the same skillet, cook the sausage patties until fully cooked. Remove and drain on paper towels, then set aside.
-
Heat a small non-stick pan or a pan with 4 egg rings over medium heat and lightly grease with butter or cooking spray.
-
Crack an egg into each ring and season with salt and pepper.
-
Cook until the whites are set and the yolks are cooked to your liking, about 3–4 minutes. For firmer yolks, flip and cook for an additional 1–2 minutes.
-
Remove the eggs from the pan and let cool slightly.
-
Place the bottom half of each English muffin on a clean surface.
-
Place a slice of cheese on each muffin bottom.
-
For 3 sandwiches, add a cooked egg and two halves of bacon.
-
For the remaining 3 sandwiches, add a cooked egg and a sausage patty.
-
Cover each with the top half of the English muffin.
-
Wrap each assembled sandwich in parchment paper.
-
Place the wrapped sandwiches in a large Ziploc bag or airtight container.
-
Store in the freezer for up to 3 months.
-
To reheat, unwrap the sandwich from the parchment and wrap it in a paper towel.
-
Microwave on high for 1–2 minutes, or until heated through.
-
Alternatively, reheat in a preheated 350°F (175°C) oven for about 20 minutes, or until warmed through.
16. Truffle Mayo Roast Beef Sandwich

This sandwich feels like pure luxury on a cold day. The truffle mayo adds such a rich, earthy flavor that pairs perfectly with the tender roast beef and peppery arugula. I love the little crunch from the toasted pine nuts and the salty kick of parmesan, it’s simple but feels so special. It’s the kind of lunch that makes winter afternoons feel a bit more indulgent.
You can read more about this recipe and get a printable recipe card here.
Servings: 2
Ingredients:
- 1 baguette
- 4-6 slices of medium-rare roast beef
- 2 oz arugula
- 2 tbsp mayonnaise
- 1 tbsp white truffle oil
- 1 oz shaved parmesan
- 1 oz pine nuts
- Salt, to taste
- Black crushed pepper, to taste
Instructions:
-
In a small bowl, mix the mayonnaise and truffle oil until smooth and well combined.
-
Toast the pine nuts in a dry pan over medium-high heat for 3–4 minutes, stirring occasionally, until golden and fragrant.
-
Slice the baguette open and spread a generous layer of truffle mayo on the bottom layer (or both sides if desired).
-
Layer arugula over the bottom half of the baguette.
-
Add slices of roast beef on top of the arugula.
-
Sprinkle shaved parmesan over the beef.
-
Season with a pinch of salt and freshly ground black pepper.
-
Finish with a handful of the toasted pine nuts.
-
Close the sandwich, cut in half, and enjoy!
17. BBQ Pulled Pork Sliders

This recipe is one of my winter favorites because it fills the house with the most amazing smell while it cooks. The pork turns out so tender it practically falls apart, and the tangy BBQ sauce gives it that perfect sweet and smoky flavor. I love piling it high on warm toasted buns and adding a bit of crisp red cabbage for texture. It’s cozy, messy in the best way, and always a hit on cold evenings or game day weekends.
Servings: 12
Ingredients:
- 2 pound pork shoulder roast
- 1 tbsp kosher salt
- 1 ½ tsp black salt
- ¼ cup apple cider vinegar
- ¾ cup prepared BBQ sauce
- 2 whole cloves garlic, smashed, peels removed, roughly chopped
- 1 small yellow onion, chopped
- 2 tbsp shallot, minced
- slider buns, opened with inside buttered and grilled (or toasted in the oven)
- red cabbage, thinly sliced (optional)
Instructions:
-
Add the pork shoulder to the slow cooker and season with salt and pepper.
-
Add cider vinegar, BBQ sauce, garlic, onion, and shallot to the slow cooker.
-
Cover and cook on low for 8 hours.
-
After 8 hours, check that the roast is very tender.
-
Carefully remove the roast from the slow cooker and place it on a serving platter or cutting board reserved for meat.
-
Using a fork in each hand, shred the meat by pulling it in two directions, working on one small section at a time.
-
Place the shredded meat into a serving container or add it directly to the prepared slider buns.
-
Top with red cabbage for crunch and color, or add any of your favorite toppings.
-
Serve immediately.
18. Japanese Pork Cutlet Sando (Tonkatsu Sandwich)
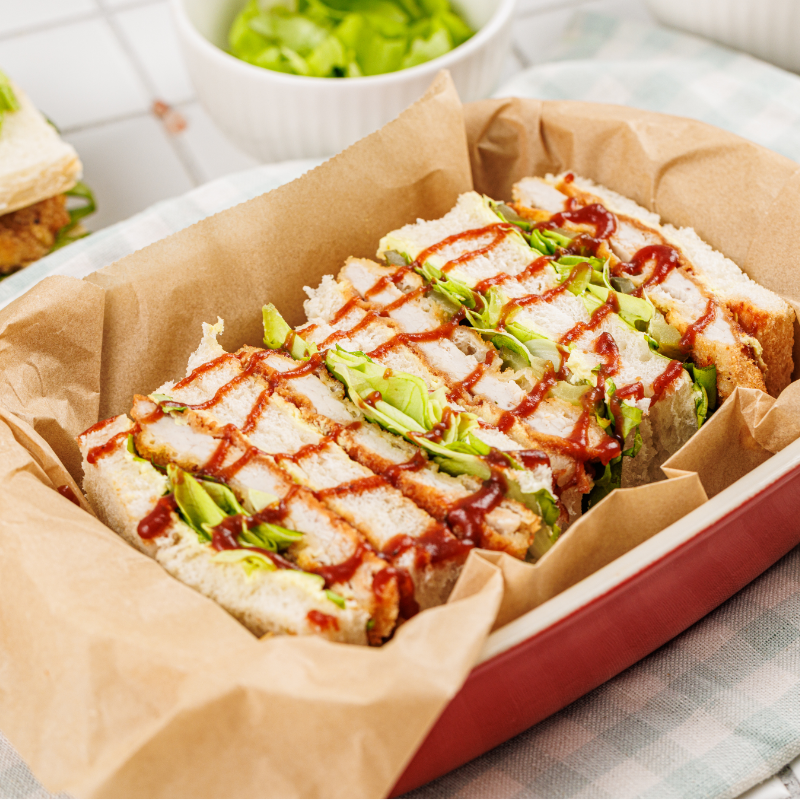
This sandwich is pure comfort with a crispy twist. The golden pork cutlet stays juicy inside while the panko coating adds the most satisfying crunch. I love how the sweet and tangy sauce soaks slightly into the soft bread, making every bite rich and flavorful. It’s simple, cozy, and just fancy enough to feel like a little treat on a cold winter day.
Servings: 2
Ingredients:
For the Pork Cutlets:
- 2 pork cutlets (5–7 oz each / 150–200 g)
- 1 egg, beaten
- ⅔ cup panko breadcrumbs (75 g)
- ⅓ cup all-purpose flour (50 g)
- 1 tsp salt (5 g)
- ½ tsp black pepper (1 g)
- Oil for frying
For the Sauce:
- 2 tbsp ketchup (30 ml)
- 1 tbsp soy sauce (15 ml)
- 1 tsp honey or sugar (5 ml or 4 g)
- ½ tsp Worcestershire sauce, optional (2.5 ml)
For the Sandwiches:
- 4 slices soft white sandwich bread (crusts removed)
- 2 tbsp mayonnaise (30 ml)
- Lettuce or shredded cabbage
- Sliced cucumber, optional
Instructions:
-
In a small bowl, mix ketchup, soy sauce, honey, and Worcestershire sauce (if using) until smooth.
-
Pound pork cutlets to about 1 cm (⅓ inch) thick between plastic wrap.
-
Season both sides of the pork cutlets with salt and pepper.
-
Dredge the cutlets in flour, then dip them in beaten egg, and coat with panko breadcrumbs.
-
Heat oil in a skillet over medium heat and fry the cutlets for 3–4 minutes per side, until golden and crispy.
-
Transfer the cooked cutlets to paper towels to drain excess oil.
-
Spread mayonnaise on one side of each bread slice.
-
On two slices, layer lettuce or cabbage, then place the hot pork cutlet on top.
-
Drizzle the prepared sauce over the cutlet and add cucumber slices if using.
-
Top with the remaining bread slices, mayo side down.
-
Trim edges if desired, then cut the sandwiches in half or into thirds.
-
Serve immediately while the cutlet is still warm and crispy.
19. Mozzarella Pesto Croffle Sandwiches with Smoked Turkey

These little sandwiches are such a fun and cozy twist on a classic. The croffle base is buttery, crisp, and warm, which makes it perfect for layering with smoky turkey, gooey mozzarella, and flavorful pesto. I love how the waffle iron gives everything that golden crunch while melting the cheese just right. It’s an easy, comforting lunch that feels special enough for a winter weekend treat.
Servings: 4 mini sandwiches
Ingredients:
- 1 can Pillsbury crescent rolls (8 triangles = 8 croffles = 4 sandwiches)
- 4 tbsp pesto (about 1 tbsp per sandwich)
- 4 slices mozzarella cheese (or a handful of shredded mozzarella per sandwich)
- 8–12 slices smoked turkey (2–3 per sandwich)
Instructions:
-
Preheat your waffle iron to medium heat and lightly coat it with cooking spray or a little butter.
-
To make the croffles, unroll the crescent dough and separate it into 8 triangles. Gently roll or press each triangle to flatten slightly, then shape into a small crescent or ball. Place the dough pieces in the waffle iron (you may need to work in batches). Close the lid and cook for 3–4 minutes, until golden brown and cooked through. Set aside to cool slightly.
-
Build the sandwiches by using two croffles for each one. Spread 1 tablespoon of pesto on the bottom croffle, then layer with mozzarella and smoked turkey.
-
For a warm, melty finish, place the top croffle on and return the sandwich to the waffle iron. Close gently and cook for another 2–3 minutes, until the cheese is melted and the sandwich is hot and crisp.
20. Chicken Club Sandwich
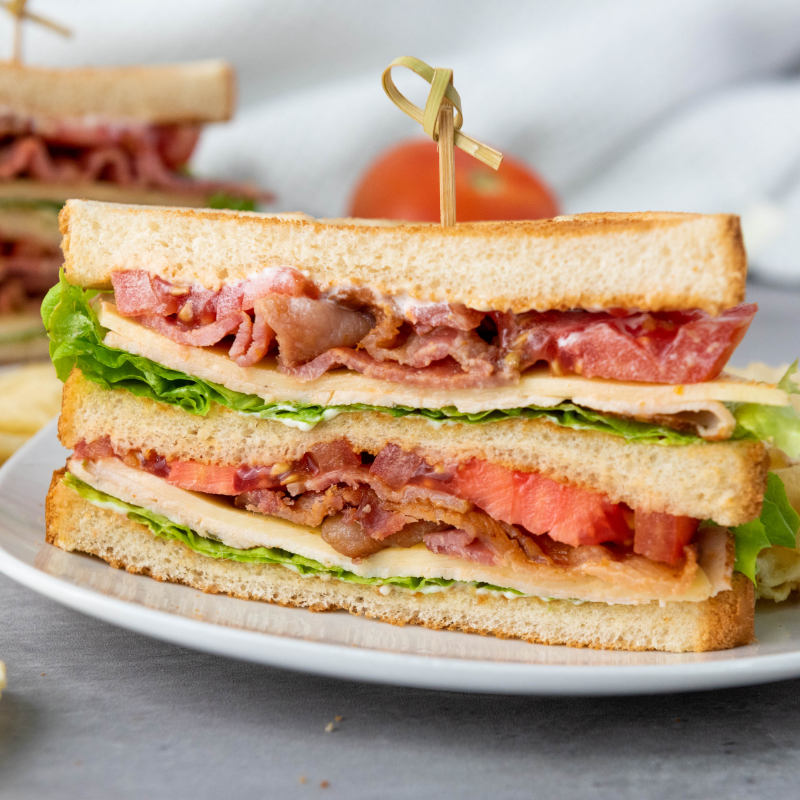
This stacked sandwich is my idea of the perfect cozy lunch when I want something hearty and satisfying. The layers of chicken, bacon, cheese, and fresh tomato hit all the right notes, and the toasted bread adds just the right amount of crunch. I love how each bite has a mix of creamy mayo, smoky bacon, and crisp lettuce. It’s simple comfort food that feels like a little diner-style treat on a cold winter afternoon.
You can read more about this recipe and get a printable recipe card here.
Servings: 2
Ingredients:
- 3 slices of white bread
- 2 tbsp mayonnaise
- 2 lettuce leaves
- 2 slices of deli chicken breast
- 2 slices of American cheese
- 4 slices of cooked bacon
- 1 tomato, sliced
Instructions:
- Toast all 3 slices of white bread until golden brown and crispy.
- Spread mayonnaise on one side of each toasted slice.
- Place one slice of bread mayo-side up on a cutting board or plate—this will be your bottom layer.
- Add 1 lettuce leaf, 1 slice of deli chicken, 1 slice of cheese, and 2 slices of bacon.
- Top with the second slice of bread, mayo-side down on the first layer, then spread a little mayo on the top side of that same slice.
- Add the second layer of toppings: 1 lettuce leaf, 1 slice of deli chicken, 1 slice of cheese, 2 slices of bacon, and a few tomato slices.
- Finish with the third slice of bread, mayo-side down.
- Gently press the sandwich together and use a sharp knife to cut it diagonally or into quarters if you’d like.
- Serve right away and enjoy that double-decker deliciousness!
21. Mini Chili Cheese Dog Sliders

These bite-sized sandwiches are the ultimate cozy party food for cold days. They’ve got everything I love about a classic chili cheese dog, just in a warm, pull-apart slider form. The soft rolls soak up the flavorful chili, the cheese melts perfectly, and the buttery topping gives them that extra comfort factor. I love serving them straight from the oven when everyone’s gathered inside on a chilly evening, they disappear fast every time.
22. Brie, Bacon, Apple & Honey Panini

This warm, melty sandwich feels like the perfect mix of sweet and savory comfort on a cold day. The creamy Brie melts beautifully around the crisp bacon and tart apple slices, while the drizzle of honey ties everything together. I love how the bread toasts to a golden crunch, making every bite rich and cozy. It’s simple to make but tastes like something you’d find at a little café on a snowy afternoon.
You can read more about this recipe and get a printable recipe card here.
Servings: 2
Ingredients:
- 4 slices of your favorite bread
- 1/2 wheel of Brie cheese, sliced
- 4 slices of bacon, cooked until desired crispiness has been reached
- 1/2 apple, cored and thinly sliced
- 1 tbsp honey
Instructions:
-
Take 2 slices of bread and divide the Brie cheese evenly between them.
-
Add a layer of thinly sliced apples on top of the cheese.
-
Place two slices of cooked bacon on top of the apple on each slice.
-
Drizzle honey over the bacon.
-
Top each sandwich with another slice of bread to close them.
-
Spread butter on the outside of each sandwich.
-
Heat a panini grill or skillet over medium heat.
-
Grill the sandwiches until the bread is golden brown and the Brie is melted, about 3–5 minutes.
-
Slice in half and enjoy while warm.
23. Shrimp Po’ Boy

This sandwich always reminds me of something you’d grab from a seaside café, only it’s even better homemade. The crispy shrimp, tangy remoulade, and fresh veggies make such a perfect mix of textures and flavors. I love the little kick of spice and how the warm shrimp contrast with the cool lettuce and tomato. It’s messy in the best way and such a satisfying treat on a cold winter day when you want something that tastes like a mini escape.
You can read more about this recipe and get a printable recipe card here.
Servings: 4
Ingredients:
For the remoulade sauce:
- ¼ cup (60 ml) mayonnaise
- ½ tbsp mustard
- ½ tbsp capers, finely chopped
- ½ tbsp finely chopped dill pickle
- ½ tsp lemon juice
- ½ tsp hot sauce
- ½ tsp paprika
- Salt and pepper to taste
For the shrimp:
- 8.8 oz (about ½ lb) medium shrimp, peeled and deveined
- ½ cup (120 ml) buttermilk
- ½ large egg (beat the egg and use half)
- ½ tbsp hot sauce (e.g., Tabasco)
- ½ tsp black pepper
- ½ tsp salt
- ½ cup (60 g) corn flour
- ½ cup (60 g) all-purpose flour
- ½ tsp paprika
- ½ tsp garlic powder
- Oil for frying
For the sandwich:
- 4 long rolls
- ½ cup shredded iceberg lettuce
- ½ large tomato, thinly sliced, or a few cherry tomatoes, halved
- ½ small red onion, thinly sliced
- ½ small cucumber, thinly sliced
Instructions:
-
In a bowl, mix mayonnaise, mustard, capers, dill pickle, lemon juice, hot sauce, and paprika.
-
Add salt and pepper to taste, then stir until smooth and refrigerate until ready to use.
-
In a large bowl, whisk together buttermilk, egg, hot sauce, black pepper, and salt.
-
In another bowl, combine corn flour, all-purpose flour, paprika, and garlic powder.
-
Dip the shrimp into the buttermilk mixture, then coat them in the flour mixture.
-
Heat oil in a large skillet or deep fryer to 350°F (175°C).
-
Fry the shrimp in batches for 2–3 minutes, until golden brown.
-
Transfer the cooked shrimp to a paper towel-lined plate to drain excess oil.
-
Slice the baguettes or rolls lengthwise, keeping them attached at the bottom to form a pocket.
-
Spread remoulade sauce on one side of each roll (or both if you like a lot of sauce).
-
Layer shredded lettuce, sliced tomato, red onion, and cucumber on the bottom half of each roll.
-
Add the fried shrimp on top of the vegetables.
-
Close the sandwiches with the top half of the rolls.
-
Serve hot, with French fries or other sides if desired.
24. Philly Cheesesteak Sliders

These sliders are my idea of pure comfort food on a cold evening. The combination of tender steak, melted provolone, and sautéed peppers and onions makes the kitchen smell amazing. I love how the cheese gets all gooey and the rolls turn golden in the oven. They’re easy to make, totally satisfying, and perfect for sharing during a cozy night in or a winter game day.
You can read more about this recipe and get a printable recipe card here.
Servings: 12
Ingredients:
- 1 green bell pepper, sliced and halved
- 1 yellow onion, quartered and sliced
- 14 oz package shaved steak
- 1 tsp steak seasoning
- 6 slices provolone cheese
- 12 slider rolls
- 1 tbsp butter
Instructions:
- Preheat the oven to 350 degrees.
- Chop the onion and pepper.
- In a large skillet over medium heat, cook the onion and pepper for 5-7 minutes to slightly soften. Remove to a plate.
- Add the shaved steak and steak seasoning to the skillet, and cook until brown, stirring the meat as it cooks.
- Add the peppers and onions back into the skillet and cook for an additional 3-5 minutes.
- Slice the slider rolls in half, leaving the bottom and top intact.
- Set the bottom of the rolls into the casserole dish. Cover the rolls with a little over half of the steak, pepper, and onion mixture, then top with 4 slices of provolone.
- Cover the cheese with the rest of the meat mixture, then top with broken pieces of cheese, fitting them in under meat etc.
- Cover with the top half of the slider rolls.
- Melt the butter and brush over the top of the rolls.
- Transfer the pan to the oven and bake for 10-15 minutes, until cheese is melty.
25. Tuna Melt Sandwich

This is one of my favorite cozy lunches when the weather turns cold. The warm, melty cheese and creamy tuna filling hit that perfect comfort food spot without taking much effort. I love the crunch from the celery and pickles mixed with the richness of the cheddar. It’s simple, satisfying, and always tastes best fresh from the oven. It’s the kind of easy meal that makes a winter afternoon feel a little warmer.
You can read more about this recipe and get a printable recipe card here.
Servings: 2
Ingredients:
- 1 can of tuna, drained (5 oz)
- 3 tbsp mayonnaise
- 1 tsp Dijon mustard
- 2 tablespoons chopped celery
- 2 tablespoons red onion, finely chopped
- 3 small kosher dill pickles
- 4 slices of bread
- 2 slices of cheddar cheese
- Salt and pepper to taste
Instructions:
-
In a bowl, mix the drained tuna, mayonnaise, Dijon mustard, chopped celery, red onion, chopped dill pickles, and season with salt and pepper to taste.
-
Spread the tuna mixture evenly over 2 slices of bread.
-
Top each slice with a slice of cheddar cheese.
-
Place the bread slices on a baking sheet and broil on low for 2–3 minutes, or until the cheese is melted and bubbly.
-
Remove from the oven and slice the sandwiches in half.
-
Optionally, serve with chips.
26. Classic Italian Sub Sandwich

This sandwich always makes me think of cozy deli lunches on a chilly day. The mix of salty meats, creamy cheese, and tangy dressing is so satisfying, and the crisp lettuce and tomato add just the right amount of freshness. I love how all the flavors come together after sitting for a bit, making it even better if you prep it ahead. It’s hearty, flavorful, and perfect for a cold afternoon when you want something filling and full of flavor.
You can read more about this recipe and get a printable recipe card here.
Servings: 2
Ingredients:
- 2 hoagie rolls, sliced lengthwise
- 4-6 slices of ham
- 4-6 slices of Genoa salami
- 4-6 slices of capicola
- 4 slices of provolone cheese
- 1 cup shredded iceberg lettuce
- 1 large tomato, thinly sliced
- 1/2 cup thinly sliced red onion
- 4-6 slices of pepperoncini (optional)
- 2 tablespoons olive oil
- 1 tablespoon red wine vinegar
- 1/2 teaspoon dried Italian seasoning
- Salt and freshly ground black pepper
Instructions:
-
Open the hoagie rolls and drizzle each side with 1 tablespoon of olive oil.
-
Sprinkle a little dried Italian seasoning on each roll for added flavor.
-
Divide the ham slices evenly between the two rolls, followed by the salami slices, then the capicola slices.
-
Place 2 slices of provolone cheese on each roll.
-
Layer the tomato slices on top of the cheese, then add the sliced red onion.
-
Add 4–6 slices of pepperoncini to each sandwich, then evenly distribute the shredded lettuce over the top.
-
Drizzle about ½ tablespoon of red wine vinegar over the vegetables on each roll.
-
Season with a pinch of salt and freshly ground black pepper to taste.
-
Place the top half of each roll over the fillings, gently pressing down to compact the sandwiches slightly.
-
Cut each hoagie roll in half if desired, and serve immediately – or wrap in parchment paper and refrigerate for a couple of hours to let the flavors meld.
27. Crockpot Cherry Cola Pulled Chicken Sandwich

This recipe is one of my favorite ways to make an easy, cozy dinner on a cold day. The slow cooker does all the work, filling the house with the sweetest, smokiest smell while the chicken turns perfectly tender. I love how the cherry cola gives the sauce a fun twist that’s just the right mix of sweet and tangy. Piled high on soft buns, it’s a warm and comforting meal that feels special but couldn’t be easier to make.
You can read more about this recipe and get a printable recipe card here.
Servings: 4
Ingredients:
- 4 boneless skinless chicken breasts
- 1 teaspoon garlic salt
- 1 teaspoon onion powder
- 1 teaspoon smoked paprika
- 1 cup honey bbq sauce
- 1 cup cherry cola
- 2 tablespoon maraschino cherry juice
- 4 sandwich buns
Instructions:
- Place your chicken into the bottom of your slow cooker.
- Sprinkle the garlic salt, onion powder and paprika all over the chicken.
- In a small bowl whisk together the bbq sauce, cherry cola and cherry juice.
- Pour over the chicken breasts.
- Cover and cook on high for 4 hours or low for 6 hours.
- Remove half of the cooking liquid from the slow cooker.
- Shred the chicken with 2 forks.
- Pile on buns and serve!
28. BLT Sliders

These little sandwiches are such a fun twist on a classic and perfect for cozy winter gatherings. I love how the crispy bacon, juicy tomatoes, and cool lettuce all come together in one warm, bite-sized package. Toasting the buns gives them that extra bit of crunch that makes them irresistible. They’re quick to make, easy to serve, and always a crowd-pleaser when everyone’s craving something simple and satisfying.
You can read more about this recipe and get a printable recipe card here.
Servings: 12 sliders
Ingredients:
- 12 Pack Slider Rolls
- 12 Slices Cooked Thick Bacon, halved
- ¾ Cups Mayonnaise
- 2 Roma Tomatoes, sliced to about ⅛ of an inch
- Shredded Iceberg Lettuce
- 12 Cherry Tomatoes (optional)
- 12 Small Pieces of Kale (optional)
- Toothpicks
Instructions:
- Preheat the oven to 350 degrees fahrenheit.
- Slice the sliders horizontal to separate the tops and bottoms. Toast in the oven for 5-7 minutes or until desired darkness is reached.
- Once the buns are removed from the oven, lay the tops of the buns down and add about 1 tablespoon mayo to the underside of each bun. Alternatively, you can just use a knife and spread it all over the underside if you’re in a hurry. Works just fine both ways.
- Place one slice of tomato on each bottom bun, or more if you’re a tomato lover.
- Add two slices of bacon on top of each of the tomatoes, side-by-side.
- Layer the bottom buns with the shredded lettuce (however much suits your fancy).
- Place the top buns onto the bottom buns.
- If desired, use a toothpick with one cherry tomato and a piece of kale to garnish each sandwich. Gently separate the sandwiches before serving for easier grabbing and enjoy!
29. Crispy Buttermilk Fried Chicken Sandwich

This sandwich is everything I crave on a cold day. The chicken turns out crispy on the outside and juicy on the inside, with a coating that adds the perfect crunch. I love how the garlic aioli brings a creamy and tangy touch that ties everything together. Served on a soft brioche bun with a few pickles, it’s pure comfort food that warms me up from the first bite.
You can read more about this recipe and get a printable recipe card here.
Servings: 2
Ingredients:
For the Buttermilk Fried Chicken:
- 2 boneless, skinless chicken thighs
- 1 cup (240 ml) buttermilk
- 1 teaspoon hot sauce
- 1 teaspoon salt
- ½ teaspoon black pepper
- ½ teaspoon smoked paprika
- ½ teaspoon garlic powder
- ½ teaspoon onion powder
For the Dredge:
- 1 cup (125 g) all-purpose flour
- ¼ cup (30 g) cornstarch
- 1 teaspoon salt
- ½ teaspoon black pepper
- ½ teaspoon smoked paprika
- ½ teaspoon cayenne pepper (optional for spice)
- ½ teaspoon garlic powder
- ½ teaspoon onion powder
- 1 egg
- 1 tablespoon buttermilk
For Frying:
- 2 cups (480 ml) vegetable oil (for frying)
For the Garlic Aioli:
- ¼ cup (60 g) mayonnaise
- 1 clove garlic, minced
- 1 teaspoon lemon juice
- ¼ teaspoon salt
- ¼ teaspoon black pepper
For Assembling:
- 2 brioche buns, toasted
- 4 bread and butter pickles
- 2 butter lettuce leaves (optional, for a fresh crunch)
Instructions:
-
In a bowl, whisk together buttermilk, hot sauce, salt, black pepper, smoked paprika, garlic powder, and onion powder.
-
Submerge the chicken thighs in the marinade, cover, and refrigerate for at least 2 hours (or overnight for best results).
-
In a shallow dish, mix flour, cornstarch, salt, black pepper, smoked paprika, cayenne (if using), garlic powder, and onion powder.
-
In a separate bowl, whisk together the egg and 1 tablespoon of buttermilk.
-
Remove the chicken from the marinade and let the excess drip off.
-
Dredge each thigh in the flour mixture, then dip into the egg mixture, and return to the flour mixture, pressing to create a craggy coating.
-
Heat vegetable oil in a deep skillet or Dutch oven to 350°F (175°C).
-
Fry the chicken for 5–7 minutes per side, or until golden brown and cooked through (internal temp should reach 165°F / 74°C).
-
Drain the fried chicken on a wire rack over a baking sheet to keep it crispy.
-
In a small bowl, mix together mayonnaise, minced garlic, lemon juice, salt, and black pepper to make the garlic aioli.
-
Spread the garlic aioli on both halves of a toasted brioche bun.
-
Place one crispy fried chicken thigh on the bottom bun.
-
Add two pickles on top of the chicken.
-
Add butter lettuce, if desired.
-
Top with the other half of the bun and press gently before serving.
30. Sun-Dried Tomato and Turkey Pinwheel Sandwiches

These little wraps are such a fun and easy option for winter lunches. The creamy sun-dried tomato spread adds a burst of flavor that pairs so nicely with the turkey and cheese. I love how fresh and colorful they look, and they hold up perfectly for meal prep or snacking. They’re light but still satisfying, and they always brighten up a cold afternoon.
You can read more about this recipe and get a printable recipe card here.
Servings: 12 pinwheels
Ingredients:
Sun-Dried Tomato Spread:
- 2 oz cream cheese, at room temperature
- 2 tbsp sun-dried tomatoes in oil, drained and chopped
- 2 tbsp mayonnaise
- 4-5 dashes Tabasco sauce
- kosher salt
- ground black pepper
Pinwheel Sandwiches:
- 2 tortilla wraps, 9 inch
- 150-200 g sliced turkey breast
- 4-6 leaves of lettuce, boston or butter lettuce
- 6 slices cheese, cheddar, provolone, or monterey jack, or havarti
Instructions:
- Combine the cream cheese, sun-dried tomatoes, mayonnaise, Tabasco sauce, in a small bowl until well blended. Season to taste with salt and pepper.
- Lay out the tortillas and start to assemble. Spread the cream cheese mixture over the entire surface of the tortillas.
- Cover each tortilla with 4-5 slices of sliced turkey, leaving a bit of space on one end because the ingredients will shift when you roll the tortilla. Lay cheese and lettuce along the center of the tortilla.
- Roll the tortilla up, tightly, towards the side that has the deli meat set back from the edge.
- Store in the fridge, seam side down, in a baking dish or wrapped in plastic wrap until ready to serve.Slice into 1 inch slices to yield 6-7 pinwheels per tortilla. Use a toothpick to secure if desired.
31. Ham & Cheese Sliders

These warm, cheesy little sandwiches are one of my favorite things to bake when the weather gets cold. The combination of smoky ham, melted Swiss cheese, and that buttery poppy seed glaze is just irresistible. I love how they come out of the oven golden and gooey, ready to pull apart and share. They’re perfect for an easy dinner, a cozy game night, or anytime I want something comforting.
You can read more about this recipe and get a printable recipe card here.
Servings: 12
Ingredients:
- 12 slider buns (like Hawaiian rolls)
- ½ lbs thinly sliced cooked ham
- 12 slices Swiss cheese
- ¼ cup mayonnaise
- 1 tbsp Dijon mustard
- 4 tbsp butter, melted
- 1 tbsp minced onion
- 1 tbsp poppy seeds
Instructions:
-
Preheat your oven to 350°F (175°C).
-
Cut the slider buns in half and place the bottom halves in a baking dish.
-
Spread mayonnaise on the buns, then layer Swiss cheese, ham, and another layer of Swiss cheese on top.
-
Place the top halves of the buns over the fillings to close the sliders.
-
In a bowl, mix together melted butter, Dijon mustard, minced onion, and poppy seeds to make the glaze.
-
Brush the glaze generously over the tops of the sliders, ensuring even coverage.
-
Cover the baking dish with aluminum foil and bake for 15 minutes.
-
Remove the foil and bake for an additional 5–10 minutes, or until the tops are lightly browned and crispy.
-
Let the sliders cool for a few minutes before serving.
32. Bagel with Egg, Prosciutto & Garlic Butter

This recipe feels like the perfect cozy breakfast or brunch on a cold winter morning. The mix of salty prosciutto, melted cheese, and rich garlic butter makes every bite so flavorful. I love how the egg bakes right in the center, turning golden and just a little runny. It smells amazing as it cooks and feels like something special even though it’s easy to make.
You can read more about this recipe and get a printable recipe card here.
Servings: 4
Ingredients:
- 4 bagels
- 4 eggs
- 4 slices of cheddar cheese
- 4 slices of prosciutto
- 4 slices of your favorite Italian salami
- 1 ½ tbsp salted butter
- 1 garlic clove
- ½ tsp dried oregano
- ½ tsp chili paprika
- A few sprigs of fresh parsley
- Salt, to taste
Instructions:
-
Preheat your oven to 375°F. You can also use a fan oven or an air fryer if preferred.
-
In a blender, combine the garlic, parsley, butter, oregano, chili paprika, and a pinch of salt. Blend until smooth and creamy.
-
Spread the garlic butter evenly over the top of each (no need to slice).
-
Layer each bagel with a slice of cheddar cheese, a slice of Italian salami, and a slice of prosciutto.
-
Carefully make a small hole in the center of the prosciutto on each bagel to hold the egg.
-
Crack an egg into each hole, allowing the egg white to spread slightly – it’s okay if some spills over.
-
Sprinkle each bagel with a bit of chili paprika and a pinch of salt.
-
Place the bagels on a baking sheet and bake for 13–16 minutes, or until the eggs are set and the prosciutto is crispy and golden.
-
Remove the bagels from the oven and let them cool for 2–4 minutes.
-
Garnish with freshly chopped parsley before serving.
33. Cuban Sandwich

This warm and melty sandwich is such a cozy pick for winter. The mix of savory meats, gooey cheese, and tangy pickles hits all the right notes, and the toasted bread gives it that perfect crunch. I love how the mustard and mayo balance everything out and make each bite so flavorful. It’s hearty, satisfying, and just the thing for a cold day when you want something that feels like a little treat.
You can read more about this recipe and get a printable recipe card here.
Servings: 2
Ingredients:
- 4 pieces Cuban bread or baguette slices
- 7 oz cooked pork or beef, thinly sliced
- 3 oz ham, thinly sliced
- 3 oz Edam or Gruyère cheese (or another melting cheese), sliced
- 4-6 pickle slices, thinly sliced
- 2 tbsp mustard (yellow or Dijon)
- 2 tbsp mayonnaise
- 1 tbsp olive oil
- Salt and pepper to taste
Instructions:
-
Spread mayonnaise on one side of each bread slice and mustard on the other.
-
On one slice, layer the cooked pork, then ham, cheese, and pickles.
-
Close the sandwich with the second slice of bread, keeping the mayo and mustard sides facing out.
-
Brush the outer sides of the sandwich with olive oil to help prevent burning while grilling.
-
Preheat the grill to medium heat.
-
Place the sandwich on the grill and close the lid.
-
Grill for 3–4 minutes on each side, or until the bread is golden brown and crispy and the cheese is melted.
-
Press the sandwich with a grill press or a heavy object if needed to help it cook evenly.
-
Serve hot, sliced diagonally for a nicer presentation.
34. Marry Me Chicken Sandwich

This sandwich is pure comfort with a little bit of flair. The creamy sauce, sun-dried tomatoes, and fresh basil give it such a rich, cozy flavor that feels perfect for a cold day. I love how the tender chicken soaks up all that goodness, making every bite so satisfying. It’s easy to throw together but tastes like something you’d order at a nice café on a winter afternoon.
You can read more about this recipe and get a printable recipe card here.
Servings: 4
Ingredients:
- 1/2 cup of mayonnaise
- 1/2 cup of sour cream
- 2 tbsp oil from sun dried tomatoes
- 1 tsp paprika
- 1 tsp red pepper flakes
- 1 tsp pepper
- 1 tbsp garlic (minced)
- 16 oz of cooked chicken (shredded)
- 1 cup sun dried tomatoes (diced)
- 1/2 cup of fresh shredded Parmesan cheese
- 1/2 cup of fresh basil leaves
- Your choice of bread
Instructions:
- In a large bowl add the mayonnaise, sour cream, oil from the sun dried tomatoes, paprika, red pepper flakes, pepper and garlic. Stir until everything is combined.
- In another large bowl add the chicken, sun dried tomatoes, Parmesan cheese and basil leaves, stir until mixed.
- Add the dressing mixture to the chicken mixture and stir until completely coated. Scoop and serve on your favorite type of bread.
I hope you found a few new favorites to warm up your cold-weather meals. From toasty melts and cozy sliders to hearty classics packed with flavor, these sandwiches are proof that comfort food can be simple and satisfying. I love how each one brings a little warmth to the table, no matter how chilly it gets outside.