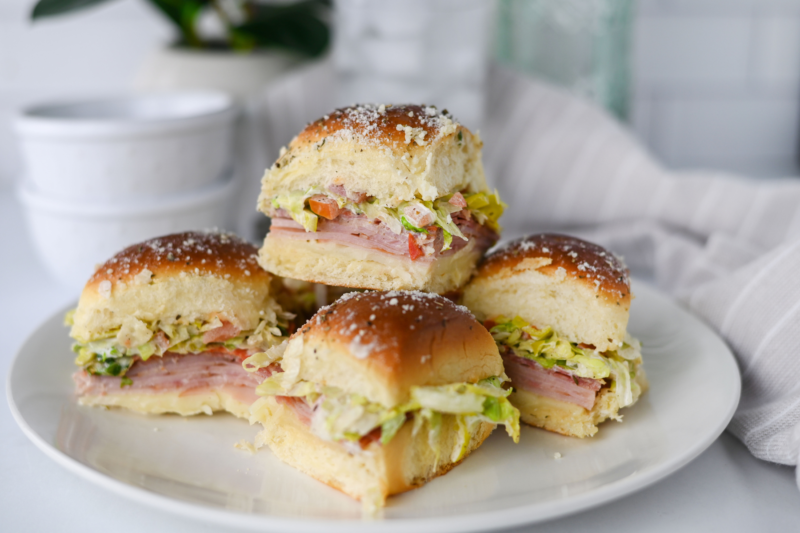
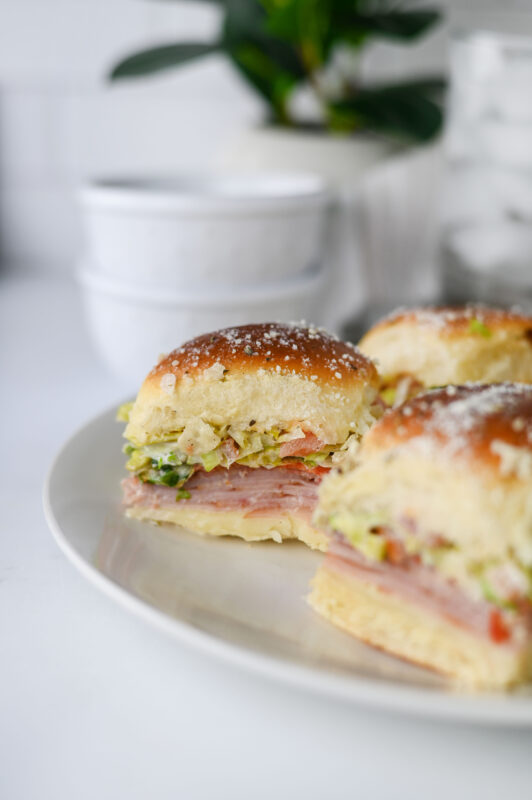
Baked Italian Grinder Sliders with Chopped Italian Salad
If you love a classic Italian grinder but don’t love wrestling with a giant sandwich, you’re going to be very happy here. This is one of those recipes that takes all those bold, deli-style flavors and turns them into something warm, buttery, and way easier to serve. Soft Hawaiian rolls, layers of melty cheese and savory meats, and that signature grinder crunch all come together in a way that feels comforting and just a little bit fun.
What really makes this one special is the chopped salad layered right inside. Crisp lettuce, juicy tomatoes, tangy pepperoncini, and a creamy, zippy dressing add that cool crunch you expect from a grinder, but without everything sliding out the sides. It’s the kind of contrast that makes you keep going back for “just one more” slider, even when you’re already full.
This is the sort of recipe I reach for when I want something that feels a little extra but doesn’t actually take much effort. It works just as well for a casual family dinner as it does for game day, gatherings, or anytime you need something that disappears fast. Set the pan on the table, let everyone pull one apart, and don’t be surprised if it becomes a repeat request.
If you like this recipe then you’ll LOVE these:
- Bacon Cheeseburger Sliders
- Big Mac Sliders
- BLT Sliders
- Chicken Cordon Bleu Sliders
- Chicken Parmesan Sliders
- French Onion Beef Dip Sliders
- Mini Chili Cheese Dog Sliders
- Monte Cristo Sliders
- Nashville Hot Honey Butter Chicken Sliders
- Philly Cheesesteak Sliders
- Sloppy Joe Sliders
- Crockpot Cranberry Turkey BBQ Sliders
- Crack Chicken Sliders
- Ham & Cheese Sliders
Why We Love This Recipe
- It’s the best of both worlds. You get all the bold, deli-style flavors you love in an Italian grinder, but in warm, buttery slider form that’s way easier to serve and eat.
- That creamy chopped salad situation is everything. Cool, crunchy, tangy, and just messy enough to make it fun, it balances the warm meats and cheese perfectly.
- It feels special without being fussy. Nothing complicated here, but once it’s baked and brushed with butter and Parmesan, it looks and tastes like you really went the extra mile.
- It works for dinner and sharing. Easy enough for a weeknight, but also totally party-worthy when you need something everyone will hover around.
- Everyone can grab and go. Sliders mean no plates, no knives, and no awkward sandwich fallout, which is always a win.
- These reheat surprisingly well. If you’re lucky enough to have leftovers, they warm right back up without losing that cozy, melty goodness.

Equipment
-
9×13-inch baking dish – This gives the sliders plenty of room to bake evenly while keeping everything snug and melty in one cozy pan.
-
Sharp serrated knife – Makes slicing the rolls clean and easy without squishing them flat.
-
Large mixing bowl – You’ll want enough space to toss the chopped salad so everything gets evenly coated.
-
Cutting board – Handy for chopping the lettuce, tomatoes, and pepperoncini without making a mess.
-
Measuring cups and spoons – Helps keep the dressing balanced so it’s creamy and flavorful, not overpowering.
-
Pastry brush – Perfect for brushing that buttery, Parmesan-topped goodness over the rolls.
-
Microwave-safe bowl – Just right for quickly melting the butter without dragging out another pan.
Ingredients
-
12 Hawaiian rolls – Soft, slightly sweet, and perfect for soaking up all those savory, melty layers without falling apart.
-
8 ounces deli sliced ham – Adds that classic, salty bite that makes these taste just like your favorite grinder.
-
4 ounces sliced provolone – Mild, melty, and creamy, it ties all the meats together in the best way.
-
3 ounces pepperoni – Brings a little spice and richness that really wakes everything up.
-
3 ounces thin sliced salami – Gives you that unmistakable Italian deli flavor with just the right amount of chew.
-
8 ounces shredded lettuce – Adds fresh crunch and keeps things feeling balanced, not heavy.
-
2–3 Roma tomatoes – Juicy but not watery, so you get flavor without soggy sliders.
-
1/2 cup sliced pepperoncini – Tangy, slightly spicy, and honestly non-negotiable for that true grinder vibe.
-
1/4 cup mayonnaise – Makes the chopped salad creamy and helps all those flavors cling together.
-
1 tablespoon red wine vinegar – Adds a bright, tangy pop that cuts through the richness perfectly.
-
1 teaspoon Italian seasoning, plus extra for sprinkling on top – Pulls all the Italian flavors together and makes the tops smell amazing as they bake.
-
1/2 teaspoon salt – Just enough to bring everything into balance without overpowering anything else.
-
1/2 teaspoon pepper – Adds a gentle kick that keeps the flavors from falling flat.
-
1/2 teaspoon garlic powder – Gives you that savory depth without having to mess with fresh garlic.
-
3 tablespoons butter – Brushed on top for golden, glossy rolls that taste like pure comfort.
-
2–3 tablespoons grated Parmesan cheese – Finishes things off with a salty, cheesy sprinkle that makes the tops irresistible.

Recipe Instructions
You can find a printable recipe card at the bottom of this post.
Step 1: Preheat the oven to 350°F.
Step 2: Slice the Hawaiian rolls in half horizontally and set the top halves aside.
Step 3: Lightly coat a glass baking dish with nonstick cooking spray.
Step 4: Arrange the bottom halves of the rolls evenly in the prepared dish.

Step 5: Layer the provolone cheese over the rolls, followed by the ham, salami, and pepperoni.


Step 6: Place the roll tops back on and bake for about 15 minutes, or until the tops are lightly golden.

Step 7: While the rolls bake, dice the Roma tomatoes to make about 1/2 cup and set aside.
Step 8: Remove the rolls from the oven and let them cool slightly, then lift off the top halves and set them aside.
Step 9: In a large mixing bowl, combine the shredded lettuce, diced tomatoes, pepperoncini, mayonnaise, red wine vinegar, Italian seasoning, salt, pepper, and garlic powder.

Step 10: Toss until everything is evenly mixed and well coated.

Step 11: Spoon the salad mixture evenly over the layered meats on the rolls, smoothing it out as best as you can.

Step 12: Replace the roll tops.

Step 13: Melt the butter in a microwave-safe bowl for about 20 seconds.
Step 14: Brush the melted butter over the tops of the rolls, then sprinkle with Parmesan cheese and a little extra Italian seasoning.

Step 15: Serve and enjoy.

Serving & Storing
-
Serve these warm while the cheese is still melty and the tops are buttery and golden. That’s when they’re at their absolute best.
-
If you’re putting them out for a gathering, I like to keep the pan on the table and let everyone pull one apart as they go. No fuss, no extra dishes.
-
For a simple dinner, these are great with chips, a pickle on the side, or a light salad if you want to balance things out a bit.
-
If you have leftovers, wrap them tightly or store them in an airtight container in the fridge for up to two days.
-
To reheat, pop them back in the oven at a low temperature or warm them in the air fryer until heated through. The microwave works in a pinch, but the oven keeps the rolls from getting too soft.
-
If you’re planning ahead, you can store the baked sliders and the chopped salad separately and add the salad after reheating so everything stays fresh and crunchy.

Variations & Substitutions
-
Swap the meats around based on what you have. Turkey, roast beef, or even just a mix of ham and salami all work really well here.
-
Not a provolone fan? Mozzarella or Swiss melt beautifully and still give you that classic deli vibe.
-
If you like a little heat, add banana peppers, crushed red pepper flakes, or a drizzle of hot honey inside the sliders before baking.
-
For a lighter twist, use Greek yogurt in place of some or all of the mayo in the chopped salad. It’s still creamy, just a bit brighter.
-
No Hawaiian rolls? Any soft slider rolls or dinner rolls will do, just aim for something that stays fluffy when baked.
-
Want to skip the oven? You can warm the rolls and melt the cheese in the air fryer, then add the chopped salad right before serving.
-
If you’re feeding someone who’s not into lettuce on their sandwich, serve the chopped salad on the side and let everyone build their own.

Little Tricks That Make a Big Difference
-
Let the sliders cool for just a minute before adding the chopped salad. That quick pause keeps the lettuce from wilting and keeps everything nice and crisp.
-
Shred your own lettuce if you can. It stays crunchier and fresher than the pre-shredded stuff, and it really does make a difference.
-
Don’t skip the butter on top. Brushing it on generously is what gives you those golden, glossy rolls that smell amazing the second they come out of the oven.
-
Sprinkle a little extra Italian seasoning and Parmesan right at the end for that bakery-style finish that makes them look extra inviting.
-
Use a serrated knife when cutting the sliders apart. It keeps the rolls intact and saves you from dragging all the filling out the sides.
-
If you want ultra-melty cheese, loosely tent the pan with foil for the first few minutes of baking, then uncover to let the tops brown.

FAQs
Can I make these ahead of time?
Yes, with a little planning. You can assemble and bake the sliders ahead, then store them in the fridge. Keep the chopped salad separate and add it just before serving so everything stays fresh and crunchy.
Can I serve the chopped salad on the side instead?
Absolutely. If you’re feeding picky eaters or just want options, the sliders are delicious on their own and the salad works perfectly as a scoop-it-on-yourself topping.
What’s the best way to reheat leftovers?
The oven or air fryer is your best bet. Reheat at a low temperature until warmed through to keep the rolls from getting too soft. The microwave works in a pinch, but the texture won’t be quite as good.
Can I make these without Hawaiian rolls?
Yes, any soft slider or dinner roll will work. Just avoid anything too crusty, since you want that fluffy, pull-apart texture.
Will the lettuce get soggy?
Not if you let the sliders cool slightly before adding the chopped salad. That small step helps keep everything crisp and fresh.
Can I add more or less of the dressing?
Definitely. If you like things extra creamy, add a little more mayo. If you prefer it lighter, start with less and adjust to taste.
Are these good for parties?
They’re perfect for it. They’re easy to serve, easy to grab, and they tend to disappear fast, which is always a good sign.
Baked Italian Grinder Sliders

These Italian grinder sliders bring all the bold, deli-style flavors you love into warm, buttery, pull-apart rolls. Layered with melty cheese, savory meats, and finished with a cool, creamy chopped salad, they’re easy to make and perfect for both casual dinners and sharing with friends.
Ingredients
- 12 Hawaiian rolls
- 8 ounces deli sliced ham
- 4 ounces sliced provolone
- 3 ounces pepperoni
- 3 ounces thin sliced salami
- 8 ounces shredded lettuce
- 2-3 roma tomatoes
- 1/2 cup sliced pepperoncini
- 1/4 cup mayonnaise
- 1 tbsp. red wine vinegar
- 1 tsp. Italian seasoning, plus extra for sprinkling on top
- 1/2 tsp salt
- 1/2 tsp pepper
- 1/2 tsp garlic powder
- 3 tbsp butter
- 2-3 tbsp. grated parmesan cheese
Instructions
- Preheat the oven to 350°F.
- Slice the Hawaiian rolls in half horizontally and set the top halves aside.
- Lightly coat a glass baking dish with nonstick cooking spray.
- Arrange the bottom halves of the rolls evenly in the prepared dish.
- Layer the provolone cheese over the rolls, followed by the ham, salami, and pepperoni.
- Place the roll tops back on and bake for about 15 minutes, or until the tops are lightly golden.
- While the rolls bake, dice the Roma tomatoes to make about 1/2 cup and set aside.
- Remove the rolls from the oven and let them cool slightly, then lift off the top halves and set them aside.
- In a large mixing bowl, combine the shredded lettuce, diced tomatoes, pepperoncini, mayonnaise, red wine vinegar, Italian seasoning, salt, pepper, and garlic powder.
- Toss until everything is evenly mixed and well coated.
- Spoon the salad mixture evenly over the layered meats on the rolls, smoothing it out as best as you can.
- Replace the roll tops.
- Melt the butter in a microwave-safe bowl for about 20 seconds.
- Brush the melted butter over the tops of the rolls, then sprinkle with Parmesan cheese and a little extra Italian seasoning.
- Serve and enjoy.
Notes
- Let the sliders cool for a minute or two before adding the chopped salad so the lettuce stays crisp and fresh.
- If you’re making these ahead, store the baked sliders and the chopped salad separately and assemble just before serving.
- Use a serrated knife to cut the sliders for clean slices without pulling out the filling.
- Adjust the amount of pepperoncini to taste if you like things milder or extra tangy.
- Any soft slider rolls will work if you don’t have Hawaiian rolls, just avoid crusty bread.
- For extra melty cheese, loosely cover the pan with foil for the first few minutes of baking, then uncover to brown the tops.
Nutrition Information:
Yield:
12Serving Size:
1Amount Per Serving: Calories: 290Total Fat: 18gSaturated Fat: 7gUnsaturated Fat: 11gCholesterol: 59mgSodium: 854mgCarbohydrates: 18gFiber: 2gSugar: 5gProtein: 13g