Make Mealtime a Breeze with These 30 Back to School Dinner Ideas
Back-to-school season always sneaks up on me, one minute we’re enjoying lazy summer nights, and the next, it’s homework, sports practice, and somehow figuring out what’s for dinner every single night. If you’re anything like me, juggling everything while trying to get a meal on the table can feel like a full-time job. That’s why I’ve put together these 30 back-to-school dinner ideas that are not only quick and easy but also totally delicious. No more staring blankly into the fridge wondering what to make!
I love meals that come together fast but don’t skimp on flavor or family approval. Whether it’s a comforting pasta, a simple stir-fry, or a one-pan wonder, these dinners are designed to make your evenings run smoother. Plus, they’re kid-friendly enough to please picky eaters and flexible enough to suit whatever you have on hand. Trust me, having a lineup of reliable dinners ready to go takes so much stress out of the week.
Ready to reclaim your evenings and make mealtime something to look forward to again? These 30 back-to-school dinner ideas will help you breeze through busy nights without breaking a sweat, or the bank.
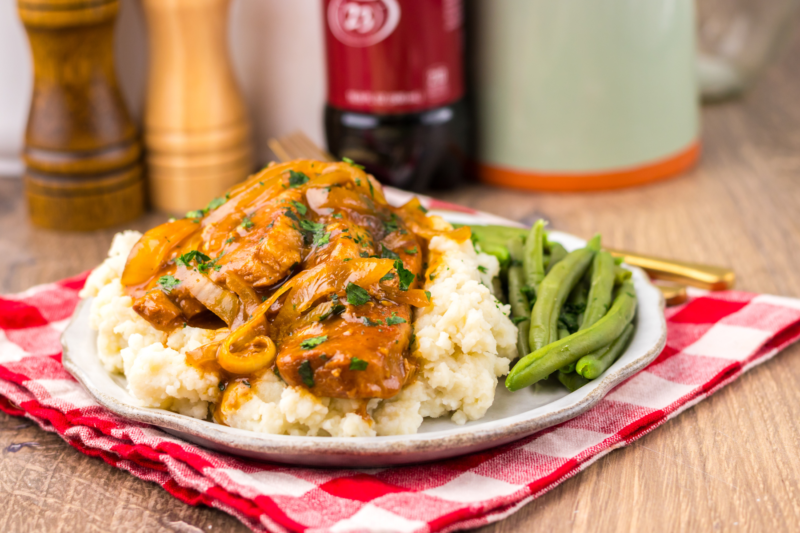
1. Crockpot Cherry Cola Pulled Chicken

This Crockpot Cherry Cola Pulled Chicken is hands-down one of my favorite back-to-school dinner hacks. You just toss the chicken and a few simple spices into the slow cooker, then pour over a sweet and tangy mix of honey BBQ sauce, cherry cola, and a splash of maraschino cherry juice that gives it a fun twist. While it cooks low and slow, you get a little breathing room from the usual chaos, and when it’s done, the chicken shreds beautifully and piles right onto sandwich buns for a mess-free, crowd-pleasing meal. It’s the kind of recipe that feels special but takes zero effort, perfect for busy weeknights when you want something tasty without the fuss!
You can read more about this recipe and get a printable recipe card here.
Servings: 4
Ingredients:
- 4 boneless skinless chicken breasts
- 1 teaspoon garlic salt
- 1 teaspoon onion powder
- 1 teaspoon smoked paprika
- 1 cup honey bbq sauce
- 1 cup cherry cola
- 2 tablespoon maraschino cherry juice
- 4 sandwich buns
Instructions:
- Place your chicken into the bottom of your slow cooker.
- Sprinkle the garlic salt, onion powder and paprika all over the chicken.
- In a small bowl whisk together the bbq sauce, cherry cola and cherry juice.
- Pour over the chicken breasts.
- Cover and cook on high for 4 hours or low for 6 hours.
- Remove half of the cooking liquid from the slow cooker.
- Shred the chicken with 2 forks.
- Pile on buns and serve!
2. Air Fryer Baked Potato

Air Fryer Baked Potatoes are seriously a game changer when it comes to quick, hands-off dinners during the back-to-school rush. Instead of waiting forever for them to bake in the oven, the air fryer gets them perfectly crispy on the outside and fluffy on the inside in way less time. All you need are some good-sized russets, a little olive oil, and salt, that’s it! Pop them in the air fryer, flip them halfway through, and soon you’ve got a simple, comforting side or base for all your favorite toppings that feels like a little treat on a busy weeknight.
Servings: 2
Ingredients:
- 3 large russet potatoes
- Olive oil or spray oil
- Salt, to taste
Instructions:
-
Rinse the potatoes thoroughly under running water and dry them with a paper towel.
-
Use a fork to poke several holes in each potato to let steam escape while cooking.
-
Coat each potato with olive oil or spray them lightly with cooking spray, then sprinkle with salt.
-
Preheat your air fryer to 385°F for 3 to 5 minutes.
-
Arrange the potatoes in the air fryer basket, making sure they don’t touch each other.
-
Cook the potatoes at 385°F for about 60 minutes, adjusting time based on their size.
-
Flip the potatoes halfway through cooking to promote even roasting.
-
Check for tenderness by piercing with a fork; when soft, take them out of the air fryer.
-
Allow the potatoes to rest for a few minutes before slicing them open.
3. Chicken Parmesan Sliders

Chicken Parmesan Sliders are basically the ultimate back-to-school dinner win, they’re easy to throw together, packed with cheesy, saucy goodness, and come on these soft, sweet Hawaiian rolls that everyone loves. I love how you can cook the chicken tenders right from the bag, then layer everything up with marinara and melty mozzarella before popping them in the oven for a quick bake. The buttery, garlicky Parmesan topping takes these sliders to the next level, making them feel fancy without any extra effort. Perfect for busy nights when you want something comforting, kid-approved, and totally delicious!
You can read more about this recipe and get a printable recipe card here.
Servings: 12 sliders
Ingredients:
- 12 Hawaiian sweet rolls
- 20 oz bag chicken tenders
- 1-½ cup marinara sauce
- 8 oz Mozzarella cheese slices
- 4 tablespoons butter, melted
- 2 tablespoons grated Parmesan cheese
- ½ tablespoon Italian seasoning
- 1 teaspoon garlic salt
- Chopped parsley, optional for garnish
Instructions:
- Cook the chicken tenders according to the package instructions, then set them aside.
- Preheat the oven to 350°F.
- Using a serrated knife, slice the Hawaiian rolls in half horizontally, keeping them connected. Place the bottom half in a parchment-lined baking sheet or a lightly greased baking dish.
- Spread a thin layer of marinara sauce over the bottom rolls.
- Arrange the cooked chicken tenders evenly over the marinara, covering the rolls completely.
- Spoon the remaining marinara sauce over the chicken.
- Layer mozzarella cheese slices over the top, then place the top halves of the rolls on.
- Melt the butter in the microwave, then stir in garlic salt, Italian seasoning, and grated Parmesan cheese. Brush the butter mixture evenly over the tops of the rolls.
- Bake for 20 to 25 minutes, or until the tops are golden brown and the cheese is hot and melted.
- Serve sliders warm with extra marinara on the side for dipping.
4. Crockpot Pineapple Brown Sugar Chicken
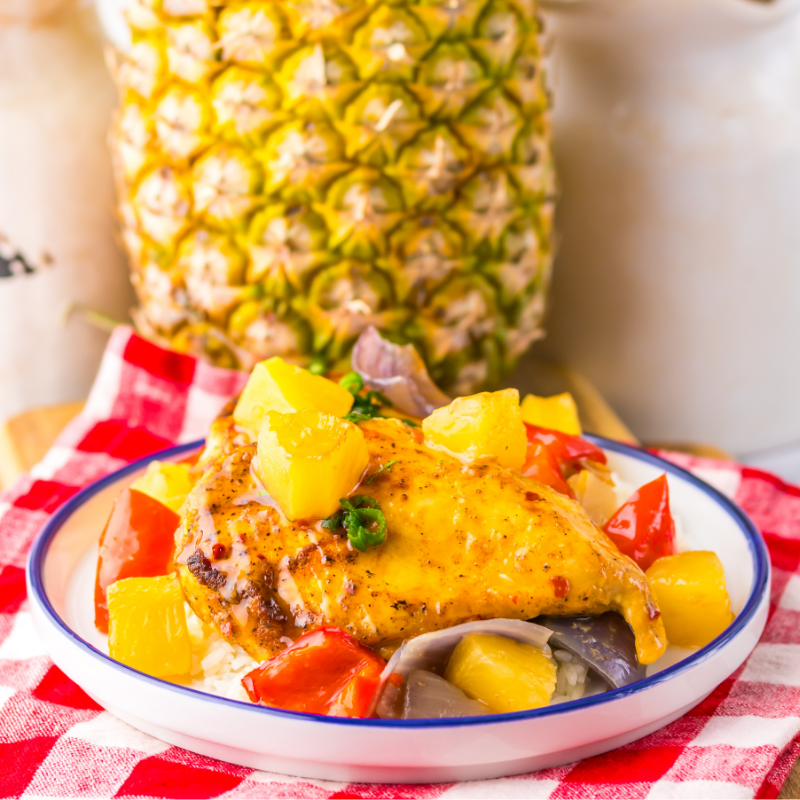
This Crockpot Pineapple Brown Sugar Chicken is the kind of back-to-school dinner that feels like a mini vacation on a plate — sweet, tangy, and just a little bit spicy. I love how the slow cooker does all the work while you tackle homework or rush to after-school activities. The combo of pineapple, brown sugar, and soy sauce creates this amazing sticky sauce that coats tender chicken breasts, while the red bell peppers and onions add a pop of color and crunch. It’s a perfect balance of flavors that’s easy to make and sure to get everyone asking for seconds!
You can read more about this recipe and get a printable recipe card here.
Servings: 4
Ingredients:
- 4 boneless skinless chicken breasts
- ¼ teaspoon red pepper flake
- 1 teaspoon garlic salt
- 1 teaspoon onion powder
- 1 teaspoon paprika
- ½ teaspoon black pepper
- 1 red bell pepper, chopped
- 1 red onion, chopped
- 1 (20-ounce) can pineapple chunks, 1 cup juice reserved
- 1/3 cup brown sugar, packed
- 3 tablespoons lite soy sauce
- 2 tablespoons honey
- 1 tablespoons apple cider vinegar
- 2 tablespoons cornstarch
- Scallions for garnish
Instructions:
- Season the chicken with the red pepper flake, garlic salt, onion powder, paprika and black pepper.
- Place the chicken in a large skillet over medium high heat 3 minutes per side just to get some color.
- Add the chicken to the bottom of your slow cooker.
- Top with the red bell pepper, red onion, and pineapple chunks.
- In a small bowl whisk together your reserved 1 cup of pineapple juice, brown sugar, soy sauce, honey, vinegar and cornstarch.
- Pour the mix over the chicken.
- Cover and cook on low for 6 hours or high for 4 hours.
- Garnish with scallions.
- Serve!
5. Nashville Hot Honey Butter Chicken Sliders
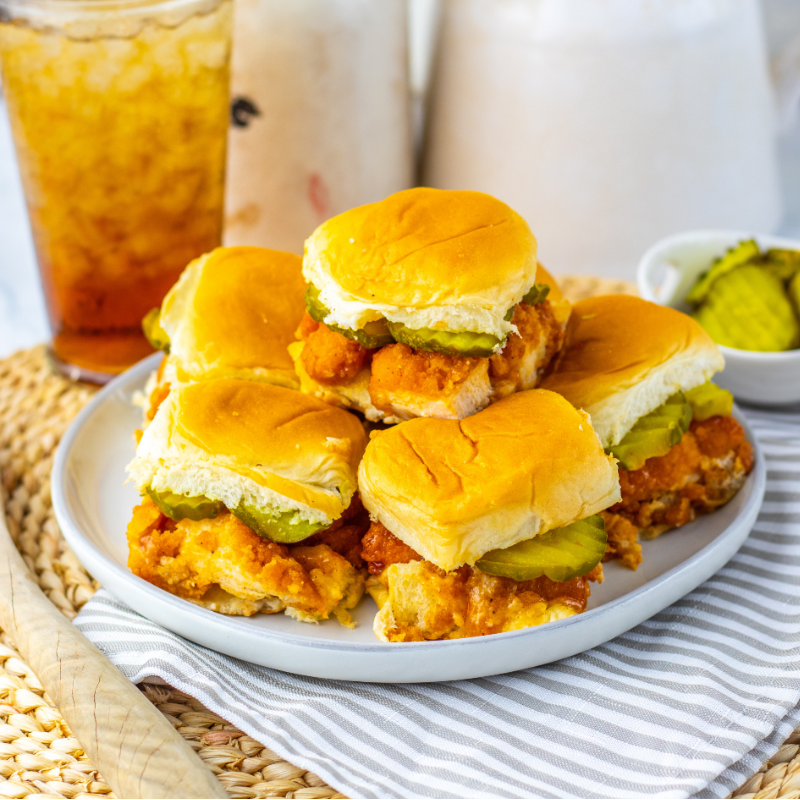
Nashville Hot Honey Butter Chicken Sliders are my secret weapon for back-to-school dinners that wow without the hassle. Crispy chicken bites get a sticky, spicy-sweet makeover with a drizzle of honey, a kick of hot sauce, and just the right blend of smoky spices. Slathered with garlicky mayo on soft, sweet Hawaiian rolls and topped with tangy pickle chips, these sliders hit all the right flavor notes. They’re perfect for busy nights when you want something quick, messy, and totally delicious, and the whole family will be coming back for more!
You can read more about this recipe and get a printable recipe card here.
Servings: 12 sliders
Ingredients:
- 24 oz bag of crispy boneless chicken bites (or your favorite frozen chicken nuggets/bites)
- 12 count Hawaiian rolls
- 1/4 cup of mayo
- 1 tsp of garlic powder
- 3 tbsp of unsalted butter (melted)
- 1/4 cup of honey
- 2 tbsp of franks red hot hot sauce
- 1 tsp of paprika
- 1 tsp of cayenne powder
- 16 oz jar of pickle chips
Instructions:
-
Cook the chicken bites in the air fryer or oven according to the package directions. While they cook, slice the entire set of slider buns in half horizontally (like you’re making one big sandwich). Set the top half aside. In a small bowl, mix the mayo and garlic powder, then spread it over the bottom half of the buns.
-
In a large bowl, stir together the melted butter, honey, hot sauce, paprika, and cayenne. Add the cooked chicken bites and toss until they’re fully coated in the sauce.
-
Spread the sauced chicken evenly over the bottom buns. Layer pickle slices over the chicken, then place the top buns back on.
-
Using a sharp knife, carefully slice into individual sliders. (It’s okay if you cut through some pickles or chicken along the way!) Serve and enjoy!
6. Street Corn Chicken & Rice

Street Corn Chicken & Rice is hands down one of those back-to-school dinners that feels fresh and fun but comes together without any fuss. The chicken gets all charred and flavorful with a punch of smoky spices, while the corn is browned up just right to add that perfect bit of sweetness and crunch. Then there’s the creamy, tangy street corn sauce loaded with queso fresco and lime that brings everything together beautifully over a bed of fluffy rice. It’s like a little fiesta on your plate that’s quick enough for busy weeknights but tasty enough to feel like a treat!
You can read more about this recipe and get a printable recipe card here.
Servings: 4
Ingredients:
- 1 1/2 cups of white rice
- 4 boneless skinless chicken breasts (diced)
- 1/4 cup of lime juice
- 2 tablespoons of chopped cilantro
- 1 tsp paprika
- 1 tsp garlic salt
- 1 tsp cumin
- 1 tsp chili powder
- 1 tsp onion powder
- 1/4 cup of vegetable oil
- 12 oz bag of frozen corn
- 1 tbsp of butter
- 1/2 cup of crumbled queso fresco (divided)
- 1/3 cup of mayo
- 1 tbsp of chopped cilantro
- 1 tsp paprika
- 1 tsp chili powder
- 1 tbsp lime juice
- 1 red onion (diced)
Instructions:
- In a large mixing bowl add the diced chicken, 1/4 lime juice, 2 tbsp cilantro, 1 tsp paprika, 1 tsp garlic salt, 1 tsp cumin, 1 tsp chili powder, 1 tsp onion powder and 1/4 cup of vegetable oil. Stir to mix and coat the chicken.
- In a large skillet add the chicken and cook on a medium to high heat for about 10 minutes. You want the chicken to get color and charred pieces all over. Remove the chicken to a plate and set aside.
- Add the butter to the pan and the bag of corn, stir around on a medium to high heat until the pieces of corn get brown and burnt slightly.
- In a medium sized bowl add 1/4 cup of crumbled queso fresco, mayo, cilantro, paprika, chili powder and lime juice and 2 cups of the browned corn. Save the leftover corn for later. Stir the mixture up.
- Add the cooked rice to serving bowls, add the chicken, add the street corn sauce on top, add the diced red onion, sprinkle 1/4 cup of queso fresco on top of all the bowls, sprinkle some of the leftover browned corn and sprinkle more cilantro on top. (optional) serve and enjoy!
7. Garlic Butter Honey BBQ Chicken Tacos

Garlic Butter Honey BBQ Chicken Tacos are my go-to when I want a back-to-school dinner that’s bursting with flavor but comes together super fast. The chicken gets cooked up with simple spices until it’s golden, then it’s tossed in this dreamy mix of buttery garlic, sweet honey, tangy BBQ sauce, and a splash of apple cider vinegar that adds just the right zing. Warm tortillas make the perfect cozy wrap for all that saucy goodness, and you can pile on your favorite toppings to make them your own. It’s an easy, delicious dinner that feels like a little celebration after a busy day!
You can read more about this recipe and get a printable recipe card here.
Servings: 4
Ingredients:
- 2 tbsp vegetable oil
- 1 lb of boneless skinless chicken breast (diced)
- 1 tsp salt
- 1 tsp pepper
- 1 tsp onion powder
- 3 tbsp of unsalted butter
- 1 tbsp of garlic (minced)
- 2 tbsp honey
- 1/2 cup of bbq sauce
- 1 tbsp of apple cider vinegar
- 8 fajita or street taco size tortillas
Instructions:
- Add the oil to a medium sized skillet, add the diced chicken, salt, pepper and onion powder, stir and cook over a medium to high heat until the chicken is completely cooked through and has some color.
- Take the chicken out and place onto a plate, set aside. Add the butter and garlic and cook for 30 seconds on a medium to low heat. Add the honey, bbq sauce and apple cider vinegar and stir.
- Add the cooked chicken back into the pan and stir to coat the chicken in the sauce. Turn the heat to low and begin warming up the tortillas in the microwave for just a few seconds.
- Add the chicken to the tortillas and your favorite toppings! Serve and enjoy!
8. Sloppy Joe Sliders

Sloppy Joe Sliders are like the ultimate comfort food makeover for busy back-to-school nights. I love how the classic sloppy joe gets tucked into sweet, soft Hawaiian rolls and topped with melty cheddar cheese, then that buttery, slightly sweet glaze with a hint of Dijon and Worcestershire gives the whole thing a little extra something special. They bake up golden and gooey, making them perfect for little hands and hungry tummies after a long day. Plus, they’re super easy to make, so you can have dinner on the table without any stress or fuss.
You can read more about this recipe and get a printable recipe card here.
Servings: 12 sliders
Ingredients:
- 12 Hawaiian sweet rolls
- 1lb ground beef
- 15-ounce can of Manwich
- 8 slices of cheddar cheese
- 4 tablespoons butter, melted
- 1 Tablespoon brown sugar
- 1 teaspoon Dijon mustard
- 1 teaspoon Worcestershire sauce
- 1 teaspoon sesame seeds
- Chopped parsley, optional for garnish
Instructions:
- Preheat the oven to 350°F and line a baking sheet with parchment paper or a silicone mat.
- In a large skillet over medium-high heat, cook the ground beef until fully browned. Drain any excess grease.
- Reduce the heat to low, stir in the can of Manwich, and let the mixture simmer for about 5 minutes to heat through and blend the flavors.
- While the meat simmers, slice the Hawaiian rolls in half horizontally with a serrated knife, keeping the top and bottom halves intact.
- Place the bottom half of the rolls onto the prepared baking sheet.
- Spread the sloppy joe mixture evenly over the rolls, making sure to cover the entire surface.
- Lay the cheddar cheese slices over the meat.
- Add the top half of the rolls to close the sliders.
- In a small microwave-safe bowl, melt the butter. Stir in the brown sugar, Dijon mustard, and Worcestershire sauce until fully combined.
- Brush the butter mixture evenly over the tops of the rolls.
- Sprinkle sesame seeds over the top.
- Bake uncovered for 20 to 25 minutes, until the tops are golden brown and the cheese is melted.
- Let the sliders cool slightly, then transfer them to a cutting board. Garnish with chopped parsley if desired.
- Slice along the seams to separate into individual sliders and serve warm.
9. BLT Sliders

BLT Sliders are the perfect little back-to-school dinner that hits all the classic flavors in a fun, bite-sized way. Crispy bacon, juicy tomato slices, and crunchy iceberg lettuce get piled high on soft, toasted slider buns with just the right amount of mayo to keep things saucy. I love how easy these are to throw together, and they’re super kid-friendly too — plus, the little cherry tomato and kale toothpick garnish makes them feel a bit fancy without any extra effort. They’re great for busy nights when you want something simple, satisfying, and totally tasty!
You can read more about this recipe and get a printable recipe card here.
Servings: 12 sliders
Ingredients:
- 12 Pack Slider Rolls
- 12 Slices Cooked Thick Bacon, halved
- ¾ Cups Mayonnaise
- 2 Roma Tomatoes, sliced to about ⅛ of an inch
- Shredded Iceberg Lettuce
- 12 Cherry Tomatoes (optional)
- 12 Small Pieces of Kale (optional)
- Toothpicks
Instructions:
- Preheat the oven to 350 degrees fahrenheit.
- Slice the sliders horizontal to separate the tops and bottoms. Toast in the oven for 5-7 minutes or until desired darkness is reached.
- Once the buns are removed from the oven, lay the tops of the buns down and add about 1 tablespoon mayo to the underside of each bun. Alternatively, you can just use a knife and spread it all over the underside if you’re in a hurry. Works just fine both ways.
- Place one slice of tomato on each bottom bun, or more if you’re a tomato lover.
- Add two slices of bacon on top of each of the tomatoes, side-by-side.
- Layer the bottom buns with the shredded lettuce (however much suits your fancy).
- Place the top buns onto the bottom buns.
- If desired, use a toothpick with one cherry tomato and a piece of kale to garnish each sandwich. Gently separate the sandwiches before serving for easier grabbing and enjoy!
10. Marry Me Chicken

Marry Me Chicken is exactly the kind of back-to-school dinner that sounds fancy but comes together in no time, and honestly, it tastes like a total dream. The creamy mix of mayo, sour cream, and flavorful sun-dried tomato oil gets kicked up with garlic, paprika, and a little heat from red pepper flakes, then coats tender shredded chicken mixed with fresh basil and Parmesan. I love scooping this rich, tangy chicken onto my favorite bread for a meal that feels indulgent but is seriously easy to make. Perfect for nights when you want something a little special without spending hours in the kitchen!
You can read more about this recipe and get a printable recipe card here.
Servings: 4
Ingredients:
- 1/2 cup of mayonnaise
- 1/2 cup of sour cream
- 2 tbsp oil from sun dried tomatoes
- 1 tsp paprika
- 1 tsp red pepper flakes
- 1 tsp pepper
- 1 tbsp garlic (minced)
- 16 oz of cooked chicken (shredded)
- 1 cup sun dried tomatoes (diced)
- 1/2 cup of fresh shredded Parmesan cheese
- 1/2 cup of fresh basil leaves
- Your choice of bread
Instructions:
- In a large bowl add the mayonnaise, sour cream, oil from the sun dried tomatoes, paprika, red pepper flakes, pepper and garlic. Stir until everything is combined.
- In another large bowl add the chicken, sun dried tomatoes, Parmesan cheese and basil leaves, stir until mixed.
- Add the dressing mixture to the chicken mixture and stir until completely coated. Scoop and serve on your favorite type of bread.
11. Taco Chicken Salad

Taco Chicken Salad is one of those back-to-school dinners that feels fresh, flavorful, and totally fuss-free, just what you need when the week gets hectic. It’s packed with shredded chicken, zesty green chiles, sweet corn, and black beans, all tossed together with crunchy peppers and onions for a bit of bite. The creamy, tangy dressing made with mayo, sour cream, salsa, and taco seasoning ties it all together perfectly, with a splash of lime adding that extra pop of brightness. It’s super easy to whip up ahead of time and makes for a tasty, satisfying meal that everyone can enjoy!
You can read more about this recipe and get a printable recipe card here.
Servings: 4
Ingredients:
- 3 cups shredded chicken breast
- 4 ounce can green chiles
- 1 cup cooked corn, drained
- 1 cup black beans, drained and rinsed
- 1 small red bell pepper, diced
- ½ red onion diced
- ¼ cup fresh cilantro chopped
- 1 cup mayonnaise
- ½ cup sour cream
- ¼ cup salsa
- 1 tablespoon taco seasoning
- 1 tablespoon fresh lime juice
Instructions:
- In a large bowl combine the shredded chicken, green chiles, corn, black beans, bell pepper, onion, and cilantro.
- In a small bowl combine the mayonnaise, sour cream, salsa, taco seasoning and lime juice.
- Toss the dressing with the chicken mixture.
- Garnish with cilantro.
- Serve!
12. Chicken Caesar Pasta Salad

Chicken Caesar Pasta Salad is basically my go-to when I want a back-to-school dinner that’s fresh, filling, and totally fuss-free. Tender grilled or rotisserie chicken pairs perfectly with bowtie pasta and crisp romaine, all tossed in that classic, creamy Caesar dressing we can’t get enough of. The croutons add just the right crunch, and the Parmesan cheese brings everything together with a little cheesy goodness. It’s super quick to throw together and works great as a meal you can eat right away or chill for a bit, making busy nights feel a whole lot easier and tastier!
You can read more about this recipe and get a printable recipe card here.
Servings: 6
Ingredients:
- 8 oz grilled chicken breast or rotisserie chicken
- 8 oz bowtie pasta
- 3 cups chopped romaine lettuce
- 1 cup croutons
- 3/4 cup shredded Parmesan cheese
- 3/4 cup Caesar dressing
- Fresh ground pepper, to taste
Instructions:
- Cook the bowtie pasta according to the package directions.
- Drain and rinse the pasta under cold water to cool, then set aside.
- Slice the grilled chicken into bite-sized pieces or shred the rotisserie chicken.
- In a large mixing bowl, combine the cooled pasta, chopped romaine lettuce, chicken, shredded Parmesan cheese, Caesar dressing, and croutons.
- Toss everything gently until evenly coated.
- Season with freshly ground black pepper to taste.
- Serve immediately or chill for 15–30 minutes before serving.
13. Air Fryer Pork Chops

Air Fryer Pork Chops are a total game changer for back-to-school dinners when you want something juicy, flavorful, and ready in a flash. The simple marinade of sage, garlic, brown sugar, and a few spices gives the pork chops a little sweet-savory kick that makes every bite deliciously satisfying. Cooking them in the air fryer means you get that perfect golden crust without any fuss, and the best part? They’re done in just about 10 minutes, leaving you more time to tackle homework or just breathe before dinner. Letting them rest for a few minutes seals in all those juices, making each chop tender and mouthwatering!
Servings: 2
Ingredients:
- 2 bone-in pork chops
- 1.5 tsp salt
- 1 tsp dried sage
- 1/4 tsp garlic powder
- 1 tbsp brown sugar
- 1/4 tsp black pepper
- 1.5 tbsp oil
Instructions:
-
Mix the salt, dried sage, garlic powder, brown sugar, black pepper, and oil together in a small bowl to make the marinade.
-
Rub the marinade evenly over both sides of the pork chops and let them sit at room temperature for about 10 minutes.
-
Preheat your air fryer to 380°F (190°C) for 3 to 5 minutes.
-
Arrange the marinated pork chops in a single layer in the air fryer basket, making sure they don’t overlap.
-
Cook the pork chops at 380°F (190°C) for 10 minutes, flipping them halfway through for even browning.
-
When golden and cooked through, remove the pork chops from the air fryer.
-
Let them rest for a few minutes before serving to let the juices settle.
14. Air Fryer Sweet Potato Jackets with Greek Yogurt

Air Fryer Sweet Potato Jackets with Greek Yogurt are the perfect cozy yet quick back-to-school dinner when you want something comforting but a little different. The sweet potato gets a crispy, flavorful skin thanks to a simple rub of olive oil, paprika, basil, salt, and pepper, then cooks up soft and tender inside in the air fryer. Topping it off with a cool, creamy dollop of Greek yogurt adds a tangy contrast that just takes the whole thing up a notch. It’s an easy meal that feels nourishing and satisfying, without any complicated steps, perfect for busy weeknights when you want something tasty and fuss-free!
You can read more about this recipe and get a printable recipe card here.
Servings: 1
Ingredients:
- 1 sweet potato
- 1/2 tsp paprika
- 1/2 tsp salt
- 1 tbsp olive oil
- 1 cup yogurt
- 1/3 tsp pepper
- 1 tsp dry basil
Instructions:
- Preheat the air fryer to 400°F (200°C). Pierce the sweet potato several times with a fork to allow steam to escape while cooking. Rub the sweet potato with olive oil, paprika, dry basil, salt and pepper, ensuring it is evenly coated.
- Place the seasoned sweet potato in the air fryer basket. Cook the sweet potato in the air fryer for 30-40 minutes, or until it is tender and the skin is crispy.
- Once the sweet potato is cooked, carefully remove it from the air fryer and let it cool for a few minutes. Cut the sweet potato in half lengthwise.
- Serve the sweet potato jackets with a dollop of the Greek yogurt topping on top. Garnish with salt, pepper and dry basil, if desired. Enjoy!
15. Air Fryer Teriyaki Salmon

Air Fryer Teriyaki Salmon is a total winner when you want a back-to-school dinner that’s both impressive and super simple. The salmon soaks up this glossy, homemade teriyaki sauce packed with garlic, ginger, honey, and brown sugar, then cooks quickly in the air fryer to juicy, flaky perfection. I love brushing on a little extra sauce at the end to get that sticky, caramelized glaze that makes every bite pop. Toss on some sesame seeds and scallions for a fresh finish, and you’ve got a delicious, restaurant-quality meal that’s ready faster than you can say “dinner’s served!”
You can read more about this recipe and get a printable recipe card here.
Servings: 4
Ingredients:
- 1 lb (4 pieces) salmon fillets
- 1/2 cup soy sauce
- 1/2 cup water
- 4 cloves garlic, minced
- 1-inch piece of ginger, grated
- 2 tbsp honey
- 2 tbsp brown sugar
- 1 tbsp cornstarch
- 1 tsp sesame seeds (for garnish)
- 1 scallion, thinly sliced (for garnish)
Instructions:
Prepare the Teriyaki Sauce:
- Preheat the oven to 350 degrees Fahrenheit.
- In a small saucepan, combine the soy sauce, ¾ of the water, minced garlic, grated ginger, honey, and brown sugar.
- Place the saucepan over medium heat and whisk the mixture until the sugar has dissolved and starts to thicken.
- In a separate bowl, mix the cornstarch with the remaining cold water to create a slurry.
- Add the cornstarch slurry to the saucepan and continue to whisk the mixture until it thickens to a glossy consistency. This should take about 2-3 minutes.
- Remove the teriyaki sauce from heat and set it aside to cool.
Marinate the Salmon:
- Place the salmon fillets in a shallow dish or a resealable plastic bag.
- Pour the teriyaki sauce over the salmon. Make sure the salmon is well coated.
- Seal the bag or cover the dish and refrigerate for at least 15 minutes (or up to 1 hour) to allow the salmon to marinate.
Air Fry the Salmon:
- Remove the marinated salmon from the refrigerator and place it in an air fryer safe dish.
- Air fry the salmon for about 12 minutes, or until it reaches your desired level of doneness. The salmon should be flaky and cooked through.
- If you like your salmon with a caramelized glaze, brush the reserved teriyaki sauce over the salmon fillets during the last 2-3 minutes of cooking.
Garnish and Serve:
- Once the salmon is done, carefully remove it from the air fryer.
- Sprinkle sesame seeds and thinly sliced scallions on top of the salmon for added flavor and presentation.
- Serve your air fryer teriyaki salmon hot over a bed of steamed rice or with your favorite side dishes.
16. Crockpot Soy Honey Garlic Chicken

Crockpot Soy Honey Garlic Chicken is hands-down one of those back-to-school dinners that feels like a total win without any extra effort. You just throw chicken, soy sauce, honey, garlic, and a few other simple ingredients into the slow cooker and let it work its magic while you handle all the other chaos of the day. When it’s done, the chicken is tender, juicy, and coated in this perfectly sweet and savory sauce that tastes way more complicated than it actually is. Shredded up and served over rice with a sprinkle of scallions and sesame seeds, it’s a comforting, family-friendly meal that’s totally fuss-free, and trust me, everyone will be asking for seconds!
You can read more about this recipe and get a printable recipe card here.
Servings: 6-8
Ingredients:
- 2 lbs (4 pieces) of chicken breast
- 1 cup reduced sodium soy sauce
- ½ cup honey
- ¼ cup hoisin sauce
- 1 tbsp rice vinegar
- 1 tbsp toasted sesame oil
- 6-8 cloves of garlic
- 2 scallions
- 1 tsp sesame seeds
- ¼ tsp salt, or to taste
- ¼ tsp black pepper, or to taste
Instructions:
-
Grate the garlic.
-
In your slow cooker, add the chicken, soy sauce, honey, hoisin sauce, garlic, rice vinegar, toasted sesame oil, and salt and pepper. Stir until well combined.
-
Cook in the slow cooker for 3-4 hours on high or 6-7 hours on low. Flip the chicken breast over when it is halfway cooked.
-
Once fully cooked, shred the chicken. A hand mixer works great for easy shredding.
-
Serve with rice and top with scallions and sesame seeds.
17. Easy Ramen Noodles

Easy Ramen Noodles are my go-to when I want a cozy, comforting back-to-school dinner that comes together faster than you can say “homework time.” Ditching the seasoning packets for homemade chicken broth flavored with garlic, ginger, and sesame oil makes this bowl of noodles taste way better than the instant stuff, plus, adding sautéed baby bok choy and soft-boiled eggs takes it to the next level of yum. I love how the fresh shredded carrots and black sesame seeds add a little crunch and pop of color, making this meal feel special but totally doable on a busy weeknight. It’s warm, satisfying, and hits that comfort-food spot every single time!
Servings: 2
Ingredients:
- 2 packs of instant ramen noodles
- 4 cups of chicken broth
- 2 large eggs, boiled
- 2 tablespoons soy sauce
- 2 tablespoons sesame oil
- 4 green onions, chopped
- 2 cloves garlic, minced
- 2 teaspoons grated ginger
- 4 baby bok choy
- 1 carrot, shredded (to be used as topping)
- 1 tablespoon black sesame seeds (for garnish)
Instructions:
-
Bring a pot of water to a boil. Carefully add the eggs and boil for 6–7 minutes for soft-boiled or 9–10 minutes for hard-boiled. Remove the eggs with a slotted spoon and transfer them immediately to a bowl of ice-cold water to stop the cooking. Once cooled, peel the eggs and set them aside.
-
In a large pot, bring 4 cups of chicken broth to a boil. Add the ramen noodles (discard the seasoning packets to reduce sodium) and cook according to package instructions, about 3–4 minutes. Drain the noodles and divide them evenly between two bowls, keeping the broth hot.
-
Heat sesame oil in a pan over medium heat. Add minced garlic and grated ginger, sautéing for about 1 minute until fragrant. Add baby bok choy and cook until the leaves are wilted and the stems are tender but still crisp, about 2–3 minutes.
-
Pour the hot broth over the noodles in each bowl. Add the sautéed bok choy evenly between the bowls. Slice the boiled eggs in half and place two halves in each bowl.
-
Top each bowl with shredded raw carrots and a sprinkle of black sesame seeds. Garnish with chopped green onions. Serve immediately, allowing each person to stir their bowl before eating.
18. Ham & Cheese Sliders

Ham & Cheese Sliders are basically my secret weapon for back-to-school dinners that feel like a little party but come together with hardly any effort. Soft, sweet slider buns get layered with melty Swiss cheese and savory ham, then brushed with this irresistible buttery glaze made with Dijon, onion, and poppy seeds that gives the whole thing a perfect golden crust. They bake up warm and gooey, making them perfect for hungry kids and adults alike. Plus, they’re super easy to serve up for a quick meal that everyone will be asking for again and again!
You can read more about this recipe and get a printable recipe card here.
Servings: 12
Ingredients:
- 12 slider buns (like Hawaiian rolls)
- ½ lbs thinly sliced cooked ham
- 12 slices Swiss cheese
- ¼ cup mayonnaise
- 1 tbsp Dijon mustard
- 4 tbsp butter, melted
- 1 tbsp minced onion
- 1 tbsp poppy seeds
Instructions:
-
Preheat your oven to 350°F (175°C).
-
Cut the slider buns in half and place the bottom halves in a baking dish.
-
Spread mayonnaise on the buns, then layer Swiss cheese, ham, and another layer of Swiss cheese on top.
-
Place the top halves of the buns over the fillings to close the sliders.
-
In a bowl, mix together melted butter, Dijon mustard, minced onion, and poppy seeds to make the glaze.
-
Brush the glaze generously over the tops of the sliders, ensuring even coverage.
-
Cover the baking dish with aluminum foil and bake for 15 minutes.
-
Remove the foil and bake for an additional 5–10 minutes, or until the tops are lightly browned and crispy.
-
Let the sliders cool for a few minutes before serving.
19. Homemade Margherita Pizza

Homemade Margherita Pizza is such a fun and tasty way to bring a little Italian magic to your back-to-school dinner rotation. Making the dough from scratch might sound intimidating, but it’s actually super simple and so satisfying to knead and roll out your own pizza base. Then, all you need is a good tomato sauce, melty mozzarella, and a handful of fresh mint leaves for a fragrant, fresh twist that takes this classic pizza to the next level. It bakes up quick and golden, and trust me, there’s nothing like slicing into a homemade pizza fresh from the oven, perfect for busy weeknights when you want something delicious and homemade without a ton of fuss!
Servings: 2
Ingredients:
- 1 cup strong bread flour
- 1 tbsp instant yeast
- 1/3 cup passata or tomato sauce
- ½ cup grated mozzarella
- ½ tsp salt
- 1 tbsp olive oil and
- Handful of fresh mint leaves
- 1 cup warm water
Instructions:
-
In a medium bowl, combine the flour, yeast, and salt.
-
Pour 1 cup of warm water into the bowl.
-
Stir the mixture until a rough dough begins to form.
-
Transfer the dough onto a lightly floured surface.
-
Knead the dough for a few minutes until it becomes smooth and elastic.
-
Shape the dough into a ball.
-
Using a rolling pin, roll the dough out into a large round shape that fits a 10-inch pizza pan.
-
Place the rolled-out dough onto the 10-inch pizza pan.
-
Preheat your oven to 425–430°F (220–220°C).
-
Spread the passata sauce evenly over the surface of the dough.
-
Sprinkle shredded mozzarella cheese evenly on top.
-
Scatter fresh mint leaves over the cheese.
-
Bake the pizza in the preheated oven for about 10 minutes, or until the crust is golden and the cheese is melted and bubbly.
-
Remove from the oven, slice, and enjoy!
20. Sheet Pan Chicken Fajitas

Sheet Pan Chicken Fajitas are my absolute favorite back-to-school dinner hack when I want something colorful, packed with flavor, and crazy easy to throw together. Tossing diced chicken and a rainbow of bell peppers and onions with a blend of smoky spices and olive oil means your oven does all the heavy lifting while you catch a breather. When they come out perfectly cooked and slightly caramelized, you just pile everything onto warm tortillas and top with creamy avocado, melty cheese, sour cream, and a squeeze of fresh lime, it’s like fajita night with zero stress and all the deliciousness. Perfect for busy evenings when you want a crowd-pleaser that’s quick, tasty, and feels like a fiesta!
You can read more about this and get a printable recipe card here.
Servings: 4-6
Ingredients:
- 5 lbs chicken, diced
- 1 red bell pepper, sliced
- 1 yellow bell pepper, sliced
- 1 orange bell pepper, sliced
- 1 red onion, sliced
- ½ tsp paprika
- ½ tsp garlic powder
- ½ tsp onion powder
- ½ tsp Mexican chili powder
- ½ tsp dried oregano
- ½ tsp cumin
- 1 tsp salt, or to taste
- 1 tsp black pepper, or to taste
- 2 garlic cloves, minced
- 1 bunch cilantro, chopped
- 2 tbsp olive oil
- 2 tbsp sour cream, for topping
- 1 avocado, diced, for topping
- 1 cup mozzarella, shredded, for topping
- 1 lime, juiced, for topping
- 12 tortillas (e.g., flour tortillas)
Instructions:
-
Preheat your oven to 375 degrees Fahrenheit (190°C) to ensure it’s ready when your fajitas are prepared.
-
In a large mixing bowl, add the diced chicken, olive oil, paprika, garlic powder, onion powder, Mexican chili powder, dried oregano, cumin, salt, and black pepper. Mix until well combined. Then add the minced garlic, sliced red, yellow, and orange bell peppers, and sliced red onion. Mix everything together until the chicken and veggies are evenly coated with the spices and oil.
-
Prepare a sheet pan by lining it with parchment paper or lightly greasing it. Spread the seasoned chicken and veggies evenly across the sheet pan, ensuring they are in a single layer.
-
Place the sheet pan in the preheated oven and bake for 30-35 minutes or until the chicken is fully cooked and starts to develop a delicious brown color. Check the chicken for doneness, as cooking times may vary slightly depending on your oven.
-
Once your chicken fajitas are cooked to perfection, warm your tortillas according to package instructions or personal preference.
-
Place a generous portion of the cooked chicken and veggie mixture onto each tortilla. Squeeze fresh lime juice over the filling, add diced avocado, a dollop of sour cream, a sprinkle of shredded mozzarella, and a garnish of chopped cilantro.
21. Crockpot Beef Stroganoff

Crockpot Beef Stroganoff is like the ultimate back-to-school comfort food that practically makes itself while you’re busy juggling the chaos of the day. Toss tender beef, onions, and mushrooms into the slow cooker with creamy mushroom soup, beef broth, and a few flavorful seasonings, then let it cook low and slow until the meat is melt-in-your-mouth tender. Stir in the sour cream at the end for that rich, velvety finish, and serve it over buttery egg noodles for a meal that feels cozy and indulgent without any extra effort. It’s the kind of dinner that warms you up and keeps everyone happy, perfect for busy weeknights when you need something hearty and hassle-free!
You can read more about this recipe and get a printable recipe card here.
Servings: 6
Ingredients:
- 1½ lbs stewing beef or chuck roast, cut into 1-inch cubes
- 1 small onion, finely diced
- 8 oz (225 g) mushrooms, sliced
- 1 can (10.5 oz) cream of mushroom soup
- 1 cup beef broth
- 1 tbsp Worcestershire sauce
- 1 tsp garlic powder
- ½ tsp salt
- ½ tsp black pepper
- 1 tsp dried parsley (optional)
- ¾ cup sour cream (added at end)
- 8 oz egg noodles (cooked separately)
Instructions:
-
Add the beef and onion to the slow cooker.
-
Toss in the sliced mushrooms.
-
Pour in the cream of mushroom soup, beef broth, Worcestershire sauce, garlic powder, salt, pepper, and parsley. Stir to combine.
-
Cover and cook on Low for 6–8 hours or High for 4–5 hours, until the beef is fork-tender.
-
In the last 15–30 minutes of cooking, stir in the sour cream and let it warm through completely.
-
Cook the egg noodles according to the package directions. Drain and serve alongside or beneath the stroganoff.
-
Serve hot, spooning the stroganoff over the cooked noodles.
22. Crockpot Cowboy Casserole

Crockpot Cowboy Casserole is the ultimate back-to-school dinner that feels like a cozy, hearty hug after a busy day. It’s got everything you want, seasoned ground beef, creamy soup, melty cheddar, sweet corn, and a big layer of crispy tater tots on top to make it extra comforting. I love how easy it is to throw everything in the slow cooker and let it do its thing while you tackle homework or get ready for the next day. Plus, that broiled, golden tater tot finish is pure magic, crispy on the outside and soft and cheesy underneath. It’s a crowd-pleaser that’s perfect for busy weeknights when you want a meal that’s simple, satisfying, and totally delicious!
You can read more about this recipe and get a printable recipe card here.
Servings: 6
Ingredients:
- 1 lb ground beef, browned and drained
- 1 can (15 oz) corn, drained
- 1 can (10.5 oz) cream of mushroom or cream of chicken soup
- ½ cup sour cream
- 1½ cups shredded cheddar cheese (mild or medium)
- 1 small onion, diced
- 1 tsp garlic powder
- Salt and pepper to taste
- 1 bag (about 20 oz) frozen tater tots
Instructions:
-
Spray the insert of a 6-quart slow cooker with nonstick spray. Add the browned ground beef, corn, soup, sour cream, cheese, onion, garlic powder, salt, and pepper. Stir to combine.
-
Spread the frozen tater tots evenly in a single layer on top.
-
Cover and cook on Low for 4–5 hours or High for 2–3 hours, until the mixture is hot and bubbly, and the tater tots are soft but fully cooked.
-
For a crispy finish, transfer the mixture to a baking dish and broil for 2–3 minutes to lightly brown the tater tots before serving.
23. Crockpot Mississippi Pork

Crockpot Mississippi Pork is hands down one of my favorite back-to-school dinners that feels like a total treat but is ridiculously easy to make. You just toss a pork shoulder into the slow cooker, sprinkle on those flavorful ranch and au jus mixes, add some buttery chunks, and let those tangy pepperoncini peppers do their magic while it cooks low and slow. By the end of the day, you’ve got tender, juicy pork that shreds effortlessly and is packed with savory, tangy goodness. Whether you pile it over rice, mashed potatoes, or sandwich rolls, it’s a no-fuss meal that tastes like it took way more effort than it actually did, perfect for busy weeknights!
Servings: 6-8
Ingredients:
- 3–4 lb pork shoulder (or pork butt), trimmed of excess fat
- 1 oz packet ranch seasoning mix
- 1 oz packet au jus gravy mix
- ½ cup unsalted butter (1 stick), cut into chunks
- 6–8 pepperoncini peppers (from a jar), plus 2 tbsp of the juice
- ½ cup water or broth if your slow cooker runs hot
Instructions:
-
Place the pork shoulder in the slow cooker.
-
Sprinkle the ranch seasoning and au jus mix evenly over the top, then add the butter chunks on top of the pork.
-
Arrange the pepperoncini around the pork and pour in 2 tablespoons of the brine.
-
Cover and cook on Low for 8 hours or High for 4–5 hours, until the pork is tender and easily falls apart.
-
Remove some of the juices, then shred the pork directly in the slow cooker.
- Serve over rice, mashed potatoes, or on sandwich rolls.
24. Air Fryer Honey Chicken Tenders

Air Fryer Honey Chicken Tenders are my absolute go-to for a back-to-school dinner that feels like a little crispy, sweet, spicy celebration in every bite. Coating tender chicken pieces in a seasoned egg wash and crunchy crushed cornflakes gives them that perfect golden crunch without all the mess of frying. Cooking them in the air fryer means they’re ready in no time, and that final drizzle of hot honey takes these tenders from tasty to totally addictive. Whether you dip, drizzle, or do both, these chicken tenders are a guaranteed win for busy nights when you want something quick, delicious, and fun for the whole family!
You can read more about this recipe and get a printable recipe card here.
Servings: 6
Ingredients:
- 2 large boneless, skinless chicken breasts, cut into tenders
- 2 large eggs
- 2 tablespoons milk
- ½ teaspoon salt
- ½ teaspoon black pepper
- ½ teaspoon garlic powder
- ½ teaspoon smoked paprika
- ½ teaspoon onion powder
- 3 cups cornflakes, crushed into small pieces (not too fine)
- Cooking spray or oil (for baking/air frying)
- Store-bought hot honey (for drizzling and dipping)
Instructions:
-
Preheat the oven to 400°F (200°C) and line a baking sheet with parchment paper, or preheat the air fryer to 375°F (190°C) and spray the basket with cooking spray.
-
In a bowl, whisk together eggs, milk, salt, black pepper, garlic powder, smoked paprika, and onion powder. Place the crushed cornflakes in a separate shallow dish.
-
Dip each piece of chicken into the egg mixture, making sure it’s fully coated. Then roll the chicken in the crushed cornflakes, pressing gently so they stick well. Place the coated chicken on the prepared baking sheet or in the air fryer basket.
-
Bake in the oven for 18-22 minutes, flipping halfway through, until golden brown and the internal temperature reaches 165°F (75°C). Or cook in the air fryer for 12-15 minutes, flipping halfway, until crispy and cooked through.
-
Drizzle store-bought hot honey over the crispy chicken or serve it on the side for dipping.
25. Air Fryer Chicken Cutlets

Air Fryer Chicken Cutlets are the perfect back-to-school dinner when you want something crispy, golden, and totally satisfying without the mess of frying. I love how easy it is to slice chicken breasts into thinner cutlets, then give them a crunchy panko coating seasoned just right with salt and pepper. Cooking them in the air fryer means you get that amazing crispiness with way less oil and in a fraction of the time. They come out juicy on the inside and perfectly crunchy on the outside, great for pairing with a quick salad, dipping sauce, or even stacking in a sandwich.
You can read more about this recipe and get a printable recipe card here.
Servings: 2
Ingredients:
- 2 chicken breasts
- 1/2 cup panko breadcrumbs
- 1 teaspoon salt
- 1/2 teaspoon black pepper
- 2 eggs
- 1/4 cup all-purpose flour
- 1/4 cup golden breadcrumbs
- Cooking spray
Instructions:
-
Preheat your air fryer to 380°F (190°C) for 3 to 5 minutes.
-
Carefully slice each chicken breast in half horizontally to create 4 thinner cutlets.
-
In a shallow bowl, whisk the eggs.
-
In a second shallow bowl, mix the panko breadcrumbs with salt and black pepper.
-
Add the flour to a third shallow bowl.
-
Dredge each chicken cutlet in the flour, then dip it into the egg, and finally coat it in the panko mixture, pressing gently to help it stick.
-
Place the breaded cutlets in the air fryer basket in a single layer, don’t overcrowd them.
-
Lightly spray the tops of the cutlets with cooking spray.
-
Air fry at 380°F (190°C) for 23 minutes, flipping halfway through, until the chicken is golden and fully cooked.
-
Let the cutlets rest for a few minutes before serving.
26. Crockpot Rump Roast
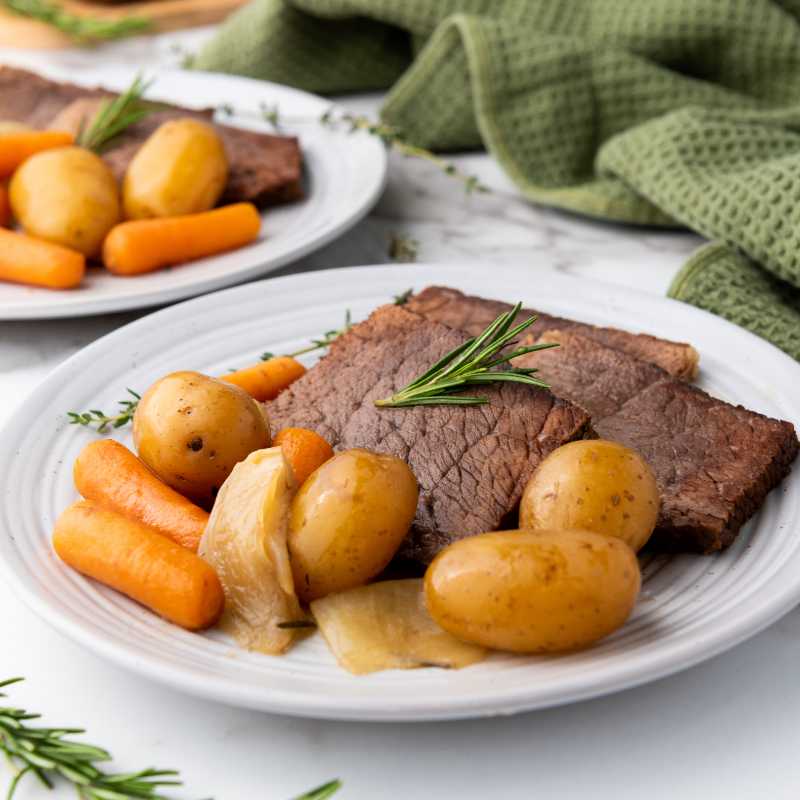
Crockpot Rump Roast is the ultimate back-to-school dinner that feels like a cozy Sunday meal but happens with zero stress on a busy weekday. You just throw a seasoned rump roast, baby potatoes, carrots, onions, and fresh herbs into the slow cooker along with some beef broth, and let it work its magic all day long. When dinner time rolls around, you’ve got tender, juicy roast beef with perfectly cooked veggies, all ready to slice and serve hot. It’s a classic, comforting meal that’s as easy as it is delicious, making those hectic nights a little more manageable and a lot more tasty!
You can read more about this recipe and get a printable recipe card here.
Servings: 4
Ingredients:
- 2.5 lbs rump roast
- 1.5 lbs yellow baby potatoes
- 1 lbs baby carrots
- 3 cups beef broth
- 1 onion
- 1 sprig rosemary
- 3-4 sprigs thyme
- 1 tsp salt, or to taste
- 1 tsp black pepper, or to taste
Instructions:
- Place the rump roast into the slow cooker and sprinkle with salt and pepper to season.
- Peel the onion and cut it into quarters.
- Add the onion and all the remaining ingredients to the slow cooker.
- Cover and cook on low for 7-8 hours, or on high for 4-5 hours.
- Once the cooking time is complete, slice the beef and serve while hot.
27. Chicken Parmesan

Chicken Parmesan is one of those classic back-to-school dinners that never fails to impress but doesn’t take forever to make. I love pounding the chicken breasts thin so they cook quickly and get that perfect crispy breadcrumb coating, then layering on tangy marinara and melty mozzarella cheese before popping them in the oven to bake until bubbly and golden. The fresh basil garnish adds a lovely pop of color and flavor, making it feel a little fancy without any extra fuss. Serve it up with spaghetti or your favorite pasta, and you’ve got a comforting, crowd-pleasing meal that feels like a real treat on a busy weeknight!
You can read more about this recipe and get a printable recipe card here.
Servings: 2
Ingredients:
- 2 boneless, skinless chicken breasts
- Salt and pepper to taste
- 1 cup all-purpose flour
- 2 large eggs, beaten
- 1 cup breadcrumbs
- 1/2 cup grated Parmesan cheese
- 1/2 cup marinara sauce
- 1 cup shredded mozzarella cheese
- 2 tbsp olive oil
- Fresh basil leaves, chopped, for garnish (optional)
- Spaghetti or pasta of your choice, cooked, for serving (optional)
Instructions:
-
Preheat your oven to 200°C (400°F). Place chicken breasts between two sheets of plastic wrap and pound them to an even thickness, about 1/2 inch (1.3 cm) thick. Season both sides with salt and pepper.
-
Place the flour in a shallow dish, beaten eggs in another, and a mixture of breadcrumbs and Parmesan in a third. Dredge each chicken breast in the flour, shaking off the excess, then dip in the egg, and finally coat with the breadcrumb mixture, pressing down to ensure it sticks.
-
In a large skillet, heat olive oil over medium heat. Add the chicken breasts and cook for 3-4 minutes on each side, until golden brown and crispy. Transfer the cooked chicken to a baking dish.
-
Spoon marinara sauce over each chicken breast, then sprinkle shredded mozzarella on top. Bake in the preheated oven for 10-15 minutes, or until the cheese is melted and bubbly, and the chicken is cooked through.
-
Garnish with fresh basil if desired and serve hot. For a complete meal, serve over spaghetti or your favorite pasta.
28. Spaghetti Pizza Bake

Spaghetti Pizza Bake is the ultimate back-to-school dinner mashup that combines two favorites into one easy, cheesy, and totally delicious dish. You start with perfectly cooked spaghetti tossed with flavorful Italian sausage and a rich spaghetti sauce, then pile on melty mozzarella and plenty of pepperoni before baking it all until bubbly and golden. It’s like pizza and pasta had the best baby ever, and the crispy edges are my favorite part! This recipe is perfect for busy nights when you want a comforting, crowd-pleasing meal that’s simple to make and fun to eat.
You can read more about this recipe and get a printable recipe card here.
Servings: 4-6
Ingredients:
- 8 ounces spaghetti
- 1 lb Italian sausage (bulk or casings removed)
- 1 teaspoon Italian seasoning
- 1 teaspoon garlic powder
- 1 teaspoon coarse kosher salt (plus more for pasta water)
- 1/2 teaspoon black pepper
- 2 cups spaghetti sauce
- 2 cups shredded mozzarella cheese
- 8-10 slices pepperoni
- 2 tbsp fresh parsley, chopped (for garnishing)
29. Philly Cheesesteak Sliders
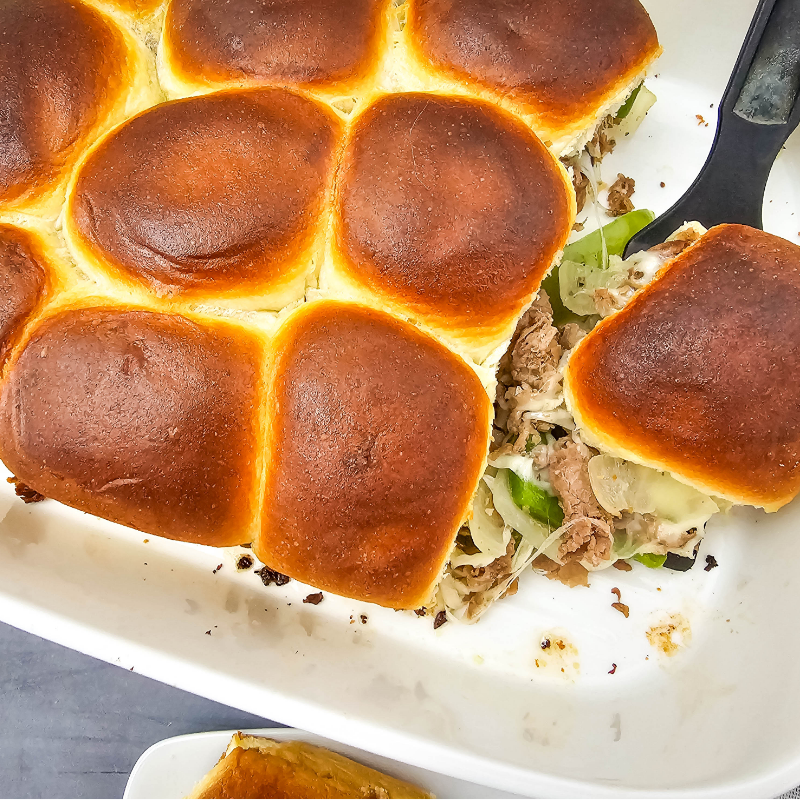
Philly Cheesesteak Sliders are hands-down one of my favorite back-to-school dinners that bring all the cheesy, meaty goodness of a classic Philly cheesesteak into perfectly bite-sized sandwiches. The combo of sautéed peppers and onions with tender shaved steak seasoned just right, layered with gooey provolone, and baked inside soft slider rolls is pure comfort food magic. Brushing the tops with melted butter before popping them in the oven gives that beautiful golden finish that makes these sliders extra irresistible. They’re super easy to make and perfect for feeding hungry kids (and adults!) after a busy day, definitely a winner in my book!
You can read more about this recipe and get a printable recipe card here.
Servings: 12
Ingredients:
- 1 green bell pepper, sliced and halved
- 1 yellow onion, quartered and sliced
- 14 oz package shaved steak
- 1 tsp steak seasoning
- 6 slices provolone cheese
- 12 slider rolls
- 1 tbsp butter
Instructions:
- Preheat the oven to 350 degrees.
- Chop the onion and pepper.
- In a large skillet over medium heat, cook the onion and pepper for 5-7 minutes to slightly soften. Remove to a plate.
- Add the shaved steak and steak seasoning to the skillet, and cook until brown, stirring the meat as it cooks.
- Add the peppers and onions back into the skillet and cook for an additional 3-5 minutes.
- Slice the slider rolls in half, leaving the bottom and top intact.
- Set the bottom of the rolls into the casserole dish. Cover the rolls with a little over half of the steak, pepper, and onion mixture, then top with 4 slices of provolone.
- Cover the cheese with the rest of the meat mixture, then top with broken pieces of cheese, fitting them in under meat etc.
- Cover with the top half of the slider rolls.
- Melt the butter and brush over the top of the rolls.
- Transfer the pan to the oven and bake for 10-15 minutes, until cheese is melty.
30. Baked Mac and Cheese

Baked Mac and Cheese is the ultimate back-to-school comfort food that never fails to bring smiles to the dinner table. Imagine creamy, cheesy elbow macaroni swimming in a rich blend of sharp cheddar and nutty Gruyère, all topped with a crunchy, buttery panko and Parmesan crust that adds the perfect crispy finish. It’s the kind of meal that feels indulgent but is actually pretty straightforward to make, and it’s always a hit with kids and adults alike. Whether you’re looking to treat your family or just want something warm and satisfying after a busy day, this baked mac and cheese has you covered!
You can read more about this recipe and get a printable recipe card here.
Servings: 8
Ingredients:
- 16 oz elbow macaroni
- 3 cups sharp cheddar cheese, shredded
- 2 cups Gruyère cheese, shredded
- 1 stick unsalted butter, divided
- 1/4 cup all-purpose flour
- 3 cups whole milk
- 1 cup whipping cream
- 1/2 teaspoon smoked paprika
- Salt and pepper to taste
- 1 cup panko breadcrumbs
- 1/2 cup grated Parmesan cheese
Instructions:
-
Preheat your oven to 350°F (175°C). Lightly grease a 9×13-inch baking dish.
-
Cook the macaroni according to the package instructions until al dente. Drain and set aside.
-
In a large saucepan, melt 1/2 stick (4 tablespoons) of butter over medium heat. Once melted, whisk in the flour and cook for 1-2 minutes until bubbly and lightly golden.
-
Gradually whisk in the milk and whipping cream, making sure there are no lumps. Continue to cook, stirring constantly, until the mixture thickens, about 5-7 minutes.
-
Stir in the smoked paprika, salt, and pepper.
-
Remove the saucepan from heat and stir in the shredded sharp cheddar and Gruyère cheeses until fully melted and smooth. Taste and adjust seasoning with salt and pepper as needed.
-
Add the cooked macaroni to the cheese sauce and stir until well combined. Pour the macaroni and cheese mixture into the prepared baking dish.
-
In a small saucepan, melt the remaining 1/2 stick (4 tablespoons) of butter. Once melted, mix in the panko breadcrumbs until well coated.
-
In a small bowl, combine the buttered panko breadcrumbs and grated Parmesan cheese. Sprinkle this mixture evenly over the macaroni and cheese.
-
Bake in the preheated oven for 20-25 minutes, or until the top is golden brown and the sauce is bubbling around the edges. For a crispier topping, broil the dish for an additional 2-3 minutes, watching closely to prevent burning.
-
Remove from the oven and let it sit for a few minutes before serving.
From quick air fryer meals to comforting slow cooker favorites, these recipes fit perfectly into busy schedules without sacrificing flavor or family fun. Whether you’re feeding picky eaters or craving something new, this lineup has something for everyone.