23 Wickedly Tasty Halloween Party Food Ideas for a Howling Good Time
There’s just something magical about Halloween food. It’s the one time of year when you can make something totally over-the-top, a little creepy, and completely delicious, and everyone will cheer instead of question your choices. I love that Halloween parties aren’t just about the costumes and candy; the food gets to join in the fun, too. From adorable mummy-wrapped treats to desserts that look like they came straight out of a haunted kitchen, the creativity is endless. Honestly, it’s my favorite excuse to play with my food.
When I plan a Halloween spread, I want dishes that are as fun to look at as they are to eat. That means bold colors, playful shapes, and flavors that keep guests coming back for seconds. Some ideas are spooky-cute and perfect for kids, while others lean into the eerie for grown-up gatherings. I’ve learned over the years that a mix of sweet, savory, and just a hint of “eww” factor makes the table feel complete. And yes, the “eww” is always followed by, “okay, but I have to try it.”
This list of 23 wickedly tasty Halloween party food ideas has a little something for every type of gathering, whether you’re hosting a family-friendly bash, a neighborhood potluck, or a late-night monster mash. You’ll find everything from easy finger foods you can whip up in minutes to show-stopping desserts that double as decorations. Get your spooky playlist ready, pull out your favorite party platters, and let’s get cooking. Your guests are going to have a howling good time!
1. Strawberry Brooms

I’m a big fan of Halloween treats that are both adorable and easy to make, and these strawberry brooms are exactly that. They’re the perfect mix of sweet and salty, with juicy strawberries dipped in rich chocolate and a crunchy pretzel handle to pull it all together. I love how they look like little witch’s brooms ready to fly right off the plate, only these ones are destined to disappear into hungry hands. They’re simple enough for kids to help with, but still impressive enough to earn a spot on any Halloween party table.
You can read more about this recipe and get a printable recipe card here.
Servings: 12 brooms
Ingredients:
- 12 large strawberries
- 12 pretzel sticks
- 12 ounces chocolate chips
Instructions:
-
Use a paper towel to pat the strawberries completely dry, then slice off the tops to create a flat surface.
-
Turn the strawberries upside down so the pointed ends face upward.
-
In a microwave-safe bowl, melt half of the chocolate chips in 30-second intervals, stirring after each, until smooth.
-
Dip each strawberry into the melted chocolate, coating it fully, then place on parchment paper to set.
-
While the chocolate is still soft, gently insert a pretzel stick into the flat end of each strawberry.
-
Melt the remaining chocolate chips and spoon into a piping bag. Snip the tip and pipe lines down the sides of each strawberry to resemble broom bristles.
-
Let the chocolate set completely before serving.
2. Cauldron Cake Pops

These cauldron cake pops are pure Halloween magic, tiny bubbling pots of “potion” you can actually eat! I love how the black candy coating gives them that perfect cast-iron look, while the bright green frosting and candy eyeballs make them look like something straight out of a witch’s kitchen. They’re such a fun way to turn a simple cake-and-frosting combo into a spooky showstopper, and the best part is you can customize the “brew” with different sprinkles or candy bits. Every time I make them, they’re the first thing people grab off the table.
You can read more about this recipe and get a printable recipe card here.
Servings: 36 pops
Ingredients:
- Fully baked 9×13 cake (approximately 16oz, 454g), any flavour
- 1/2 cup (2.4oz, 70g) vanilla frosting, divided
- 2 cups (12oz, 350g) black candy melts
- 1/4 teaspoon green food coloring
- 3 tablespoons green sprinkles
- 2 tablespoons candy eyeballs
Instructions:
-
Crumble the cake into a large bowl until pieces are no larger than small peas. Mix in 1/4 cup frosting until it forms a moldable dough (moist but not mushy). Reserve remaining frosting.
-
Line a cookie sheet with parchment paper. Shape dough into 1-inch balls, flattening one side slightly.
-
Melt candy melts in a microwave-safe bowl at 50% power: 1 minute first, then in 30-second intervals, stirring each time, until smooth.
-
Dip the tip of each lollipop stick into melted candy, then insert into the rounded side of each cake ball. Freeze for 10 minutes.
-
Reheat candy melts if needed. Dip each chilled pop to fully coat, tap off excess, and place facedown on the cookie sheet. Let set for 10–15 minutes.
-
Tint remaining frosting with green food coloring and transfer to a piping bag.
-
Stand cake pops upright in a holder or foam block. Pipe green frosting onto the flattened tops, add sprinkles and candy eyeballs, and let set for 10 minutes before serving.
3. Cake Ball Spiders

These cake ball spiders are the perfect mix of cute and creepy, which is exactly what I love in a Halloween treat. They start off as soft, sweet cake balls, but once you add those chocolatey spider legs and little round bodies, they turn into bite-sized party showpieces. I always get a kick out of watching people hesitate for just a second before popping one in their mouth, they look so real it’s almost spooky! The best part is they’re surprisingly easy to make, and you can whip up a whole creepy-crawly crowd in no time.
You can read more about this recipe and get a printable recipe card here.
Servings: 40 spiders
Ingredients:
- 1 box vanilla cake mix
- 1 cup water
- ⅔ cup oil
- 2 eggs
- 1 cup premade vanilla icing
- 16 oz white candy melts
- ½ cup black candy melts
Instructions:
-
Preheat oven to 350°F.
-
In a stand mixer, combine cake mix, water, oil, and eggs. Mix well, scraping down the sides as needed.
-
Grease or line a 13×9-inch baking dish, pour in the batter, and spread evenly.
-
Bake for 28–30 minutes, or until golden and set in the center. Let cool completely.
-
Crumble the cake into a bowl, add 1 cup vanilla icing, and mix with a paddle attachment until just combined.
-
Scoop into balls using a small ice cream scoop or tablespoon, shape, and place on parchment. Chill until firm.
-
Melt white candy melts in a microwave-safe bowl until smooth.
-
Dip each cake ball into the melted coating, tap off excess, and place back on parchment to set.
-
Once set, melt black candy melts, transfer to a piping bag, and snip a small opening.
-
Pipe a small head, larger body, and eight legs on top of each cake ball to create spiders. Let set before serving.
4. Mini Donut Eyeballs
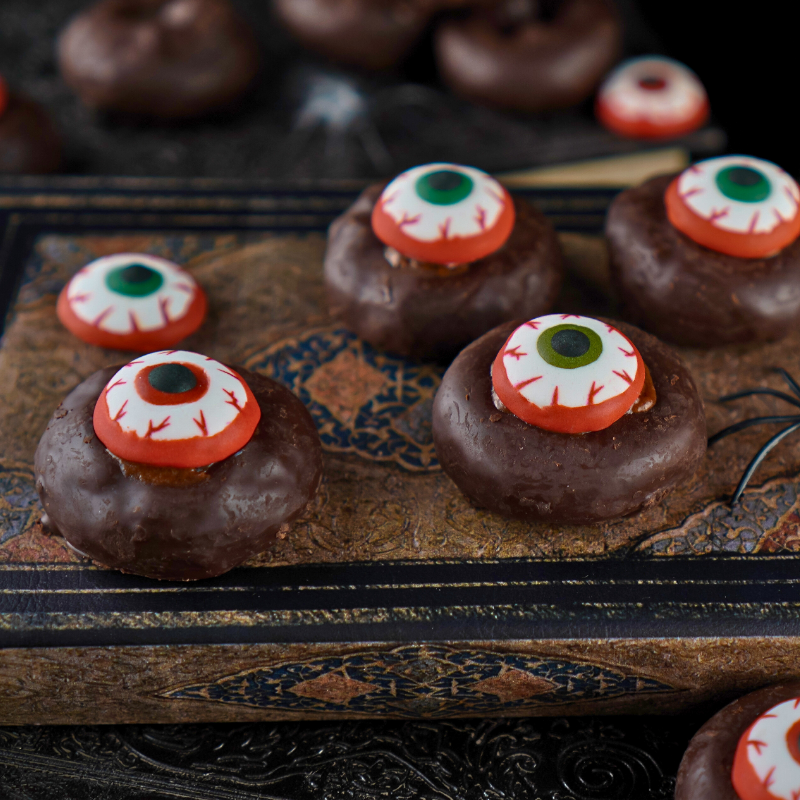
These mini donut eyeballs are one of my go-to last-minute Halloween snacks because they’re ridiculously easy but still get a big reaction. All you need are a few store-bought donuts, some frosting, and candy eyes, and suddenly you’ve got a platter of sweet little “stares” looking back at you. I love how they add a playful (and slightly eerie) touch to the table without requiring any baking at all. They’re perfect for kids’ parties, quick classroom treats, or just when you want something festive without spending hours in the kitchen.
You can read more about this recipe and get a printable recipe card here.
Servings: 12 eyeballs
Ingredients:
- 12 Mini Chocolate Donuts
- 12 Icing Decoration Eyes
- 3 Teaspoons Chocolate Frosting (give or take)
Instructions:
-
Arrange the donuts in a single layer on a plate or flat surface.
-
Add a small dollop (about 1/4 teaspoon) of chocolate frosting into the center dip of each donut. A piping bag with a small tip works well for quick and tidy application.
-
Place a sugar eyeball in the center of each donut, pressing lightly into the frosting. Enjoy!
5. Oreo Spiders

Oreo spiders are one of those Halloween treats that make everyone smile, right before they gobble them up. I love how easy they are to put together, but they still have that perfect mix of cute and creepy that makes them party-worthy. The crunchy cookie, creamy filling, and chewy licorice legs give each bite a fun texture, and the candy eyes really bring them to life. They’re a great project to make with kids, and they disappear just as fast as you can assemble them!
You can read more about this recipe and get a printable recipe card here.
Servings: 18 spiders
Ingredients:
- 18 Double-Stuffed Oreos
- Eye ball candies
- Licorice ropes
- Black icing
Instructions:
-
Line your workspace with parchment paper.
-
Cut licorice ropes into 1-inch pieces and set aside.
-
Gently twist apart each Oreo, keeping the filling on one side.
-
Arrange four licorice pieces on each side of the filling for legs, pressing them in lightly. Replace the cookie top and press gently to secure.
-
Add two small dots of black icing for eyes.
-
Place candy eyes on the icing and press lightly to set.
6. Coffin Rice Krispies Treats

These coffin Rice Krispies treats are such a fun way to give a classic snack a spooky twist. I love how the bright red candy coating gives them a gory, Halloween vibe, while the black “RIP” lettering makes them look like they came straight from a haunted graveyard. They’re quick to make, no baking required, and still look like you went all out for your party spread. Plus, that mix of crunchy, chewy, and chocolatey is always a crowd-pleaser.
You can read more about this recipe and get a printable recipe card here.
Servings: 6 coffins
Ingredients:
- 3 oz black candy melts
- 12 oz red candy melts
- 6 rice krispies treats
Instructions:
- Use a coffin-shaped cookie cutter to cut shapes from premade Rice Krispies treats.
- Melt red candy melts and dip each treat halfway, shaking off any excess. Place on parchment paper and freeze for 10 minutes.
- Melt black candy melts in a piping bag, snip the tip, and pipe “RIP” onto each treat. Let set before serving.
7. Frankenstein Wafers

These Frankenstein wafers are one of my favorite no-fuss Halloween treats. They’re cute, colorful, and just the right amount of spooky. The green candy coating instantly gives them that monster vibe, while the candy eyes and black jimmies bring his quirky personality to life. I especially love adding the little piped stitches; it’s such a simple touch but makes them look like you spent way more time on them than you actually did. They’re perfect for parties, school snacks, or even as a fun weekend activity with the kids.
You can read more about this recipe and get a printable recipe card here.
Servings: 10 wafers
Ingredients:
- 12 oz green candy melts
- 6 oz black candy melts
- 2 tablespoons black jimmies
- 20 candy eyes
- 10 vanilla wafers
Instructions:
-
Melt green candy melts in the microwave at 50% power for 2 minutes, then stir. Continue melting in 1-minute intervals, stirring each time, until smooth.
-
Dip vanilla wafers into the melted green candy and place them on a parchment-lined baking sheet.
-
While the coating is still wet, sprinkle with black jimmies and add candy eyes.
-
Melt black candy melts at 50% power for 2 minutes, stir, then continue in 1-minute intervals until smooth.
-
Transfer the melted black candy to a piping bag, snip the tip, and pipe stitches onto each wafer.
-
Let the decorations set completely before serving.
8. Ghost Strawberries

Ghost strawberries are such a simple but adorable Halloween treat, and they never fail to get a reaction. I love how the white candy coating transforms fresh, juicy strawberries into sweet little ghosts with just a few dips and dots of frosting. The sparkle gel eyes give them the perfect spooky-yet-cute expression, and they’re light enough to balance out all the richer Halloween goodies on the table. Plus, they come together so quickly, you can easily make a whole ghostly gang in under half an hour.
You can read more about this recipe and get a printable recipe card here.
Servings: 8 ghosts
Ingredients:
- 3.5 oz Black Sparkle Gel Frosting
- 8 Strawberries
- 10 oz white candy melts
Instructions:
-
Microwave candy melts at 50% power (or on defrost) for 2 minutes. Stir, then continue heating in 1-minute intervals, stirring between each, until fully melted. Check the package for specific melting instructions, as they may vary.
-
Dip strawberries into the melted white candy, then use the excess to create a small swoop on parchment paper. Place the strawberry on top of the swoop to dry.
-
Once set, use black sparkle gel to draw eyes on each strawberry.
-
Refrigerate until ready to serve.
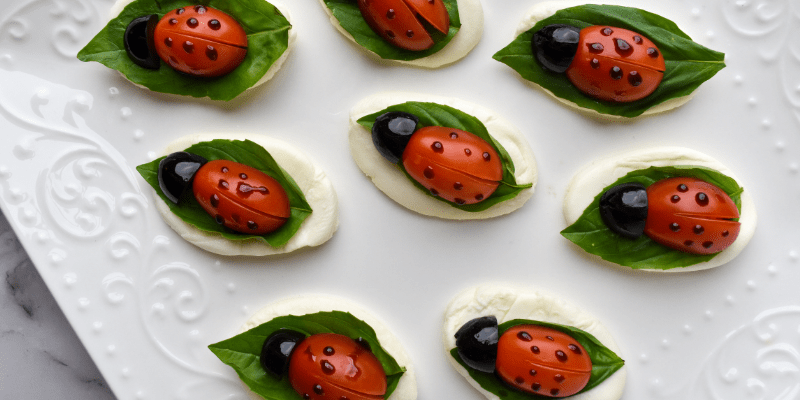
9. Jack Skellington Cheese Ball

This Jack Skellington cheese ball is a total Halloween party win – it’s fun, festive, and deliciously creamy. I love how easy it is to shape the cheese mixture into his iconic face, and the olives make the perfect spooky features. It’s one of those snacks that doubles as a table centerpiece, so guests get excited before they’ve even had a bite. Plus, it pairs perfectly with a big pile of crackers, making it just as tasty as it is eye-catching.
You can read more about this recipe and get a printable recipe card here.
Servings: 4-6
Ingredients:
- 12 oz cream cheese
- 1/4 cup parmesan cheese
- 4 black olives
- Crackers for serving
Instructions:
-
In a medium bowl, mix together the cream cheese and Parmesan until well combined.
-
Transfer the mixture onto plastic wrap and shape it into a ball.
-
Cut one black olive in half and place the halves as eyes.
-
Slice two black olives for the mouth, then cut one slice into smaller pieces to form the nose. Attach the nose and mouth to the cheese ball.
-
Refrigerate until ready to serve.
-
Serve with crackers.
10. Jack Skellington Oreos

These Jack Skellington Oreos are such a fun way to dress up a classic cookie for Halloween. I love how the smooth white candy coating transforms each Oreo into a perfect little canvas for Jack’s spooky grin. Piping on the face is surprisingly easy, and it’s the kind of detail that makes guests instantly recognize the Nightmare Before Christmas vibe. They’re quick to make, look amazing on a party platter, and disappear almost as fast as you can set them out.
You can read more about this recipe and get a printable recipe card here.
Servings: 8 cookies
Ingredients:
- 12 oz white candy melts
- 6 oz black candy melts
- 8 Oreo cookies
Instructions:
-
Melt white candy melts in the microwave at 50% power (defrost mode) for 2 minutes. Stir, then continue heating in 1-minute intervals, stirring between each, until smooth.
-
Dip Oreos into the melted white candy, shake off any excess, and place on parchment paper to dry.
-
Once set, melt black candy melts at 50% power (defrost mode) for 2 minutes. Stir, then continue in 1-minute intervals, stirring between each, until melted.
-
Transfer the melted black candy to a piping bag, snip the tip, and pipe Jack’s face onto each Oreo.
-
Let the decorations set completely before serving.
11. Monster Donuts

Monster donuts are one of my favorite silly-and-sweet Halloween treats. They take just minutes to make, but they always get a laugh. I love how the vampire teeth instantly give them personality, and adding a mix of big and small candy eyes makes each one look hilariously different. They’re perfect for a quick party snack, a fun breakfast surprise, or even a last-minute addition to your Halloween dessert table. Plus, no baking required means more time for enjoying the party.
You can read more about this recipe and get a printable recipe card here.
Servings: 3 donuts
Ingredients:
- 3 premade donuts
- 6 pretty eye candies
- 8 candy eye sprinkles
- 3 vampire toy teeth
Instructions:
-
Insert candy teeth into the center of each donut.
-
Attach two large candy eyes to each donut.
-
Add smaller candy eyes around the larger ones for extra detail.
12. Monster Strawberries

Monster strawberries are such a fun, colorful twist on a classic chocolate-dipped treat, and they’re almost too cute to eat. I love how the purple chocolate gives them that whimsical, monster-like vibe, and the candy eyes make each one look like it has its own little personality. They’re the perfect mix of fresh, fruity, and festive, and they come together so quickly that you can easily whip up a whole batch right before your Halloween party.
You can read more about this recipe and get a printable recipe card here.
Servings: 6 monsters
Ingredients:
- 1 package PME Cake Sweet Street Pretty Eyes Sprinkles
- 5 oz Ghirardelli’s white chocolate wafers
- 6 drops purple gel food coloring
- 1 teaspoon coconut oil
- 6 Strawberries
Instructions:
-
Place white chocolate wafers in a bowl and microwave on defrost for 2 minutes, then stir. Continue heating in 1-minute intervals on defrost, stirring between each, until melted. Stir in food gel and coconut oil until the mixture turns purple.
-
Dip strawberries into the purple chocolate, letting excess drip off, and place them on a parchment-lined baking sheet. Before the coating sets, press one candy eye onto each strawberry.
-
Allow to dry completely, then remove from the parchment and store in the refrigerator until ready to serve.
13. Monster Wafers

Monster wafers are one of those quick, no-bake Halloween snacks that instantly brighten up a party table. I love how the purple candy coating makes them pop, and adding a big candy eye gives each one its own goofy, monster personality. The little sprinkles are the perfect finishing touch, making them look playful and colorful without any extra effort. They’re simple, fun, and guaranteed to disappear fast.
You can read more about this recipe and get a printable recipe card here.
Servings: 10 wafers
Ingredients:
- 12 oz purple candy melts
- 3 tablespoons PME Little Monster sprinkles
- 10 vanilla wafers
- 10 PME pretty eye sprinkles
Instructions:
-
Melt candy melts in the microwave on defrost for 2 minutes, then stir. Continue heating in 1-minute intervals, stirring between each, until smooth.
-
Dip vanilla wafers into the melted candy and place them on a parchment-lined surface.
-
Add one candy eye to each wafer, then sprinkle with small monster sprinkles.
-
Let set completely before serving.
14. Mummy Wafers

Mummy wafers are such an easy way to add a spooky-sweet touch to any Halloween spread, and they come together in minutes. I love how the zigzag lines of white icing give them that perfect wrapped-up look, and the candy eyes peeking through make them irresistibly cute. They’re the kind of treat that’s just as fun for kids to make as it is to eat, and they look great piled on a plate for a quick party snack.
You can read more about this recipe and get a printable recipe card here.
Servings: 10 mummies
Ingredients:
- 10 vanilla wafers
- 1/2 bag white cookie icing
- 20 candy eyes
Instructions:
-
Arrange vanilla wafers on a parchment-lined baking sheet and use cookie icing to pipe lines back and forth across each one.
-
Add a small dot of white cookie icing to the back of each candy eye, then attach two eyes to each wafer.
-
Allow the icing to dry completely before serving.
15. Air Fryer Halloween Mummy Dogs

Air fryer Halloween mummy dogs are one of my favorite savory Halloween party snacks, they’re cute, fun, and totally kid-approved. I love how the crescent roll dough bakes up golden and flaky, wrapping the hot dogs in that perfect mummy look. Adding the little edible eyes at the end always gets a laugh, and they taste just as good as they look. They’re quick to make, thanks to the air fryer, and they’re always one of the first things to disappear from the party table.
You can read more about this recipe and get a printable recipe card here.
Servings: 8 mummies
Ingredients:
-
1 can crescent roll dough (usually about 8 oz or 226g)
-
8 Hot dogs
-
16 Edible eyeballs
Instructions:
-
Preheat the air fryer to 350°F (175°C) for about 5 minutes.
-
Unroll the crescent roll dough, separate it into triangles, and cut each triangle into thin strips (about 1/4 inch wide).
-
Wrap each hot dog with dough strips, leaving a small gap for the face, until it resembles a mummy. Repeat for all hot dogs.
-
Place the wrapped hot dogs in the air fryer basket without touching, and cook at 350°F (175°C) for 5–7 minutes, or until golden brown and cooked through.
-
Let cool slightly, then add edible eyeballs in the face gap, using a dab of mustard or ketchup if needed to help them stick.
-
Serve warm with your favorite dipping sauces.
16. Halloween Candy Corn Mini Cheesecakes

These Halloween candy corn mini cheesecakes are such a fun twist on a classic dessert, and they’re perfect for adding a pop of color to the party table. I love how the yellow, orange, and white layers mimic the look of candy corn, but with a creamy, tangy cheesecake flavor that’s even better. The little fondant ghosts on top make them extra festive, and they’re such a cute surprise for guests when they see them up close. They’re the kind of treat that looks impressive but is actually easy to make in advance, which makes them a total win for party prep.
You can read more about this recipe and get a printable recipe card here.
Servings: 12 cheesecakes
Ingredients:
For the Crust:
- 1 cup graham cracker crumbs
- 2 tablespoons granulated sugar
- 1/4 cup unsalted butter, melted
For the Cheesecake Filling:
- 16 ounces cream cheese, softened
- 1/2 cup granulated sugar
- 2 medium eggs
- 1 teaspoon vanilla extract
- 1/2 cup sour cream
- Orange and yellow food coloring
For the Orange Frosting:
- 1/2 cup unsalted butter, softened
- 2 cups powdered sugar
- 2-3 tablespoons heavy cream
- 1 teaspoon vanilla extract
- Orange food coloring
For the Decorations:
- White sprinkles
- White sugar paste or fondant
- Black fondant or food coloring or edible marker
Instructions:
-
Preheat the oven to 325°F (165°C) and line a 12-cup muffin tin with cupcake liners.
-
In a medium bowl, mix graham cracker crumbs, granulated sugar, and melted butter until evenly coated.
-
Divide the crumb mixture among the liners, pressing down firmly to form the crust. Bake for 5 minutes, then set aside to cool slightly.
-
In a large bowl, beat cream cheese until smooth. Add granulated sugar and mix until combined.
-
Beat in the eggs one at a time, then mix in vanilla extract and sour cream until smooth and creamy.
-
Divide the batter evenly into three bowls, tint one yellow, one orange, and leave one plain.
-
Layer yellow batter into each cupcake liner, followed by orange, then plain.
-
Bake for 18–20 minutes, or until centers are set. Cool in the pan for 30 minutes, then refrigerate for at least 4 hours or overnight.
-
In a large bowl, beat softened butter until fluffy. Gradually add powdered sugar and mix until smooth.
-
Add heavy cream and vanilla extract, beating until light and fluffy, then tint the frosting orange.
-
Remove chilled cheesecakes from liners and frost the tops with orange frosting.
-
Sprinkle with white sprinkles.
-
Roll out white sugar paste or fondant and cut into small ghost shapes. Add eyes and mouths with black food coloring or an edible marker.
-
Place a ghost on top of each cheesecake and serve immediately, or store in an airtight container in the fridge for up to 3 days.
17. Halloween Oreos
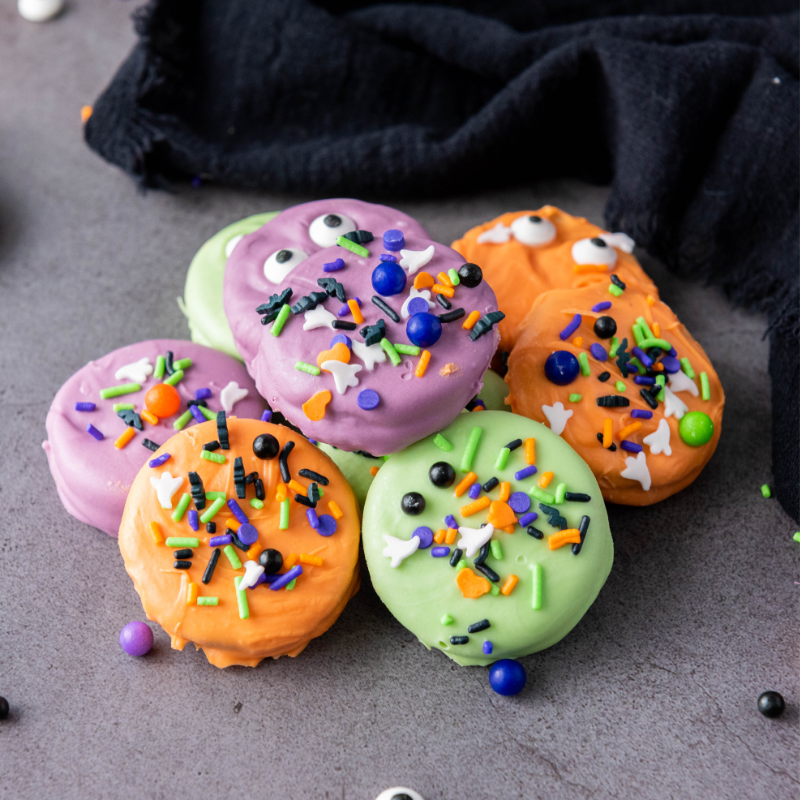
Halloween Oreos are one of my favorite quick and colorful party treats. They’re so simple to make, but they look like something straight out of a bakery display. I love how the purple, green, and orange candy coatings instantly give them that festive Halloween vibe, and the spooky sprinkles make each cookie look unique. They’re the perfect mix of fun and delicious, and since they can be made ahead of time, they’re a stress-free way to add a pop of color (and chocolate!) to your Halloween spread.
You can read more about this recipe and get a printable recipe card here.
Servings: 12 cookies
Ingredients:
- 12 Oreo cookies
- ¼ cup Purple candy melts
- ¼ cup Green candy melts
- ¼ cup Orange candy melts
- Halloween sprinkles (e.g., bats, pumpkins, ghosts, and other spooky shapes)
Instructions:
-
Line a baking sheet with parchment paper or a silicone baking mat, and separate the Halloween sprinkles into small bowls.
-
Place purple, green, and orange candy melts in three separate microwave-safe bowls. Microwave one bowl at a time in 30-second intervals, stirring after each, until smooth.
-
Using a fork or dipping tool, dip each Oreo into the melted candy until fully coated, letting the excess drip off before placing it on the prepared baking sheet.
-
Coat 4 Oreos in purple, 4 in green, and 4 in orange for a colorful assortment.
-
While the coating is still wet, generously top each Oreo with Halloween sprinkles, mixing and matching for variety.
-
Let the Oreos sit at room temperature for 30–60 minutes, or refrigerate for about 15 minutes, until the coating is fully set.
-
Once hardened, arrange on a festive plate or store in an airtight container until ready to serve.
18. Halloween Candy Bark

Halloween candy bark is one of those treats that’s as fun to make as it is to eat, and it’s perfect for getting creative in the kitchen. I love swirling all the bright, spooky colors together and then topping it with candy corn, pretzels, and sprinkles, it’s like edible Halloween confetti. The mix of sweet, salty, and crunchy makes it totally addictive, and since it’s so easy to break into pieces, it’s great for sharing at parties or packaging up as festive gifts.
You can read more about this recipe and get a printable recipe card here.
Servings: 12 pieces
Ingredients:
- 12 oz white candy melts
- 1/4 cup orange candy melts
- 1/4 cup purple candy melts
- 1/4 cup green candy melts
- 1/4 cup black candy melts
- 1/2 cup candy corns
- 1/2 cup mini pretzels, broken into pieces
- Halloween-themed sprinkles
Instructions:
-
Line a baking sheet with parchment paper or a silicone baking mat.
-
In a microwave-safe bowl, melt the white candy melts in 30-second intervals, stirring after each, until smooth.
-
Spread the melted white candy evenly on the prepared baking sheet, about 1/4 inch thick.
-
In separate microwave-safe bowls, melt the orange, purple, green, and black candy melts in 30-second intervals, stirring after each, until smooth.
-
Drop spoonfuls of each colored candy onto the white layer, then swirl together with a toothpick or skewer to create a marbled effect.
-
Immediately sprinkle candy corns, broken pretzels, and Halloween sprinkles over the top, pressing them in gently.
-
Let the bark set at room temperature for 1–2 hours, or refrigerate for about 30 minutes to speed up the process.
-
Once hardened, break into pieces by hand or with a knife.
-
Store in an airtight container at room temperature until ready to serve.
19. Bandaid Cookies
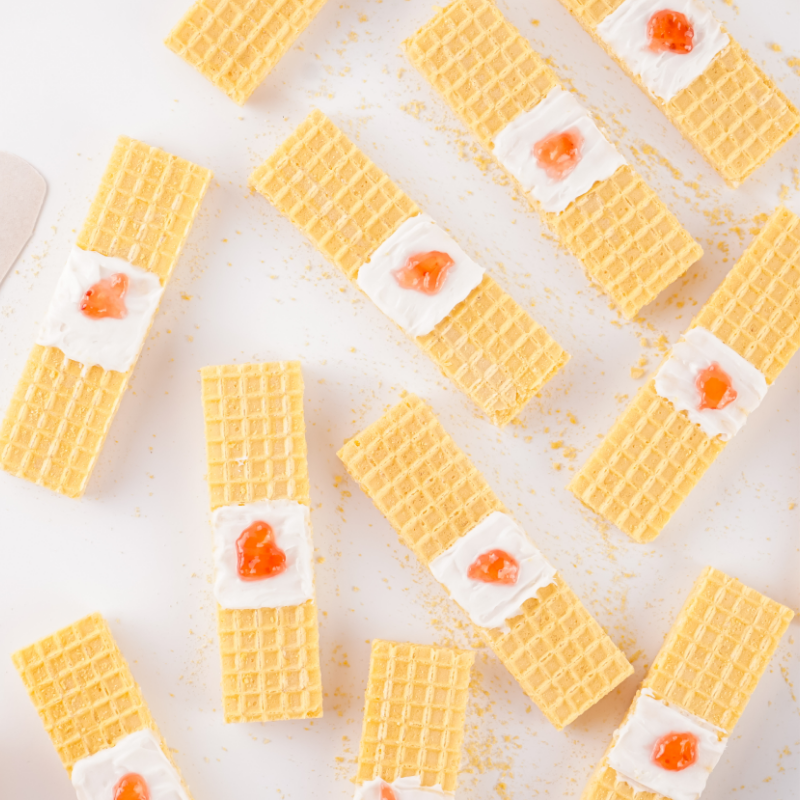
Bandaid cookies are one of those hilariously creepy Halloween snacks that always get a big reaction. I love how they’re ridiculously easy to make with just a little frosting, a dab of jelly, and suddenly your vanilla wafer looks like something straight out of a first aid kit. They’re the perfect mix of gross and funny, which makes them a total hit at parties, especially with guests who appreciate a little shock factor with their sweets.
Servings: As many as you like
Ingredients:
- White Frosting
- Vanilla Wafers
- Strawberry Jelly
Instructions:
-
Arrange the cookies on parchment paper or a plate.
-
Spread about 1/4 teaspoon of white frosting in the center of each cookie, forming a 1-inch square. Use the cookie’s lines as a guide if desired.
-
Add a small dot of strawberry jelly in the center of the frosting, about one-third the size of a Skittle, so it looks like a drop of blood.
-
Serve immediately, optionally alongside a box of bandages for a creepy touch.
20. Nutter Butter Ghosts

Nutter Butter ghosts are one of my favorite easy Halloween treats because they’re equal parts adorable and delicious. I love how the shape of the cookie naturally lends itself to a ghostly silhouette, and once you dip them in white chocolate and add those little candy eyes, they instantly come to life. The black marker mouths give each one its own personality, and they’re always a hit with both kids and adults. Plus, they’re so quick to make that you can whip up a whole ghostly gang in no time.
You can read more about this recipe and get a printable recipe card here.
Servings: 20 ghosts
Ingredients:
- 20 Nutter Butter Cookies
- 2 Cups White Chocolate Chips
- Small Candy Eyes
- Black Edible Marker
Instructions:
-
Place white chocolate chips in a small bowl or cup (a coffee cup works well) and microwave on high for 2 minutes, stirring every 30 seconds until smooth.
-
Dip each cookie halfway into the melted chocolate, letting excess drip off, then hold upright and gently shake or tap the uncovered end so some chocolate drips down the front for a ghostly effect.
-
Place the coated cookies on parchment paper and add two candy eyes near the top using baking tweezers if desired.
-
Repeat with remaining cookies, then freeze for 5 minutes to set.
-
Use an edible black marker to draw mouths just below the chocolate line, then serve and enjoy.
21. Chocolate Pumpkin Patch Brownies

Chocolate pumpkin patch brownies are one of those Halloween desserts that double as a centerpiece because they look just as amazing as they taste. I love the rich, fudgy brownie base paired with the silky chocolate ganache. It’s decadent enough on its own, but the “pumpkin” strawberries on top take it to a whole new level. The bright orange pops of color against the dark chocolate make them instantly eye-catching, and adding a few mint leaves for vines gives them that perfect pumpkin patch feel. They’re almost too cute to eat… almost.
Servings: 16
Ingredients:
For the Chocolate Brownie Cake:
- 1 cup unsalted butter
- 2 cups granulated sugar
- 4 medium eggs
- 1 teaspoon vanilla extract
- 1 cup all-purpose flour
- 1 cup cocoa powder
- 1/2 teaspoon baking powder
- 1/4 teaspoon salt
For the Chocolate Ganache Frosting:
- 1 cup heavy cream
- 8 ounces dark chocolate, chopped
- 2 tablespoons unsalted butter
For the Pumpkin Patch Decoration:
- 12-15 fresh strawberries
- 1 cup orange candy melts
- Fresh mint or basil sprigs, optional to resemble vines
Instructions:
-
Preheat the oven to 350°F (175°C). Line a 9×13-inch baking pan with parchment paper, leaving an overhang for easy removal, and grease the parchment.
-
In a medium saucepan, melt the butter over medium heat. Remove from heat, add the sugar, and stir until combined. Add the eggs one at a time, beating well after each addition, then stir in the vanilla extract.
-
In a separate bowl, whisk together the flour, cocoa powder, baking powder, and salt. Gradually add this mixture to the butter mixture, stirring until fully incorporated.
-
Pour the batter into the prepared pan, spread evenly, and bake for 25–30 minutes, or until a toothpick inserted in the center comes out with a few moist crumbs. Cool completely in the pan on a wire rack.
-
In a small saucepan, heat the heavy cream over medium heat until it just begins to simmer. Pour over the chopped chocolate in a heatproof bowl, let sit for 2 minutes, then stir until smooth. Add the butter and stir until melted and glossy. Set aside.
-
Wash and dry the strawberries thoroughly, then line a tray with parchment paper. Melt the orange candy melts in a double boiler or according to package instructions. Dip each strawberry by the stem into the melted candy, coating completely, then place on the prepared tray to set.
-
Remove the cooled brownie cake from the pan and spread the chocolate ganache evenly over the top.
-
Place the dipped strawberries on top of each brownie portion, pressing gently to secure. Arrange mint leaves around the strawberries to create a pumpkin patch effect.
-
Cut into squares or rectangles and serve immediately, or store in an airtight container at room temperature for up to 3 days.
22. Reese’s Pieces Muddy Buddies

Reese’s Pieces muddy buddies are my ultimate sweet-and-salty Halloween snack, and they disappear faster than anything else on the table. I love how the chocolate, peanut butter, and powdered sugar coat every bite of Chex cereal, making it completely irresistible. Adding mini Reese’s cups and Reese’s Pieces not only makes it extra peanut buttery and indulgent, but also gives it those perfect Halloween colors. It’s the kind of treat you can make ahead in a big batch, and everyone will keep coming back for “just one more handful.”
You can read more about this recipe and get a printable recipe card here.
Servings: 20
Ingredients:
- 9 cups chex cereal
- 1 cup semi sweet chocolate chips
- 1/2 cup peanut butter
- 1/4 cup unsalted butter
- 1 tsp vanilla
- 3 cups powdered sugar
- 1 1/2 cups mini Reese’s cups
- 1 1/2 cups Reese’s pieces
Instructions:
-
In a microwave-safe bowl, heat the chocolate chips, peanut butter, butter, and vanilla in 30-second intervals, stirring between each, until melted and smooth.
-
Pour the mixture over the Chex cereal and stir until evenly coated.
-
Add powdered sugar to two gallon-sized storage bags.
-
Divide the coated cereal between the bags, seal, and shake until fully coated with powdered sugar.
-
Let the mixture set for 1 hour.
-
Before serving, mix in the mini Reese’s cups and Reese’s pieces.
23. Pumpkin Patch Cake

This pumpkin patch cake is one of my favorite festive desserts because it’s as fun to decorate as it is to eat. I love how the crushed Oreo “dirt” and bright pumpkin candies instantly transform a simple chocolate poke cake into a mini autumn scene. The pudding makes it extra moist and rich, while the green frosting vines add that perfect finishing touch. It’s the kind of dessert that makes people smile before they’ve even taken a bite, and then go back for seconds once they have.
You can read more about this recipe and get a printable recipe card here.
Servings: 15
Ingredients:
- 1 box chocolate cake mix (any size), plus the ingredients from the back of the box (water, oil, eggs)
- 1 3.4 oz box of chocolate instant pudding mix
- 2 cups milk
- 25 Oreo cookies
- 8-10 mellowcreme pumpkin candies
- 1 cup powdered sugar
- 1/2 cup unsalted butter
- Pinch of salt
- 1 tbsp. milk
- 1/2 tsp. vanilla extract
- Green gel food color
Instructions:
-
Bake the cake in a 9×13-inch pan according to package directions, then let it cool completely.
-
Use a straw to poke holes all over the cake.
-
In a medium bowl, whisk together the chocolate pudding mix and milk, then quickly pour over the cake before it sets so it fills the holes.
-
Crush Oreo cookies into crumbs using a food processor and sprinkle over the pudding layer.
-
Refrigerate the cake for 1 hour.
-
For the frosting, beat butter and powdered sugar in a medium bowl, gradually adding vanilla, green gel coloring, and milk until smooth and spreadable.
-
Transfer the frosting to a piping bag, snip the tip, and pipe pumpkin vines across the cake.
-
Add pumpkin candies on top, then serve and enjoy.
Halloween is the perfect excuse to get a little creative (and maybe even a little spooky) in the kitchen, and these 23 wickedly tasty ideas are proof that the food can be just as much fun as the costumes. Whether you go for the cute, the creepy, or a mix of both, every one of these treats is sure to bring smiles, and maybe a few playful shivers, to your guests. With recipes this festive and flavorful, your Halloween spread is bound to be a howling good time from the first bite to the last crumb.